
My Journey into the Cloud (18): AllThingsTalk allows visualization of measurements in the Cloud
September 07, 2017
on
on
In the last installments, we have implemented several MQTT clients that we used to send and receive messages over the Internet. We have written software for the PC and an Android smartphone and also used two Wi-Fi equipped microcontroller boards. As demo applications we sent sensor values and switched an LED. For each test, however, the messages ran from one of our own MQTT clients to the other sitting on the bench, only the MQTT broker was ‘out there’, i.e. in the cloud.
After the summer break, we now want to go a step further and finally try out a platform that can store our data and also allow it to be analyzed and processed in the cloud. I took a look at the AllThingsTalk portal - not least because it is also recommended in the ‘GoNotify’ article (Elektor 9/10 2017). In its Maker version, the platform can be used free of charge after registration. My own impression is that it is simple to use and has many useful functions and last but not least, it has good documentation.
It’s worth just summarizing now what can be achieved using AllThingsTalk: after registration, you have a personalized web page where you can register your own Devices that you want to exchange data with. These can be classic microcontroller boards, smartphones and, of course, single board computers like the Raspberry Pi. Each device can be assigned several Assets (device functions) for example, if a board is equipped with a light sensor, a temperature sensor and a humidity sensor then the board has three Assets: light, temperature and humidity. Measured values of these three assets can be sent at different time intervals to the AllThingsTalk server where they can be displayed via a (user-designed) interface. It also functions in the opposite direction so that you can switch board pins etc. from the web page.
The registration procedure is easy; you just need to supply your username, e-mail address and create a password. To make things even easier you can choose one of the boards or Internet kits that are directly supported. I wanted to use the hardware that we have been using in the last installment as far as possible. When creating a new device (+ Connect a Device) I chose Wi-Fi / LAN devices and then Your Own. On the webpage that now appears of the new device, which I called MyJourneyIoT_Sensor, I entered an Asset temperature for test purposes (see screenshot). Now I need to write my own firmware and this turned out to be easier than I first thought. The reason - you guessed it - AllThingsTalk provides an MQTT broker in the net which my board, acting as an MQTT client, connects to in order to deliver messages containing measurement values to the cloud platform.
MQTT is a fairly simple protocol and I have already written a small MQTT-Library in the last installments. Specifically, it would be enough to send the correct bytes for an MQTT-CONNECT request and an MQTT-PUBLISH message to the AllThingsTalk server. After a close look at the documentation and a little trial and error, I soon got the hang of it:
Now I needed to test the whole thing with a simple demo. As I already mentioned, I used the same hardware we used in the last installment in this series, i.e. the ESP32 DevKitC plugged into a small plug board with an RGB LED connected. As a basis for my firmware I used the Arduino sketch from the last installment, including the small TCP / IP and the rudimentary MQTT library. First I changed the function
int MQTTClient_Connect(String clientid)
to
int MQTTClient_Connect(String clientid, String username, String password)
The setup function remains the same: When the ESP32 logs on to the domestic Wi-Fi network the LED lights up green.
Now in the Loop function instead of a call to ConnectAndSubscribeToTopic() it now calls the ConnectToATT() function. This connects the board to the AllThingsTalk broker via TCP / IP, followed by the CONNECT request with the data as described above.
For a first demo, I just sent a measurement value from a virtual temperature sensor every second. To make sure it sends different values each time I incremented a counter from 10 to 40 at every call. Every second the function
void SendSensorDateToATT(byte SensorDate)
is executed. Here, the topic and the payload are compiled according to the above specifications, and finally the function
MQTTClient_Publish(ATT_SensorTopic, MQTTClient_PayloadBuffer, Slength);
Is called to send the PUBLISH bytes.
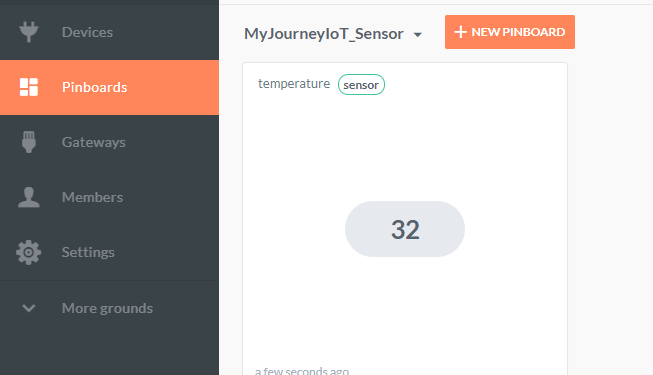
Yeeha, it works! (see screenshot). AllThingsTalk can also show a representation of (averaged) measurement values in a diagram, which I also tested.
If you already own an ESP32 DevKitC (available from the Elektor Store), you can easily try it out for yourself. Download the Arduino sketch and compare the code with the sketch from the last installment. Edit the sketch to enter the device ID, the device token and the asset name of your personal AllThingsTalk account together with your WI-FI SSID and the WI-FI password (as in the previous installment), compile the sketch and load it to the board.
If you already have some experience, it would be really simple to adapt this setup so that you send measurement values taken from a real sensor connected to the ESP32 board and build a useful application.
Stay tuned and look out for the next episode!
After the summer break, we now want to go a step further and finally try out a platform that can store our data and also allow it to be analyzed and processed in the cloud. I took a look at the AllThingsTalk portal - not least because it is also recommended in the ‘GoNotify’ article (Elektor 9/10 2017). In its Maker version, the platform can be used free of charge after registration. My own impression is that it is simple to use and has many useful functions and last but not least, it has good documentation.
It’s worth just summarizing now what can be achieved using AllThingsTalk: after registration, you have a personalized web page where you can register your own Devices that you want to exchange data with. These can be classic microcontroller boards, smartphones and, of course, single board computers like the Raspberry Pi. Each device can be assigned several Assets (device functions) for example, if a board is equipped with a light sensor, a temperature sensor and a humidity sensor then the board has three Assets: light, temperature and humidity. Measured values of these three assets can be sent at different time intervals to the AllThingsTalk server where they can be displayed via a (user-designed) interface. It also functions in the opposite direction so that you can switch board pins etc. from the web page.
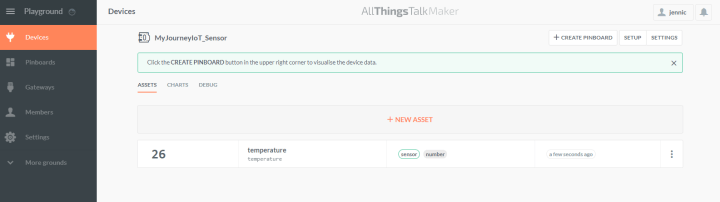
My first AllThingsTalk device
The registration procedure is easy; you just need to supply your username, e-mail address and create a password. To make things even easier you can choose one of the boards or Internet kits that are directly supported. I wanted to use the hardware that we have been using in the last installment as far as possible. When creating a new device (+ Connect a Device) I chose Wi-Fi / LAN devices and then Your Own. On the webpage that now appears of the new device, which I called MyJourneyIoT_Sensor, I entered an Asset temperature for test purposes (see screenshot). Now I need to write my own firmware and this turned out to be easier than I first thought. The reason - you guessed it - AllThingsTalk provides an MQTT broker in the net which my board, acting as an MQTT client, connects to in order to deliver messages containing measurement values to the cloud platform.MQTT is a fairly simple protocol and I have already written a small MQTT-Library in the last installments. Specifically, it would be enough to send the correct bytes for an MQTT-CONNECT request and an MQTT-PUBLISH message to the AllThingsTalk server. After a close look at the documentation and a little trial and error, I soon got the hang of it:
- First, connect to the AllThingsTalk MQTT test broker via TCP / IP at address api.allthingstalk.io, Port 1883.
- The CONNECT request follows. For the MQTT Client ID use the Device ID of the respective device. The Device ID is the last part of the URL address of the device web page; in my case it was 23 characters long. In addition, you need to include a username in the CONNECT bytes (I had not yet implemented this in my MQTT-Library, see below). The username is the Device Token generated by AllThingsTalk for authentication of each device and can be found on the Device Webpage under Settings. Different MQTT libraries may require a password to be sent along with the username. AllThingsTalk however does not expect any, so you can just choose ‘abc’ for example.
- To send a measurement value you need to send a PUBLISH message, this always contains the respective topic and the actual data value (the payload). The topic is composed as follows:
Topic = "device/" + Device ID + "/asset/" + Asset Name + "/state"
The Asset Name in this case is ‘temperature’.
Now to the Payload: To transfer a measurement value as a floating-point number, you must first create an Asset of type ‘number’. If you want to send the value ‘10.0’ for example, the following string must be transmitted as payload:
{"value": 10.0}
Now I needed to test the whole thing with a simple demo. As I already mentioned, I used the same hardware we used in the last installment in this series, i.e. the ESP32 DevKitC plugged into a small plug board with an RGB LED connected. As a basis for my firmware I used the Arduino sketch from the last installment, including the small TCP / IP and the rudimentary MQTT library. First I changed the function
int MQTTClient_Connect(String clientid)
to
int MQTTClient_Connect(String clientid, String username, String password)
The setup function remains the same: When the ESP32 logs on to the domestic Wi-Fi network the LED lights up green.
Now in the Loop function instead of a call to ConnectAndSubscribeToTopic() it now calls the ConnectToATT() function. This connects the board to the AllThingsTalk broker via TCP / IP, followed by the CONNECT request with the data as described above.
For a first demo, I just sent a measurement value from a virtual temperature sensor every second. To make sure it sends different values each time I incremented a counter from 10 to 40 at every call. Every second the function
void SendSensorDateToATT(byte SensorDate)
is executed. Here, the topic and the payload are compiled according to the above specifications, and finally the function
MQTTClient_Publish(ATT_SensorTopic, MQTTClient_PayloadBuffer, Slength);
Is called to send the PUBLISH bytes.
Yeeha, it works! (see screenshot). AllThingsTalk can also show a representation of (averaged) measurement values in a diagram, which I also tested.
If you already own an ESP32 DevKitC (available from the Elektor Store), you can easily try it out for yourself. Download the Arduino sketch and compare the code with the sketch from the last installment. Edit the sketch to enter the device ID, the device token and the asset name of your personal AllThingsTalk account together with your WI-FI SSID and the WI-FI password (as in the previous installment), compile the sketch and load it to the board.
If you already have some experience, it would be really simple to adapt this setup so that you send measurement values taken from a real sensor connected to the ESP32 board and build a useful application.
Stay tuned and look out for the next episode!
Read full article
Hide full article

About Jens Nickel
Jens Nickel (born in 1969) studied physics in Stuttgart. Already in his early youth he was enthusiastic about the writing of technical articles; As an acknowledged fan of technical and scientific journals, he took the opportunity to turn his hobby into a profe... >>
Discussion (0 comments)