
How to Program the BBC micro:bit - a primer
September 06, 2016
on
on
Now that the BBC micro:bit is no longer restricted to the select user group of 12-year-old UK schoolkids and can be bought online, it is time to explore the board and its programming environments a bit more in-depth.
The board’s graphical design is intended to appeal to children and vaguely has the shape of a face (are the pushbuttons its eyes or the micro:bit logo?) with different silkscreen hairdos of several colors. The board was also designed with safety in mind, which is why it is powered from an external battery pack (two AAA 1.5 V cells) instead of from an on-board button cell as was the case for earlier designs. Power can also be applied through the USB connector.
Since the ultimate goal of the BBC is to get children to create software, the micro:bit is supported by a suite of online programming tools targeted at novices. Currently four different languages are available: Block Editor and TouchDevelop, both from Microsoft, a visual JavaScript editor from Code Kingdom and MicroPython. The more advanced user can also program the board directly in C/C++ from the ARM mbed development environment.
The edge extension connector breaks out 19 GPIO pins of the main MCU (plus power supply), giving access to the pushbuttons, six analogue inputs, a SPI bus and the I²C bus that is also connected to the accelerometer and magnetometer. Furthermore, five pins have been designed as large holes to accept banana plugs and crocodile clips for quick and easy connections to breadboards and other hardware.
Interesting fact: the 5 x 5 LED matrix is actually laid out as a 3 x 9 matrix. The reason for this surprising configuration is to enable touch detection using the LEDs capacity to respond to incoming light. The matrix is capable of correctly lighting one LED while measuring light intensity on another at the same time.
As said earlier, a number of programming tools are available for the micro:bit, all online: Block Editor, TouchDevelop, JavaScript, MicroPython and mbed. In theory they should all allow you to achieve the same tasks, but in reality this is not the case. They all work in the same way, that is: you create a script or program, click a Compile button to download a HEX file that you then drag and drop on the micro:bit’s mass storage device (you did connect it first to your computer, did you?). The board will reboot and run your script.
The tool allows for reasonably fast programming, thanks in part to its copy-paste capability and the program can be tried quickly on a virtual micro:bit. Other debugging support is absent.
I found TouchDevelop tedious and slowing me down.
I encountered compilation button problems where the program would not download. To get it working I had to restart my web browser.
The simulator is not available for MicroPython.
The only positive point I found was the very fast compilation/download, much faster than the others. And, after searching, the detailed help documentation where you can learn how to use MicroPython. This documenation reveals that many modules are available, unlocking all the functions of the board. It also links to an offline micro:bit programmer named uFlash (micro-flash) allowing you to develop MicroPython projects in an editor of your choice, making MicroPython a valid option after all.
The mbed website is also the place to be for firmware updates (no new versions have been released yet) and low-level technical information about the board.
To get started with mbed for the micro:bit all you have to do is double click the HTM file on its mass storage device. This will take you to the mbed website where you can login or create an account if you don’t have one yet. Once inside, the micro:bit will be available as one of your platforms (or the only one) and you can immediately start working with it.
Launch the app and go to “Connections”, then tap ‘Pair a new micro:bit’ and follow the instructions. To bring the micro:bit into pairing mode you must hold down both buttons A and B and then press the Reset button on the other side of the board. It will display a message and then show an LED pattern. Copy this pattern in the app by tapping the right boxes of the matrix and then tap ‘Next’. Carefully read the instructions that appear and tap ‘Pair’. Now comes the tricky bit: the micro:bit will display a 6 digit code, digit by digit, that you must enter in the app. Unfortunately, the delay between two digits is rather short and chances are that you will miss a digit. The code will be displayed again, so you can try to catch up, but it is probably easier to ask someone to help you here. One of you will read out loud the digits while the other enters them in the app. When the code is entered successfully the micro:bit will ask you to press the A button and then a checkmark is displayed. Officially you must now reset the micro:bit but I found that it will reboot automatically.
Next step is trying to program the board OTA. The app contains three example programs that you can try. I tried the ‘find my phone sample’ and everything went fine.
It is not very fast, about one minute, but it worked, that is, the programming procedure. Unfortunately the program itself did not work, or not with my phone. Pressing the A button (as suggested by the arrow on the micro:bit’s display) did not do anything. Maybe my phone is not configured correctly? I don’t know. So I tried the ‘selfie remote sample’, but received a very helpful (not) GATT error in return. After quitting the app and killing it in the Android application manager and then relaunching it, I could reconnect to the micro:bit and program the sample. Again the micro:bit displayed an arrow, but this time a sequence: first press A, then B and then both. However, on my phone still nothing happened. Even though I had the camera up and running in selfie mode, no pictures were taken. Killing the Samsung app did not make a difference. It may be my Samsung phone, but it is a bit disappointing all the same.
Back in the app and connected to the micro:bit I tapped ‘Create code’. This takes you to the micro:bit website, the same as before. I created a very simple program in the Block Editor and tapped ‘Play’. This had no effect, because the simulator was not displayed on my phone. Tapping the download button made the button come alive, but that was all, no sign of any program being downloaded to my phone or directly to the board. Going back to the app did not help, and trying to find my scripts on the website did not give any results. Actually, my script was there, but it was empty. Creating it & downloading it again gave me the same result. At this point I gave up.
Although supported by several programming environments aimed at programming newbies, I found these rather limiting and some even counter-productive. Having programmed a lot in the past and therefore being used at full-option IDEs, my opinion is surely biased and not objective, but I would recommend to make the step to mbed as quickly as possible in order to get the most out of the board. The excellent library from Lancaster University makes this very easy. Python enthusiasts may find their 'bonheur' in offline MicroPython programming.
The Bluetooth capabilities of the micro:bit work a bit, but not as well as might be expected for a system that was thrown at one million impatient kids.
What is it?
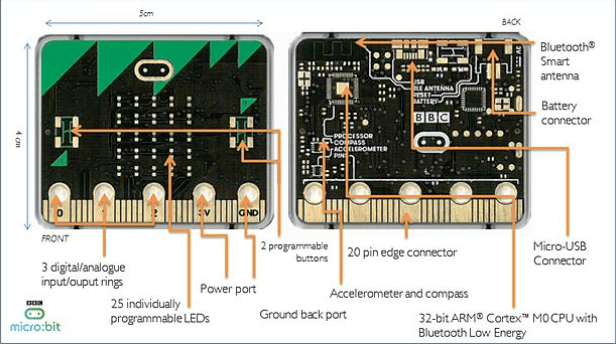
The BBC micro:bit is a small (52 x 42 mm) microcontroller board intended for fun and connected applications. On the component side of the board we find a Nordic nRF51822 ARM Cortex-M0 microcontroller with integrated Bluetooth Low Energy (BLE) radio, a 3D accelerometer (NXP MMA8652), a 3D magnetometer (NXP MAG3110) and an extension connector. On the other side there is a 5 x 5 LED matrix and two pushbuttons. Being an ARM mbed-compatible device (implemented in a second ARM Cortex-M0 MCU, an NXP Kinetis KL26), the board can be drag-’n’-drop programmed over USB, but also over the air (OTA) thanks to its Bluetooth radio.The board’s graphical design is intended to appeal to children and vaguely has the shape of a face (are the pushbuttons its eyes or the micro:bit logo?) with different silkscreen hairdos of several colors. The board was also designed with safety in mind, which is why it is powered from an external battery pack (two AAA 1.5 V cells) instead of from an on-board button cell as was the case for earlier designs. Power can also be applied through the USB connector.
Since the ultimate goal of the BBC is to get children to create software, the micro:bit is supported by a suite of online programming tools targeted at novices. Currently four different languages are available: Block Editor and TouchDevelop, both from Microsoft, a visual JavaScript editor from Code Kingdom and MicroPython. The more advanced user can also program the board directly in C/C++ from the ARM mbed development environment.
What can you do with it?
Besides scrolling text messages and producing other visual effects on the LED matrix the micro:bit can be used for many other applications. Because of its battery pack and Bluetooth LE connection the board is an excellent candidate for the Internet of Things (IoT), and wearable and mobile applications. Its on-board sensors allow for orientation and movement detection making it suitable for games and game controllers or remote controls for other devices. The board can also be used as the brains of an application, like a robot or cart, by using the extension connector.The edge extension connector breaks out 19 GPIO pins of the main MCU (plus power supply), giving access to the pushbuttons, six analogue inputs, a SPI bus and the I²C bus that is also connected to the accelerometer and magnetometer. Furthermore, five pins have been designed as large holes to accept banana plugs and crocodile clips for quick and easy connections to breadboards and other hardware.
Interesting fact: the 5 x 5 LED matrix is actually laid out as a 3 x 9 matrix. The reason for this surprising configuration is to enable touch detection using the LEDs capacity to respond to incoming light. The matrix is capable of correctly lighting one LED while measuring light intensity on another at the same time.
Programming the micro:bit
To start programming you simply go to the website and click the 'Create Code' button or, if you already made some scripts, by clicking the 'My scripts' link at the top of the page. You don’t have to setup an account first, you just jump in and program away. Your scripts, as your programs are called, are stored in the cloud and as long as you don’t delete the cookies, you can easily retrieve them. Scripts can also be saved to your computer for archiving, or to be imported on another. Finally, if you programmed something that you think is worth sharing, you can publish it.As said earlier, a number of programming tools are available for the micro:bit, all online: Block Editor, TouchDevelop, JavaScript, MicroPython and mbed. In theory they should all allow you to achieve the same tasks, but in reality this is not the case. They all work in the same way, that is: you create a script or program, click a Compile button to download a HEX file that you then drag and drop on the micro:bit’s mass storage device (you did connect it first to your computer, did you?). The board will reboot and run your script.
Block Editor
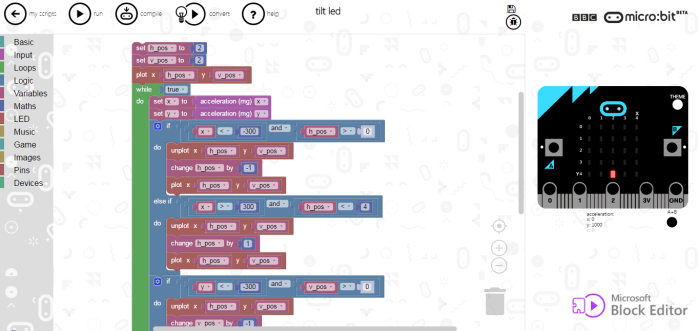
Microsoft’s Block Editor is a Scratch-like visual programming tool where the programmer drags and drops programming constructs on a canvas and then types in the details like variable names and constant values. The tool does not allow the constructs to be used in any way you like, which enforces syntactically correct programs. This is where it stops being helpful, because the programmer can easily make a mess of the algorithms that he/she is trying to implement. Block Editor does not teach you how to program, it only takes away syntax errors.The tool allows for reasonably fast programming, thanks in part to its copy-paste capability and the program can be tried quickly on a virtual micro:bit. Other debugging support is absent.
TouchDevelop
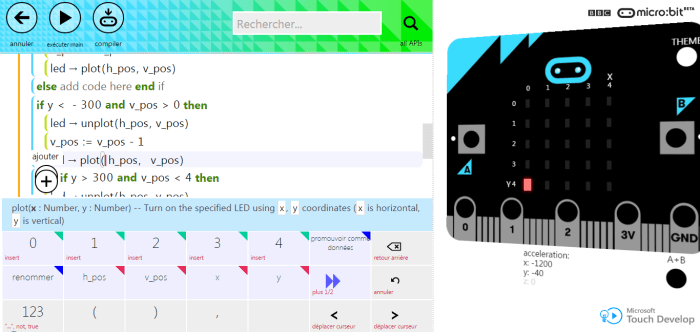
Also from Microsoft, TouchDevelop is a bit like Block Editor in that it avoids syntax errors by proposing predefined constructs, but it presents the program as written source code, as if it was typed in instead of dragged and dropped. Actually, it is more a text based tool, but, in my opinion, a very frustrating one because it gives the impression that the user is in control whereas in reality you must go through the drag and drop menu all the time. As with Block Editor the program can be tried quickly on a virtual micro:bit while any other debugging support is lacking.I found TouchDevelop tedious and slowing me down.
JavaScript
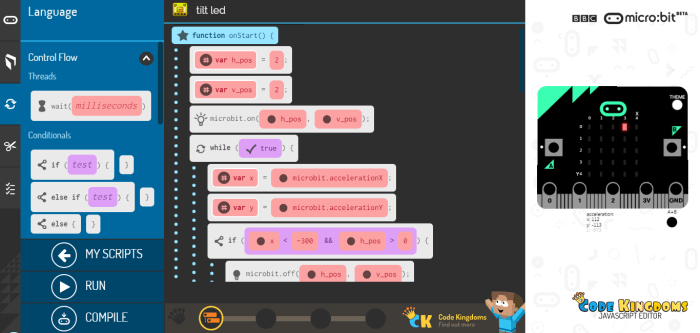
A JavaScript editor is provided by Code Kingdom. This editor has an interesting code abstraction function. A slider at the bottom lets you increase the amount of code detail shown. On the highest abstraction layer (slider to the left) it works similar to Block Editor in a graphical way, but with the slider set to the right you can type real JavaScript instructions. People with some programming experience will probably prefer this mode as it allows copy-paste and speeds things up a lot. Again, the simulator can run your program.I encountered compilation button problems where the program would not download. To get it working I had to restart my web browser.
MicroPython
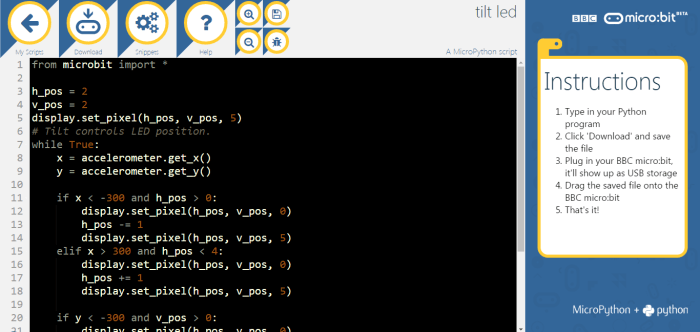
The capability to program the micro:bit in MicroPython will probably appeal to many but I found the implementation very disappointing. The reason is mainly the editor and the indentation requirements of Python (oh, how do I hate that). I found it very difficult to get a Python script to work correctly because the editor had messed up the tabs or the end-of-line characters or something else, without showing. Only when you run the program on the board will you see a message slowly scrolling along saying something like 'line 11: indentation error blah, blah, blah'. But the tabs were there, dammit! It turned out to be necessary to redo every tab on every line all the time to finally obtain a working HEX file. Copy-paste works, but messes things up big time, it is extremely frustrating.The simulator is not available for MicroPython.
The only positive point I found was the very fast compilation/download, much faster than the others. And, after searching, the detailed help documentation where you can learn how to use MicroPython. This documenation reveals that many modules are available, unlocking all the functions of the board. It also links to an offline micro:bit programmer named uFlash (micro-flash) allowing you to develop MicroPython projects in an editor of your choice, making MicroPython a valid option after all.
mbed
Finally there is ARM’s mbed for micro:bit. This is an online programming tool for people with some programming experience that allows you to write code in C/C++. Do not expect a simulator or a debugger though. But it is a proper programming environment with real editing options etc., not a toy, and you can develop real applications with it. Furthermore, an extensive and well-documented library created by Lancaster University provides access to all possibilities of the micro:bit, this is a brilliant piece of work. Extensive mbed libraries from other people can be dragged in to quickly add all sorts of functions to your project. To make things even better, mbed can be made to work offline and with a real debugger. Segger, the manufacturer of the J-Link pods, has provided special firmware for the micro:bit that allows breakpoints and single stepping.The mbed website is also the place to be for firmware updates (no new versions have been released yet) and low-level technical information about the board.
To get started with mbed for the micro:bit all you have to do is double click the HTM file on its mass storage device. This will take you to the mbed website where you can login or create an account if you don’t have one yet. Once inside, the micro:bit will be available as one of your platforms (or the only one) and you can immediately start working with it.
Bluetooth & over the air programming
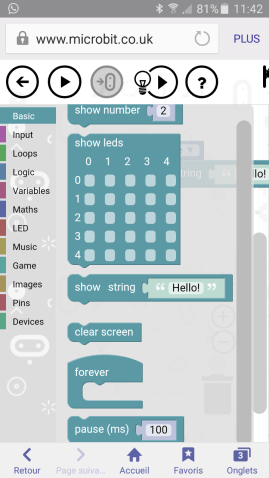
The online programming tools for the micro:bit can be used on mobile devices, something that should appeal to the younger generation whose lives revolve around such devices. The micro:bit is Bluetooth capable and an app from Samsung is available for loading programs on the board over the air (OTA). For this to work you must first pair your board with your mobile. The procedure requires several steps and can be a bit surprising, especially when you try it for the first time.Launch the app and go to “Connections”, then tap ‘Pair a new micro:bit’ and follow the instructions. To bring the micro:bit into pairing mode you must hold down both buttons A and B and then press the Reset button on the other side of the board. It will display a message and then show an LED pattern. Copy this pattern in the app by tapping the right boxes of the matrix and then tap ‘Next’. Carefully read the instructions that appear and tap ‘Pair’. Now comes the tricky bit: the micro:bit will display a 6 digit code, digit by digit, that you must enter in the app. Unfortunately, the delay between two digits is rather short and chances are that you will miss a digit. The code will be displayed again, so you can try to catch up, but it is probably easier to ask someone to help you here. One of you will read out loud the digits while the other enters them in the app. When the code is entered successfully the micro:bit will ask you to press the A button and then a checkmark is displayed. Officially you must now reset the micro:bit but I found that it will reboot automatically.
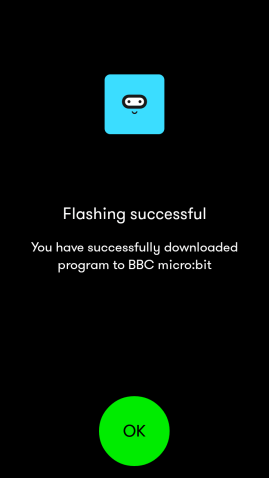
Next step is trying to program the board OTA. The app contains three example programs that you can try. I tried the ‘find my phone sample’ and everything went fine.
It is not very fast, about one minute, but it worked, that is, the programming procedure. Unfortunately the program itself did not work, or not with my phone. Pressing the A button (as suggested by the arrow on the micro:bit’s display) did not do anything. Maybe my phone is not configured correctly? I don’t know. So I tried the ‘selfie remote sample’, but received a very helpful (not) GATT error in return. After quitting the app and killing it in the Android application manager and then relaunching it, I could reconnect to the micro:bit and program the sample. Again the micro:bit displayed an arrow, but this time a sequence: first press A, then B and then both. However, on my phone still nothing happened. Even though I had the camera up and running in selfie mode, no pictures were taken. Killing the Samsung app did not make a difference. It may be my Samsung phone, but it is a bit disappointing all the same.
Back in the app and connected to the micro:bit I tapped ‘Create code’. This takes you to the micro:bit website, the same as before. I created a very simple program in the Block Editor and tapped ‘Play’. This had no effect, because the simulator was not displayed on my phone. Tapping the download button made the button come alive, but that was all, no sign of any program being downloaded to my phone or directly to the board. Going back to the app did not help, and trying to find my scripts on the website did not give any results. Actually, my script was there, but it was empty. Creating it & downloading it again gave me the same result. At this point I gave up.
Conclusion
Although the BBC micro:bit started out as a kind of educational toy, little by little the tiny board is gaining popularity in the pro industry, transforming it into a cheap, powerful and capable board that may find a solid place in between Arduino and the Raspberry Pi.Although supported by several programming environments aimed at programming newbies, I found these rather limiting and some even counter-productive. Having programmed a lot in the past and therefore being used at full-option IDEs, my opinion is surely biased and not objective, but I would recommend to make the step to mbed as quickly as possible in order to get the most out of the board. The excellent library from Lancaster University makes this very easy. Python enthusiasts may find their 'bonheur' in offline MicroPython programming.
The Bluetooth capabilities of the micro:bit work a bit, but not as well as might be expected for a system that was thrown at one million impatient kids.
Read full article
Hide full article
Discussion (0 comments)