
Review: Meet the Raspberry Pi 4
on
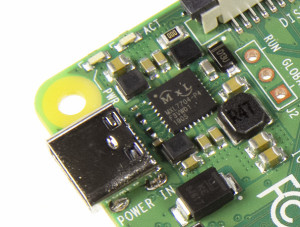
USB-C input and PMIC
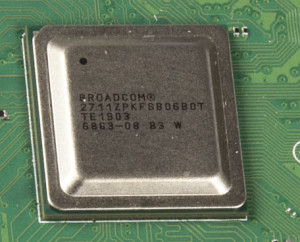
The new SoC on the Raspberry Pi 4
You will also note the two blue USB ports. And yes, we finally got USB 3.0 onboard as well as native Ethernet, effectively ending all troubles while transferring data from our mass storage device to the network. It’s all thanks to the new BMC2711 SoC at the heart of Raspberry Pi 4, which sports four Cortex-A72 cores with up to 1.5 GHz speed and a maximum of 4 GB RAM. Meaning a per-MHz performance improvement over the Cortex-A53 at the cost of more supply power. This will result in improved response even with normal desktop applications.But before we come to software and the improvements, we look a bit further. Also new is the VideoCore VI, happily affording some new feature like 4k output and 4k HEVC decoding at 60 fps. The SoC comes without a fan or heatsink attached to it, making it a nice quiet solution like the previous generations. How this works during operation is shown by a few thermal imaging camera shots. Also, with the new SoC the power requirements have changed: unlike the well-established 5 V and 2 A as a good starting point (okay, 2.5 A for the B+), we now have 5 V @ 3 A recommended on the USB-C input, meaning we need to feed a good 15 watts worth of power to Raspberry Pi 4. Besides the CPU we have a few new chips on the board.
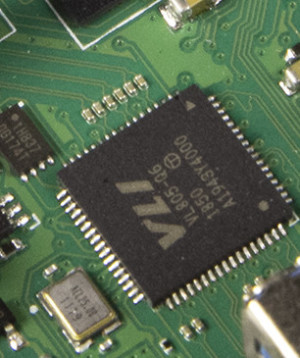
The photos show a close-up of the gigabit ethernet phy used (type BCM54213PE) and a USB Hub, a type VLI VL805-Q6. If you look at the datasheet of this USB 3.0 Hub you will soon stumble across the fact that there is no USB 3.0 Uplink. Instead, a PCI-Express lane is involved, supporting PCI-E 2.0 and giving backward capability to PCI-E 1.0. Meaning we now have some serious bandwidth to enjoy.
In terms of wireless connectivity, Bluetooth has been upgraded to version 5.0, while WiFi is 802.11ac at 2.4 GHz and 5 GHz. The details for WiFi connectivity will follow later, as we run some data transfer tests with it.
USB 3.0 Hub with PCI-E uplink
Some trusted features that remained on the new Raspberry Pi 4 are the RCA port, display connector and the camera interface. Also untouched and functionally backwards compatible is the 40-pin PCB header. So we can attach HATs like we used to, at least hardwarewise.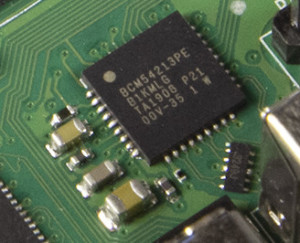
A few words of warning — what you read here is the result of using an alpha image for Raspberry Pi 4, meaning some things are broken or simply missing. It is reasonable to assume that the system software will improve over time just as with the Raspberry Pi 2, Raspberry Pi 3 B, Raspberry Pi 3 B+ and Raspberry Pi Zero W.
The software side of Raspberry Pi 4
This takes us to the software support for Raspberry Pi 4. As we are on a pre-beta, not everything works completely out of the box, while the process of updating parts to Raspberry Pi 4 is in progress. We have two options to choose from: a Raspbian buster image or a NOOBS 3.1. We found that either image boots just fine and will display a desktop properly after a short startup process.
4k video times two
Since we now have two micro-HDMI ports, we hooked up two Full HD screens to the Raspberry Pi 4. Out of the box we got an expanded Desktop on both screens. We also tested the tiny 10” Joy-It screen from the Elektor Store as secondary monitor, but it currently refused to work with Raspberry Pi 4. We should have support for dual 4k video output at 30 fps when using two screens, or 4k at 60 fps using only one screen attached.But what to do with two screens? You can play video on one screen while browsing the web on the other, or even play some 3D games. And this bring us to the video playback functionality.
We ran the first test with the VLC on Raspberry Pi 4 and Big Buck Bunny in 1080p @ 60 fps and 4k @ 60 fps resolution. As a first test we started the VLC and used the 1080p material in ‘windowed’ mode. Here we sadly missed the nice, fluent playback we used to have. At the same time, we noticed a high CPU load, indicating that parts of the decoding operations are not offloaded from the CPU. Switching to full screen, the CPU workload drops, and the video runs smoothly. With two outputs available we also tried to get two different videos displayed on the screens. Sadly vlc refused to do so — apparently at this time the video decoder can handle just one video stream at a time.
Putting a 4k video, in h.264, on the test bench with a 1080p monitor attached causes vlc to produce no image at all. Only sound was played, as 4k playback is only supported using H.265. We used material form libde265.org for the 4k playback. Sadly we only got a black screen using vlc and a high CPU load, meaning the decoding is not running in hardware as intended. As 4k video should be supported, we assume there is a bug in the driver, and the support is subject to improvement in the future. If you ask how the omxplayer worked with the files, well, it plainly refused to decode anything, since with the ongoing changes in the video decoding stack it couldn’t access the hardware anymore.
After this little video test with vlc, why not try something with Kodi? As most video-centric distributions out there haven’t been able to update their images for the new hardware now, only an old version from the Raspbian repositories was available. It made no sense to test this any further as we won’t be able to get any video acceleration with kodi on Raspberry Pi 4 at all.
Blue is the new black…
With USB 3.0 and real gigabit Ethernet now available, let’s see how this performs. With 1000 Mbit/s you can assume a 125 MB/s per second raw data rate ideally, and start making a neat NAS for your home. We used SAMBA for testing, as this is most likely the preferred way of sharing network data, and something the three major types of OS can work with.
For storage we use one Kingston DataTraveler 100 USB stick with 32 GB of storage and EXT4 for the file system. As the second storage option we used a RAM disk as we now have enough on our hands to “put to waste” in 1.2 GBytes. To set up the RAM disk we typed:
sudo mount -t tmpfs -o size=1200M none /ramdisk
After the configuration of samba (Windows Fileshares on Linux) we needed some data to copy. We used
"bbb_sunflower_1080p_60fps_normal.mp4” and "bbb_sunflower_2160p_60fps_normal.mp4” from http://bbb3d.renderfarming.net/download.html as this will give us 1,004,968 kB worth of files, and we already had them handy from the video playback tests. We first copied these to the USB stick and then measured the time it took the Raspberry Pi 4 to copy them to the RAMdisk using a simple “cp” command. This will preclude a disc slowing down the transfer due to low writing speeds.
With a small script showing the timestamp at the start of the transfer and another one at the end we got 9.3 s meaning 108.05 MB/s, sadly a limit of the flash drive used. Copying the files a second time will reveal an increase in throughput as now the additional RAM comes in handy, to work as a cache for the drive. Compared to the speed of a Raspberry Pi 3 B+ that’s fast, as with USB 2.0 you will get around 50 MB/s max. On the Raspberry Pi 3 B+ this also means you must share bandwidth with the Ethernet. Speaking of Ethernet, with the RAM disk we can read at 102 MB/s of payload from an SMB Share, meaning it’s nearly maximum speed for 1 Gbit/s considering the SMB overhead. For the files we used a Windows 10 Pro machine with an SSD as the target device. The last try was a copy from the directly attached USB stick. From experience, we can read data from it at speeds exceeding 100 MB/s. For the transfer we got 98 MB/s, again faced with the overhead of the USB stick. For a small, well priced fileserver, this is still okay and shows improvements we were long waiting for.
Let’s turn the radio on

On the Raspberry Pi 4 we again used the RAM disk to copy data to our Windows 10 machine. This time we disconnected the LAN and switched to WiFi in the 2.4 GHz band. Here the Raspberry Pi 4 will run at 150 Mbit air rate maximum linked our test access point, considering the access point could do 300 Mbit/s. We used an ideal setup with the Raspberry Pi 4 and the access point at line of sight and less than 10 meters apart. It’s not as common as in the real world, but a limit set by the lab. We also transferred the same amount of data as before (1,004,968 kBytes) and saw the transfer finished after: 159 seconds. This gives us 6.32 Mbytes per second transfer rate. Okay by all means, but what about the 5 GHz band, should this be faster? Well, yes it is. But we still have the drawback that on 5 GHz your access point must use a channel lower than 64, otherwise the Pi won’t be able to find it. The transfer speed achieved here was 7.17 Mbytes per second as a result of the 200-Mbit air rate offered by the Raspberry Pi 4. For video streaming that’s workable — to use the Raspberry Pi 4 as access point, it’s unlikely to be enough.
Bluetooth! Yes it’s there, and it performs as you may expect with Linux. Regarding Bluetooth 5.0 devices, sadly we did not have one to play with but if one arrives, we will update you with the results.
How fast can it be?
We have now 1.5 GHz maximum frequency for the cores, i.e. 100 MHz up on the Raspberry Pi 3 B+. On paper that’s a 7.1% increase over Raspberry Pi 3 B+, and it may not sound much. However, at the same time the cores in Raspberry Pi 4 got changed to Cortex-A72 types. These cores were designed with performance per MHz first, and performance per watt, second. Doing the maths it ups the performance compared to the 3 B+. If we use sysbench with one core and enter:sysbench –test=cpu run
then 121.35 s is needed on the Raspberry Pi 3 B+. Running the test on one of Raspberry Pi 4 cores, we measured 92.78 seconds of computation time, i.e. roughly 30% faster than Raspberry Pi 3 B+ for this synthetic test. If we run the test on both systems on all cores we get 34.54 s on the Raspberry Pi 3 B+ and 23.25 s on the Raspberry Pi 4, a vast increase mainly on account of the new cores.
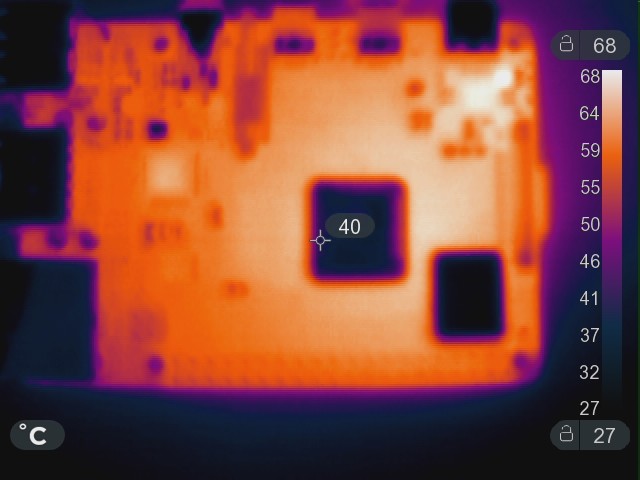
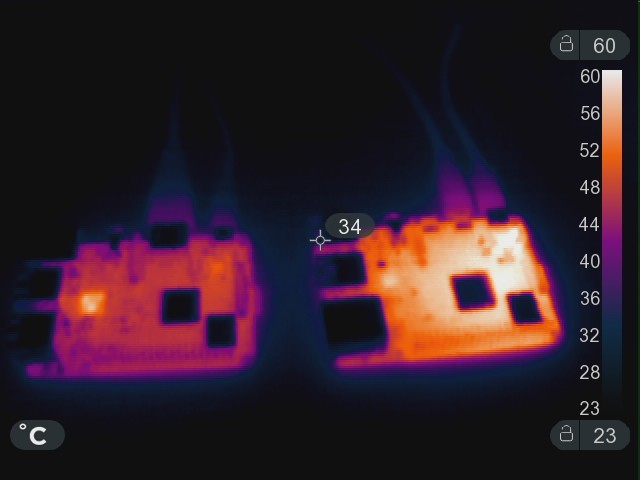
This sounds not so bad for the CPU performance, but comes at a price: upped power consumption. Looking at the thermal images you can clearly see that the Raspberry Pi 4 runs somewhat hotter than the Raspberry Pi 3 B+.

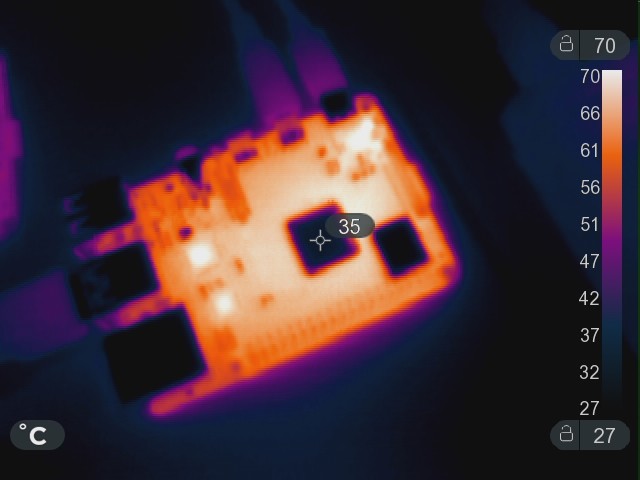
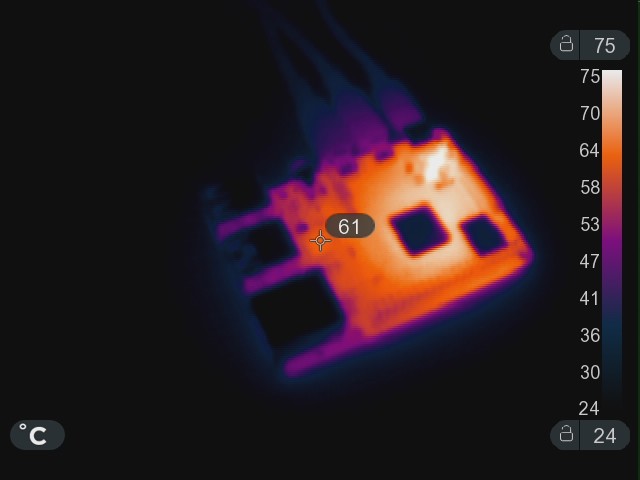
After some ‘loading’ with software it will reach temperatures well beyond amusing levels. With 68°C peak and hot spots around the CPU exceeding 55°C it’s plain to see that cooling is in order. The software image we got to play with was still in prerelease state and we should expect this to be optimized. Due to the nature of the Cortex-A72, i.e. speed prevailing over power consumption, serious amounts of dissipation were expected, but not to the extent observed in practice. The black spots seen in the thermal image are the metal caps of the CPU and wireless module, but believe me, they are not as cold at the image shows, in fact on the Raspberry Pi 4 you don’t want to touch the CPU at all. The second bright, i.e hot spot in the image is the USB 3.0 hub chip — not recommended to touch either.
Comparing the Raspberry Pi 4 and Raspberry Pi 3 B+ in pure desktop idle mode, it becomes evident that the Raspberry Pi 4 isn’t such a “cool” guy as the little brother. This implies optimisation for power consumption in idle needs to be done, and we expect the situation to improve by the time the final release appears. Figure 10 shows the idle temperatures of a Raspberry Pi 3 B+ and a Raspberry Pi 4. The cooler one on the left is the Raspberry Pi 3 B+; the one with the bright, warm, spots is the Raspberry Pi 4 (Figure 11).
This also means you have to consider where you place your Raspberry Pi 4. A dark dusty corner, otherwise fine for the previous models, is no longer an option. A good airflow around the board should keep the components cool and prevent overheating. Looking at the heat dissipated by the system, you can look forward to a serious amounts of power taken from the supply.
On power consumption, the question is how hungry the Raspberry Pi 4 has become. So we measured the current while idle, running the CPU benchmark and also running supertuxkart at 720p resolution. All tests were done with only one display attached using the Raspbian alpha image.
- With desktop idle: 2.8 watts at 5 V supply voltage.
- Playing the 1080p Big Buck Bunny video: about 3 watts in Fullscreen; and ‘windowed’, 4 watts approximately.
- Running supertuxkart at 720p resolution: around 5 watts when racing around the circuit.
- Sysbench running on one core: 3.9 watts; or 5.2 watts when running on all cores.
With the increased power demanded by the system, the dissipated heat rises also. If you put a heavy computing load on the system, do make sure to have a constant airflow through the system. Also note that the network port and USB ports get quite hot, too. Furthermore, you need to consider that the USB Hub will also draw some current if you start transferring data over the network, just as the Network or WiFi parts.
For a system mostly idle 24/7 this means we use 24.6 kW per year. If you start loading the system things don’t improve either. On the other hand, you get more computation power if you need, but also you get more heat to deal with, especially If you put any HATs on top. With the extra amount of RAM we can also consider running virtual machines on Raspberry Pi 4, having multiple webservers, an MQTT broker, or encrypted file storage on it besides being to able to move quickly from one system to another. Whether or not this works out, only time will tell.
VideoCore VI: 3D is back to the desktop

One thing the older Raspberry Pi versions have lacked for a long time was the ability to use 3D acceleration on the desktop. With the Raspberry Pi 4 and the driver for the graphics part of the VidoeCore VI, it’s back finally. As a result, on the desktop we now have 3D acceleration in ‘windowed’ mode, and it’s working! The new core has no problem running things like supertuxkart, which required a lot of tweaks on Raspberry Pi 3 B+, and even then might refuse to run at all.
The Raspberry Pi 4 now starts the game pretty quickly, and with the resolution set to 1024×768 and effects reduced to level 3, we can do a few rounds at 40 fps on average. If we step up to 720p the frame rate will decrease to 29 fps on average and the result is still playable — a clear improvement over Raspberry Pi 3 B+. If you ask how an N64 emulator or PS1 emulator will run, we’re sorry to inform that we didn’t get them to run timely for the online review. Once they are up and running, we will present the results for the tests, but you can expect it to run with more power than the older versions.
For attaching to a Raspberry Pi 4
For many of you who already own some Raspberry Pi or are looking to start with some existing extension, there is the inevitable question: will add-ons still attach to Raspberry Pi 4? Yes they will, but if you are using one of these TFT Displays that connect to HDMI you need at least a new cable for it.The camera and display connectivity and support have remained unchanged compared to the Raspberry Pi 3 B+, and so has the beloved 40-pin connector at the board edge. We can attach the same extensions as before, like the StromPi V3. Being able to supply 3 A of current we can cheerfully use StromPi on top of the Raspberry Pi 4. The PoE HAT will fit too but is not completely suitable as we get only 2.5 A output, which is the bare minimum for the Raspberry Pi 4. Meaning: the PoE HAT might work, but if we recall the troubles experienced with the older models, we will leave this experiment for later. What we will do though is a test run of a 3,5” TFT on the Pi, and a test of the Raspberry Pi Foundations 7” touchscreen hooked on the display connector.
The first test using the display port on the Raspberry Pi 4 was not successful: the display was left undetected and showed nothing. We can only assume this is due for patching later.
It is the same for the 3.5” TFT you directly attach to Raspberry Pi models, as some software parts have changed. The screen itself gets recognized after the usual configuration. But if the graphical output is redirected to the display the Raspberry Pi 4 will lock up while booting. This is something that can be fixed with software but isn’t ready yet.
After this we did not attach a camera to the Raspberry Pi 4, in view of the prerelease image we expected some things to not work correctly. Once the final image has arrived and lives a few days in the field, we will take this further to evaluate the support for the components.
Regarding the IOs, and generally SPI and I²C, these things are working as they should, also the GPIOs, as we found after a quick test. Depending on the software and libraries used, the setup you had for older Raspberry Pi models can work on the Raspberry Pi 4. As there is still work in progress, more adjustments may be called for to get it going.
Check Out the Raspberry Pi 4
We ran some basic tests covering performance, power consumption, as well as a little light 3D gaming. As mentioned in the beginning we dealt with a beta release image for the Raspberry Pi 4, so the final one should have improvements. For your favourite video-centric distribution, like openelec, some time will pass before the enhancements have been adopted for Raspberry Pi 4. As mentioned in the beginning the software is not complete and needs a few patches. This will take some time but is not unlikely to come about.Eventually we got the upgrades we waited for, faster USB, faster network, a faster CPU and finally more RAM. This comes at a price, first expressed in currency and secondly in current! With the entry models with 1 GB RAM roughly at the same price level as Raspberry Pi 3 B+, you’ll see an increase in cost as you increase the amount of RAM you wish to have. At the same time, you get an increase in power consumption and heat dissipation. Depending on the requirements for your project you may appreciate more RAM and more power consumption, more displays or even 4k, or stick with one of the older models using less power in the long run.
But to be honest, we liked the extra amount of RAM in this thing. Also, the USB 3.0 feature made transferring data to and from the network a fast and easy job. Having two displays attached to the Raspberry Pi 4 whilst supporting 4k makes a nice Thin Client, an all-digital pinball machine, a great companion in the living room, a virtual reality experience, or a small office machine.
Discussion (1 comment)