
Review: Snips — Speech Recognition for the Raspberry Pi
April 11, 2019
on
on
"Tea, Earl Grey – hot" – 10 years ago it would have been pure science fiction to expect a computer to respond appropriately to that sort of spoken request. That was before the arrival of Alexa, Google Home and Siri. The language assistants of Amazon, Google or Apple can listen to everything we say and respond (not always as expected). Anyone who wants to write their own application using speech recognition will quickly realize that the home assistant is not quite what it seems to be. All of these systems are continually looking for a match between incoming sound samples and a limited list of keyword templates. After we have enabled the wizard with the keyword, everything that it collects from audio signals is sent directly to the respective vendor's servers. The spoken-word recognition process does not take place locally but somewhere in the provider’s cloud. In this context a cloud is nothing more than a collection of computer system resources that exists somewhere in a data center. What eventually happens to that data, we as the user and app developer cannot see. We can only trust that the provider deals with it in accordance with the applicable data protection regulations. A judge in the US recently ordered Amazon's Alexa to be summoned as a "witness" in a murder case.
Anyone with a fear of Big Brother will be happy to know there are alternatives available such as Snips – this is speech recognition software that works completely offline and ensures your data does not go any further than your home network. It doesn’t need a permanent Internet connection or a bank of computers to perform speech recognition. To explore the system further we will use the Snips Voice Interaction Kit which uses a Raspberry Pi 3B+ as the base unit.
In addition to the RPi we need a few more components for this speech recognition application. Let's take a look what's in the kit.

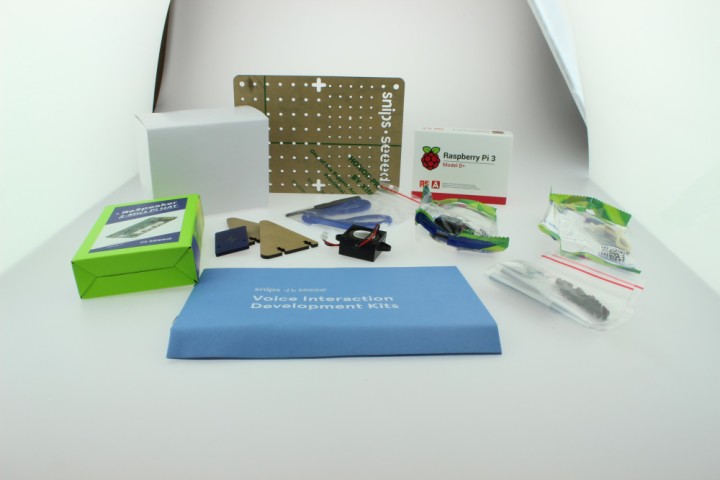

The kit arrives packed in a plain blue cardboard box. Inside are all the components including the Raspberry Pi 3B+, a 5V 3A mains power adapter, a relay, a temperature and humidity sensor, a speaker, a ReSpeaker 2-Mics Pi HAT, a mounting plate and an SD card with pre-installed system along with a quick start guide.
This gives us all the ingredientsto build our own small language assistant. When assembling the kit, use the appropriate spacers and screws. Unfortunately the manual skips over some details here so we are left wondering which screws go where. After some trial and error we finally get it sorted. The RPi board is not ideally positioned to easily access the SD card slot.
The relay is also a Grove module from Seeed Studio. Its contacts can switch 250 VAC / 30 VDC with a current rating of 5 A and should be good for 100,000 switching cycles. Although the relay can switch mains voltages the board has not been designed to operate with them because there is no insulation provided and it would be easy to accidentally touch live conductors. As long as the load voltage is below the extra-low voltage safety level (<25 VAC / <30 VDC) and within the relay parameters, you can safely use this relay module for experimentation.
A small speaker is included so you can hear what the language assistant is saying. As you would expect from a small speaker the sound quality is quite poor but adequate for the purpose.
On the board there are also three RGB LEDs (APA102), which connect via SPI to the Raspberry Pi. These can signal when the voice assistant starts to listen (or has not understood). A push button is also provide to provide interaction with the system. Finally, there are the connections for the relay, the temperature and humidity sensor.
A micro-USB port on one side provides convenient power supply connection to the RPi. Unfortunately, the header connector strip is not feed-through so we can’t stack another HAT on top and it’s not possible to use a SPI-TFT display as a GUI.
Make sure you connect the cables to the correct ports when hooking up the relay, humidity and temperature sensor. After everything has been assembled and the SD card inserted we can begin. An HDMI monitor and a USB keyboard are useful now so that we can track the RPi’s first boot process.
After booting, the system is ready for its first test. Try saying "Hey Snips - What’s the temperature?" The system should reply with the current temperature, then "Hey Snips – Turn the relay on" to switch the relay on. These commands should work straight out of the box without the need to make any configuration changes. Now we get to the more interesting part when we begin to implement our own applications/commands using speech recognition.
The corresponding country, SSID and password entries must match your own Wi-Fi credentials.
Using snips-base.local you can connect to the Raspberry Pi via SSH and explore the system. The snips software is already preinstalled on the system.
After the basic setup of the RPi, which is quite straightforward, we install Sam. Sam is a command-line interface that lets you monitor and manage the Snips software on the Raspberry Pi. To install Sam we need to open a terminal and enter sudo npm install -g snips-sam. We can now link to the Snips software on the Raspberry Pi with sam connect snips-base.local. With sam status we can then output the state and the version numbers of the individual components. The output should look like Listing 1.
Since the software is still subject to updates, it can occur that one or other of the versions will sometimes not work properly. To get the latest version, we now run sam update. The RPi now downloads and installs the latest version. Finally we need to run the sam update-assistant. This will then also update the applications and all Snips components should be online again. If we now enter sam status, all components (except snips-analytics) now run and the RPi should respond to the example commands from the tutorial.
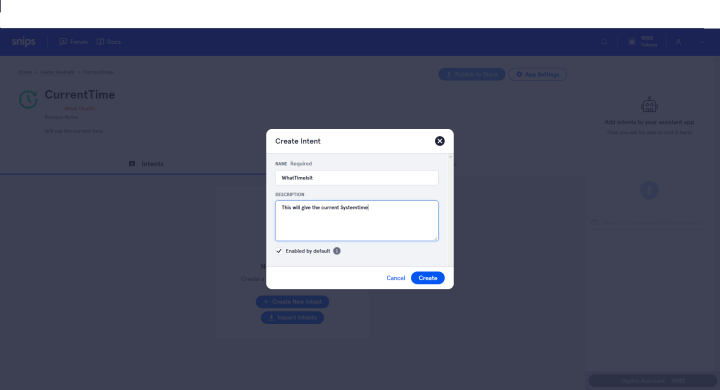
We first create a new wizard, in this case we call it WhatTimeItIs. Within a wizard, apps can now be created. We create an app called "currentTime". This app is then responsible for issuing the current time on command.
In order for the app to understand a voice command, we have to train it as an intent (short for intention).
 There are a couple of built-in modules that can make things easier for us if we Talking numbers or a date. Since our keyword questions are not available as a finished module, we need to create them. We want to listen to "Time", as well as a few synonyms.
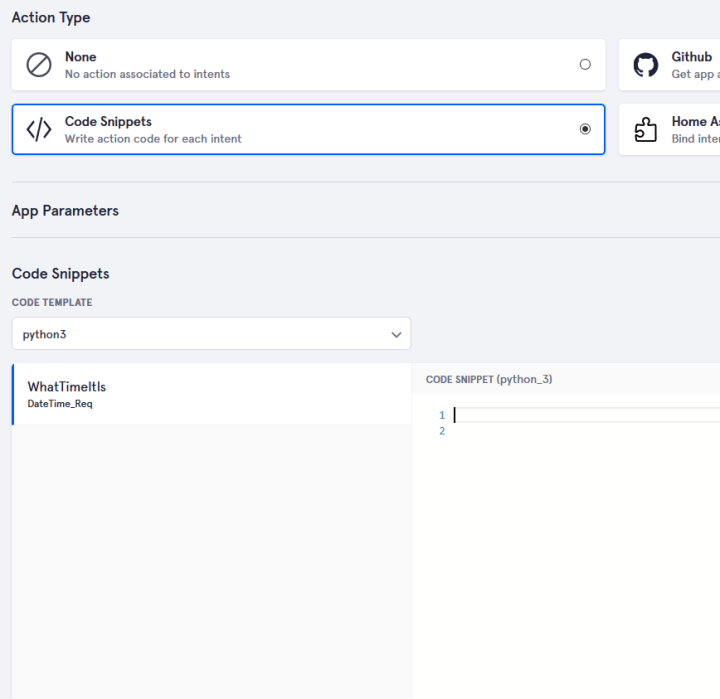
Now that we have finished learning, we can take care of the action that our voice command should trigger. For this we go to the point Actions and choose for our demo Code snippets. Currently we can write Python3 and Python2 code via the web interface and have it executed as an "action".
For more detail consult the snips documentation.
To output the time, we use the Python3 code in Listing 2.
This code will be executed when the word "Time" or one of its synonyms is detected. In response, we build a string, which is then sent to the text-to-speech software module which reads out the time for us.
With this we have created our first application and can test it. For this we still have to transfer them to the Raspberry Pi. In our attached Linux, we enter sam install assistant and install the newly created wizard. Then we can ask for the time with "Hey Snips, what's the time".
It is not ideal that the wm8960 codec is not currently supported by the current Pi kernal builds making it necessary to manual build to run the sound card in the official Raspbian. If you want to create your own image based on Raspbian, then you will need to compile and patch the driver yourself. If a new version of Snips is installed the assistant will need to be updated again or reinstalled.
Once you get used to using the Snips.ai web interface, it's fun to work with the system and explore the possibilities the system offers. Above all, it’s reassuring to know that at the end of the day, I am the only one with access to all my data.
Anyone with a fear of Big Brother will be happy to know there are alternatives available such as Snips – this is speech recognition software that works completely offline and ensures your data does not go any further than your home network. It doesn’t need a permanent Internet connection or a bank of computers to perform speech recognition. To explore the system further we will use the Snips Voice Interaction Kit which uses a Raspberry Pi 3B+ as the base unit.
In addition to the RPi we need a few more components for this speech recognition application. Let's take a look what's in the kit.
The kit arrives packed in a plain blue cardboard box. Inside are all the components including the Raspberry Pi 3B+, a 5V 3A mains power adapter, a relay, a temperature and humidity sensor, a speaker, a ReSpeaker 2-Mics Pi HAT, a mounting plate and an SD card with pre-installed system along with a quick start guide.
This gives us all the ingredientsto build our own small language assistant. When assembling the kit, use the appropriate spacers and screws. Unfortunately the manual skips over some details here so we are left wondering which screws go where. After some trial and error we finally get it sorted. The RPi board is not ideally positioned to easily access the SD card slot.
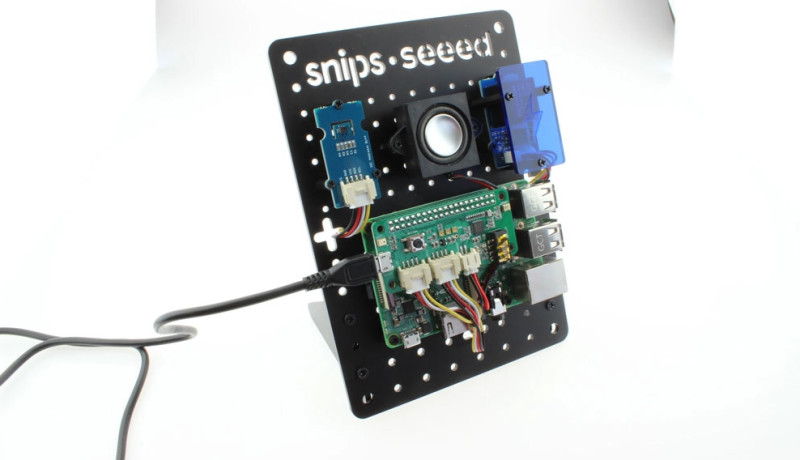
The perforated acrylic mounting board
An acrylic mounting board is supplied onto which you can fix the various modules using self-tapping screws. The matrix of fixing holes allows a certain degree of freedom as to where the modules can be fixed.The sensors and actuators
The temperature and humidity sensor is a Sensirion SHT31 mounted on a Grove module. The temperature can be measured to ±0.3 °C and the humidity with ±2% accuracy.The relay is also a Grove module from Seeed Studio. Its contacts can switch 250 VAC / 30 VDC with a current rating of 5 A and should be good for 100,000 switching cycles. Although the relay can switch mains voltages the board has not been designed to operate with them because there is no insulation provided and it would be easy to accidentally touch live conductors. As long as the load voltage is below the extra-low voltage safety level (<25 VAC / <30 VDC) and within the relay parameters, you can safely use this relay module for experimentation.
A small speaker is included so you can hear what the language assistant is saying. As you would expect from a small speaker the sound quality is quite poor but adequate for the purpose.
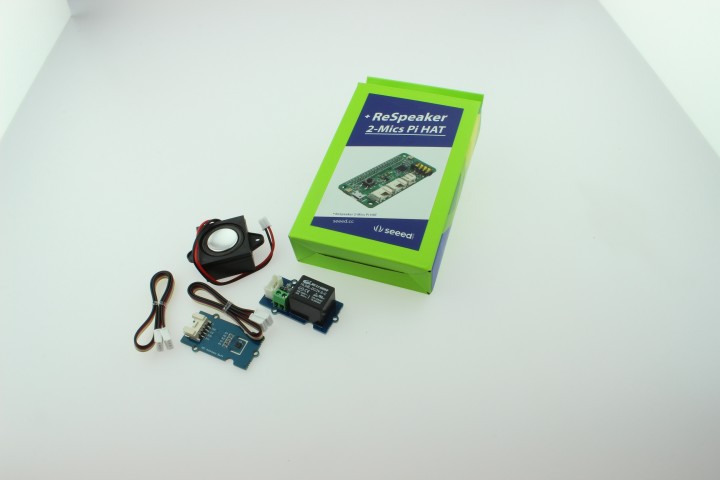
ReSpeaker 2-Mics Pi HAT
The heart of the system — apart from the RPi itself — is the ReSpeaker 2-Mics Pi HAT. This is built around a WM8960 audio codec. Unfortunately, this one is not yet supported directly by Raspbian, and the driver also has a few bugs. Therefore its necessary to when using the shield with a naked Raspbian-image, the driver itself has to be translated for the RPi. Here are the instructions to manually configure the driver. The WM8960 integrates a Class D power amplifier which can supply 1 W into 8 Ω per channel and also includes wiring for microphones. Two microphones are installed on the board; the connections for a speaker or headphones are also available.On the board there are also three RGB LEDs (APA102), which connect via SPI to the Raspberry Pi. These can signal when the voice assistant starts to listen (or has not understood). A push button is also provide to provide interaction with the system. Finally, there are the connections for the relay, the temperature and humidity sensor.
A micro-USB port on one side provides convenient power supply connection to the RPi. Unfortunately, the header connector strip is not feed-through so we can’t stack another HAT on top and it’s not possible to use a SPI-TFT display as a GUI.
Make sure you connect the cables to the correct ports when hooking up the relay, humidity and temperature sensor. After everything has been assembled and the SD card inserted we can begin. An HDMI monitor and a USB keyboard are useful now so that we can track the RPi’s first boot process.
After booting, the system is ready for its first test. Try saying "Hey Snips - What’s the temperature?" The system should reply with the current temperature, then "Hey Snips – Turn the relay on" to switch the relay on. These commands should work straight out of the box without the need to make any configuration changes. Now we get to the more interesting part when we begin to implement our own applications/commands using speech recognition.
Setup
The Raspberry Pi now needs access to our network, the easiest way to do this is by using a cable. If you want to do the whole thing via Wi-Fi, the SD card must be taken out of the RPi and the file wpa_supplicant.conf placed in the drive with the name boot. The file contains:ctrl_interface=DIR=/var/run/wpa_supplicant GROUP=netdev
update_config=1
country=<your_country_id>
network={
ssid="<your_ssid>"
psk="<your_password>"
}
update_config=1
country=<your_country_id>
network={
ssid="<your_ssid>"
psk="<your_password>"
}
The corresponding country, SSID and password entries must match your own Wi-Fi credentials.
Using snips-base.local you can connect to the Raspberry Pi via SSH and explore the system. The snips software is already preinstalled on the system.
After the basic setup of the RPi, which is quite straightforward, we install Sam. Sam is a command-line interface that lets you monitor and manage the Snips software on the Raspberry Pi. To install Sam we need to open a terminal and enter sudo npm install -g snips-sam. We can now link to the Snips software on the Raspberry Pi with sam connect snips-base.local. With sam status we can then output the state and the version numbers of the individual components. The output should look like Listing 1.
Connected to device snips-base.local
OS version ................... Raspbian GNU/Linux 9 (stretch)
Installed assistant .......... MakerKitBundle_EN
Language ..................... en
Hotword ...................... hey_snips
ASR engine ................... snips
Status ....................... Live
◦
Service status:
◦
snips-analytics .............. 0.60.8 (running)
snips-asr .................... 0.60.8 (running)
snips-audio-server ........... 0.60.8 (running)
snips-dialogue ............... 0.60.8 (running)
snips-hotword ................ 0.60.8 (running)
snips-nlu .................... 0.60.8 (running)
snips-skill-server ........... 0.60.8 (running)
snips-tts .................... 0.60.8 (running)
Since the software is still subject to updates, it can occur that one or other of the versions will sometimes not work properly. To get the latest version, we now run sam update. The RPi now downloads and installs the latest version. Finally we need to run the sam update-assistant. This will then also update the applications and all Snips components should be online again. If we now enter sam status, all components (except snips-analytics) now run and the RPi should respond to the example commands from the tutorial.
Build your own application
After creating an account, [2] you can use the web interface to create your own application, and even better, train the assistant on your own voice commands. As a small demo, we will get the language assistant to give us the current time.We first create a new wizard, in this case we call it WhatTimeItIs. Within a wizard, apps can now be created. We create an app called "currentTime". This app is then responsible for issuing the current time on command.
In order for the app to understand a voice command, we have to train it as an intent (short for intention).
There are a couple of built-in modules that can make things easier for us if we Talking numbers or a date. Since our keyword questions are not available as a finished module, we need to create them. We want to listen to "Time", as well as a few synonyms.Now that we have finished learning, we can take care of the action that our voice command should trigger. For this we go to the point Actions and choose for our demo Code snippets. Currently we can write Python3 and Python2 code via the web interface and have it executed as an "action".
For more detail consult the snips documentation.
To output the time, we use the Python3 code in Listing 2.
import time
now = time.localtime()
if len(intentMessage.slots.DateTime_Req) > 0:
date_or_time = intentMessage.slots.DateTime_Req.first().value # We extract the value from the slot
result_sentence = "Current time is : {} {} ".format(str(now.tm_hour), str(now.tm_min))◦ # The response that will be said out loud by the TTS engine.
else:
result_sentence = "Time is running out"
current_session_id = intentMessage.session_id
hermes.publish_end_session(current_session_id, result_sentence)
This code will be executed when the word "Time" or one of its synonyms is detected. In response, we build a string, which is then sent to the text-to-speech software module which reads out the time for us.
With this we have created our first application and can test it. For this we still have to transfer them to the Raspberry Pi. In our attached Linux, we enter sam install assistant and install the newly created wizard. Then we can ask for the time with "Hey Snips, what's the time".
To sum up
The kit contains everything you need to start experimenting with voice control including speakers, microphones, sensors and relays. Unfortunately, the output signals from the two built-in microphones is poor quality and quite noisy. This does not affect the speech recognition but anyone following the instructions to record a new keyword to activate the speech assistant will unfortunately need a better quality microphone. When assembling the hardware you need to pay attention, one or two additional pages in the manual with illustrations showing the spacer placing would have been helpful.It is not ideal that the wm8960 codec is not currently supported by the current Pi kernal builds making it necessary to manual build to run the sound card in the official Raspbian. If you want to create your own image based on Raspbian, then you will need to compile and patch the driver yourself. If a new version of Snips is installed the assistant will need to be updated again or reinstalled.
Once you get used to using the Snips.ai web interface, it's fun to work with the system and explore the possibilities the system offers. Above all, it’s reassuring to know that at the end of the day, I am the only one with access to all my data.
Read full article
Hide full article
Discussion (0 comments)