Review: ESP-EYE – Face Recognition on a Shoestring
When Espressif introduced the ESP32 it became an instant hit in the maker world. The new ESP-EYE board is their latest development board for image recognition and audio processing in AIoT applications.
When Espressif introduced the ESP32 it became an instant hit in the maker world. Supported by development boards, documentation, free dev tools (including the Arduino IDE) and libraries, it offers lots of processing power and wireless connectivity at low cost. Since then Espressif has changed direction a bit towards artificial intelligence (AI) based on their ESP32 platform, in what they call AIoT. The new ESP-EYE board is Espressif’s development board for image recognition and audio processing in AIoT applications.
What is on the ESP-EYE board?
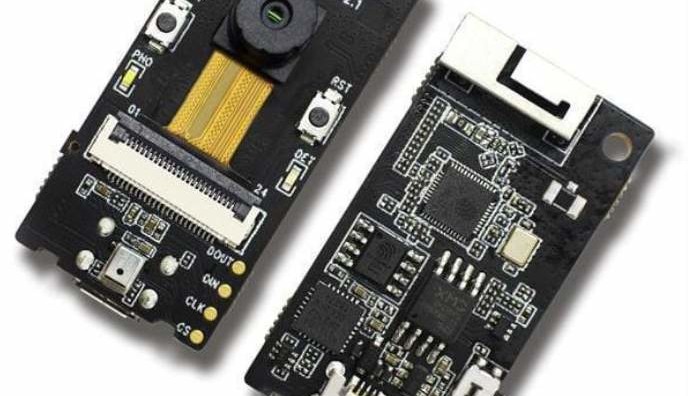
The ESP-EYE board is pretty small, measuring only 40 × 20 mm, yet packed with power. Besides an ESP32-D0WD and 3D antenna it contains 4 MB of flash memory, 8 MB of PSRAM (pseudo-static RAM), a 2-megapixel camera, a microphone, a CP2102-based USB-to-UART interface, two LEDs (red & white) and three pushbuttons (Reset, Boot & Function). Though not mounted, but space for an IPEX antenna connector is available too. There even is a mounting hole and a few voltage regulators.
Extension connectors?
Missing from the list above are extension connectors. There is one, but it consists of four test pads only — connected to IO12 (DOUT), IO2 (DIN), IO0 (CLK) and IO19 (CS) — and is intended for SPI. The preferred way of communicating with the board seems to be over USB or Wi-Fi. The USB port is also used to program the board.
Launch a serial terminal
After connecting the board to a computer, and supposing the latter has suitable CP2102 drivers installed, it shows up as a serial port (COM42 in my case). A terminal program connected to that port at 115200 baud (115200n81) reveals the suggestion to use PuTTY on Windows as it provides a better user experience.
You can follow the boot process of the board in the terminal. When it seems to be ready, you should wait a bit longer as the main application takes some time to start — it is ready when the red LED lights on. When it does, it blurps out a number of messages, the last one being:
esp-eye: Please say 'Hi LeXin' to the board
How do you say 'Hi LeXin'?
This sounds easy enough, but how do you pronounce it? I tried many times without success, and just when I was about to give up, I succeeded with something quick, sounding like “hilaiksin” (with the first ‘i’ as ‘eye’, and ‘ai’ as in ‘face’). Why on earth didn’t they use something everybody knows how to pronounce? (‘hi obi-wan’) The module then continues booting and the red LED starts blinking at a rate of 0.5 Hz.
Now what?
At this point those who do not read Chinese may be lost. The reason for this is the English ESP-EYE getting started guide on GitHub that doesn’t have any information on how to get started. If you open the Chinese version instead, you will notice that it is much longer and apparently contains installation instructions. Luckily online translation engines exist and with the help of one of these I discovered that you can now connect to the board at access point (AP) ‘esp-eye-xxx’ (with ‘xxx’ a number)
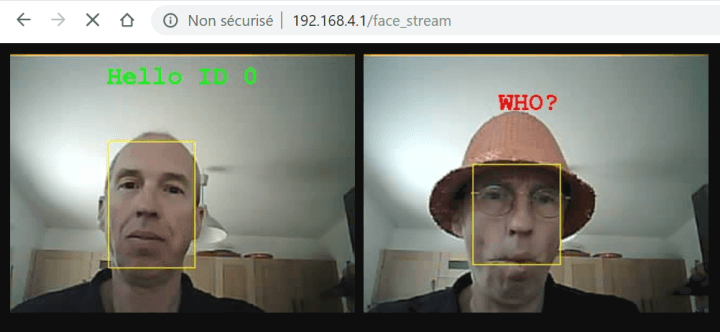
http://192.168.4.1/face_stream
Doing this will get you a black page with a live video stream in a small rectangle in the center. Also the white LED is switched on. (Naively connecting to the standard ESP AP URI 192.168.4.1 results in a message saying “This URI doesn't exist”. (BTW, once you get there it doesn’t seem to be possible to go to the face_stream page without resetting the board.) This is where the fun really starts.
After cunningly disguising myself, the ESP-EYE didn't recognize me anymore.
Make the ESP-EYE memorize your face
Pointing the camera at your face will produce a yellow rectangle drawn around what it thinks is your face. (The camera runs at about two frames per second, so show some patience.) Pressing the Function button (the tiny pushbutton on the side of the board, next to the camera connector) will make the module memorize (enroll) your face. When successful, a message in green appears, saying “Hello ID 0” (supposing this was the first time ever you did this). Several faces can be enrolled. When the camera does not recognize the face in front of it, the message “WHO?” appears in red. Enrolled faces are kept in non-volatile memory so the next time you power up the module, it will still recognize you.
Setting up a development environment
Now the time has come to start developing your own applications based on the ESP-EYE board. For this you must install the ESP IDF toolchain and the ESP-WHO package. I already had the toolchain, but I couldn’t get it to compile (Windows 10), even after reinstallation. Luckily I found a solution at this page (for Linux and Mac this seems to be more straightforward):
Open a command line interface (CLI) and create a folder somewhere to put the ESP-WHO Git repository (using commands like ‘mkdir’ and ‘cd’). Enter that folder (using ‘cd’) and then execute:
If you don’t have Git, download it first from here and install it (accept all the default options).
When the repository has been downloaded (this can take a while, depending on your internet connection) you can try to compile an example, f.i.:
cd esp-who/examples/single_chip/detection_with_command_line
idf.py build
Don't forget to set the PATH
Note that this requires a correctly configured path to work. Add an environment variable ‘IDF_PATH’ to Windows that points to ‘<full path>/esp-who/esp-idf’. Check the Internet on how to do this (hint: ‘Settings’ -> ‘System info’ -> ‘Advanced system settings’ -> ‘Environment Variables…’ -> ‘New…’; once there, I highly recommend using the ‘Browse directory…’ button). You must also add ‘%IDF_PATH%\tools’ to your path.
Compilation should terminate without warnings or errors. If it does, you can now reprogram the ESP-EYE board with the command (replacing ‘COM42’ by your port):
idf.py -p COM42 flash
Conclusion
The ESP-EYE board is a cheap and easy way to get started with AI and face recognition. Although documentation is at some points a bit unclear and fragmented, once you have found your way through it developing custom applications for the board becomes quite easy.
Read full article
Hide full article
Add a rating to this article
★★★★★
★★★★★
Page 1 / 1
Login
No account yet?Register for free!
Forgot password?
Please enter your email address. Instructions for resetting the password will be emailed to you now.

Discussion (1 comment)