
My Journey into the Cloud (24): The ESP32 controls remote processes
April 11, 2018
on
on
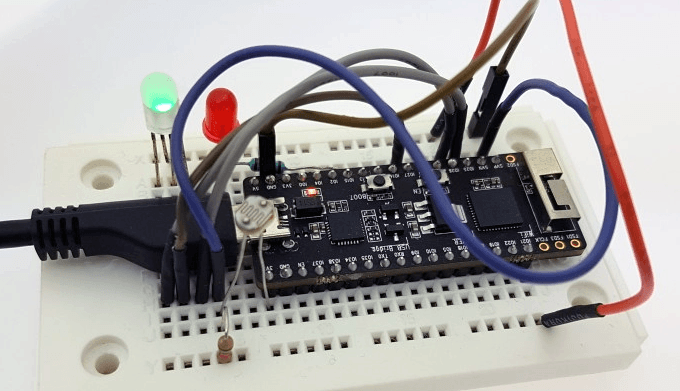
In the last instalment we built a small stand-alone device using the ESP32 Pico Kit, an RGB LED and an LDR, which we used to measure the ambient brightness level and then periodically send the measured value to the AllThingsTalk cloud platform. There, these values are displayed on a separate web page assigned to the Device. The page can be configured by the user and of course accessed from anywhere in the world. You'll no doubt remember we also took care of drop-outs and automatic Wi-Fi login as well as re-establishing connection with the AllThingsTalk MQTT broker.
In instalment 18 we created an AllThingsMaker-Device called ‘MyJourneyIoT_Sensor’ with the Asset (a subfunction) ‘temperature’ associated with the sensor, later we assigned the Asset ‘light’ to the sensor. In order to test control from the cloud, I created an Asset ‘lamp’ for the same device, but this time I clicked the ‘Actuator’ instead of the ‘Sensor’ option. As a type I chose ‘Number’ to send number values (see screenshot):

There are now three entries in the Asset overview:
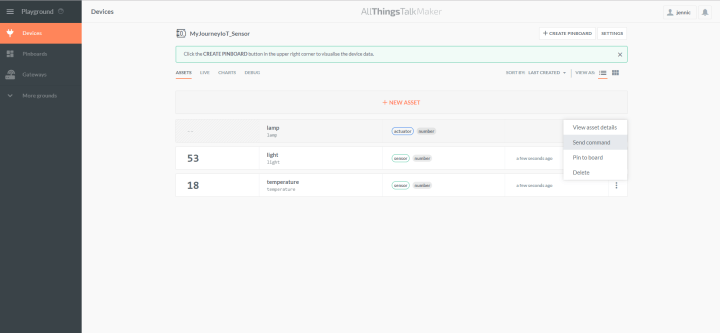
After clicking on the three vertically aligned dots on the right, the menu entry ‘Send command’ will take you to a window where you can directly edit the MQTT message payload to be sent and then send it. You may remember that the numerical values from the sensors are recorded in JSON format. For example, this command sets the actuator value to 15:
There is also a more convenient method of control available. Under the main menu items listed down the left choose ‘Pinboards’ to configure your own custom-made control surface. This is done by creating a new Pinboard and then selecting the pencil icon in the upper right to edit it. In the design view, you can now use the 'New pin' button to create new control elements that can be assigned to sensors as well as actuators. The screenshot shows how I configured it for my ‘lamp’ actuator:
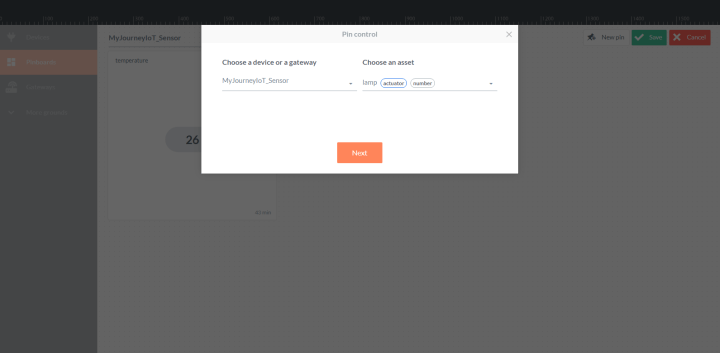
In the next window I defined that the lamp should be controlled by a slider. The finished pinboard now looks like the screenshot at the start of this article.
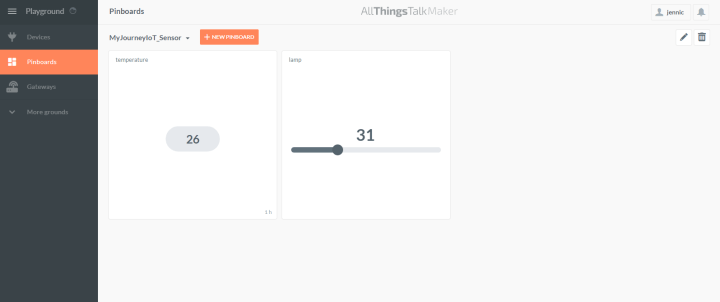
When you move the slider to a new position, a command containing the new value is sent via MQTT.
First, I extended my ConnectToATT() function with the following piece of code, which I lifted directly from a sketch used in an earlier installment and then modified it slightly:
In the function, the ESP32 as the MQTT client no longer just connects to the broker, but also subscribes to messages from the cloud, which can then control the lamp. In the first line we can see how the Topic needs to be assembled.
In the main loop we still need to check regularly whether messages have been received. The ESP32 receives these messages as an MQTT Client (or TCP Client) from the MQTT Broker (or TCP server) via the open MQTT / TCP connection.
My first approach was not too elegant. Using
the program checks regularly if an MQTT message has been received. When it has, the PayloadCountReceivedMessage variable becomes greater than 0, and the message payload is stored in the attMQTTClient.PayloadBuffer array (which is taken care of in my MQTTClient library). It soon became clear that the .Get function is something of a processor hog. This function of the MQTTClient library makes use of the .Receive function of the TCPClient library. This has a 1 second timeout set, if no characters have arrived. This is useful, for example, when you want to wait for a response from a web server, in this case you can expect characters to be received. If you only want to check if something is there, you will need to take a different approach.
So I've added a .ReceiveIfAvailable(…) function to the TCPClient library that uses the .available() function of the Arduino ESP32 WifiClient library. This returns the number of characters received over TCP / IP. If nothing arrives .ReceiveIfAvailable terminates really quickly. Now I only need to change the MQTT-Lib so that the .Get function accesses this function. It should be noted that the pinging is not too efficient but due to time constraints I will postpone optimization to a future installment.
That looked very promising, the actual value indicating the slider position is located between the ‘:’ and ‘}’ characters. In the download below you will find the finished sketch with a little demo using the slider to remotely control the blue content of the light emitted by the pulsating RGB LED. The download folder also contains the modified libraries, which need to be added to the ‘libraries’ folder of the Arduino IDE.
I've found that MQTT commands are almost always received when I move the slider but 100% reliability is not guaranteed. In a critical control situation it would be necessary to introduce some feedback to acknowledge that the lamp has been set to the correct value.
Sending commands using AllThingsTalk
The cloud platform also allows commands to be sent to the device from the device web page via MQTT. You can for example use it to control LEDs, motors and many other types of actuators.In instalment 18 we created an AllThingsMaker-Device called ‘MyJourneyIoT_Sensor’ with the Asset (a subfunction) ‘temperature’ associated with the sensor, later we assigned the Asset ‘light’ to the sensor. In order to test control from the cloud, I created an Asset ‘lamp’ for the same device, but this time I clicked the ‘Actuator’ instead of the ‘Sensor’ option. As a type I chose ‘Number’ to send number values (see screenshot):
There are now three entries in the Asset overview:
After clicking on the three vertically aligned dots on the right, the menu entry ‘Send command’ will take you to a window where you can directly edit the MQTT message payload to be sent and then send it. You may remember that the numerical values from the sensors are recorded in JSON format. For example, this command sets the actuator value to 15:
{
"value": 15
}
"value": 15
}
There is also a more convenient method of control available. Under the main menu items listed down the left choose ‘Pinboards’ to configure your own custom-made control surface. This is done by creating a new Pinboard and then selecting the pencil icon in the upper right to edit it. In the design view, you can now use the 'New pin' button to create new control elements that can be assigned to sensors as well as actuators. The screenshot shows how I configured it for my ‘lamp’ actuator:
In the next window I defined that the lamp should be controlled by a slider. The finished pinboard now looks like the screenshot at the start of this article.
When you move the slider to a new position, a command containing the new value is sent via MQTT.
Waiting for an MQTT message?
Now I had to get my ESP32 to listen for incoming messages. To get started I used the sketch from the last episode as a basis, you can download it here and compare it with the new sketch, which can be downloaded below.First, I extended my ConnectToATT() function with the following piece of code, which I lifted directly from a sketch used in an earlier installment and then modified it slightly:
String ActuatorName = "lamp";
String ATT_ActuatorTopic = "device/" + strDeviceID + "/asset/" + ActuatorName + "/command";
int MQTT_Subscribe_Result = attMQTTClient.Subscribe(ATT_ActuatorTopic); // Attempt to subscribe to topic
if (MQTT_Subscribe_Result == 1) // successful
{
BreadboardRGBLED.SwitchRGBLED(LED_GREEN);
NodeState = NODESTATE_OK;
Serial.println("MQTT subscribed.");
}
else
{
BreadboardRGBLED.SwitchRGBLED(LED_RED);
BreadboardRGBLED.setRGB(255, 0, 0); // set the default color to red for dimming
NodeState = NODESTATE_NOMQTTSUBSCRIPTION;
Serial.println("MQTT not subscribed.");
}
In the function, the ESP32 as the MQTT client no longer just connects to the broker, but also subscribes to messages from the cloud, which can then control the lamp. In the first line we can see how the Topic needs to be assembled.
In the main loop we still need to check regularly whether messages have been received. The ESP32 receives these messages as an MQTT Client (or TCP Client) from the MQTT Broker (or TCP server) via the open MQTT / TCP connection.
My first approach was not too elegant. Using
byte PayloadCountReceivedMessage = attMQTTClient.Get(attMQTTClient.PayloadBuffer);
the program checks regularly if an MQTT message has been received. When it has, the PayloadCountReceivedMessage variable becomes greater than 0, and the message payload is stored in the attMQTTClient.PayloadBuffer array (which is taken care of in my MQTTClient library). It soon became clear that the .Get function is something of a processor hog. This function of the MQTTClient library makes use of the .Receive function of the TCPClient library. This has a 1 second timeout set, if no characters have arrived. This is useful, for example, when you want to wait for a response from a web server, in this case you can expect characters to be received. If you only want to check if something is there, you will need to take a different approach.
So I've added a .ReceiveIfAvailable(…) function to the TCPClient library that uses the .available() function of the Arduino ESP32 WifiClient library. This returns the number of characters received over TCP / IP. If nothing arrives .ReceiveIfAvailable terminates really quickly. Now I only need to change the MQTT-Lib so that the .Get function accesses this function. It should be noted that the pinging is not too efficient but due to time constraints I will postpone optimization to a future installment.
The ESP32 receives commands
Now the ESP32 is able to receive MQTT messages. Initially I just used the serial interface to output the incoming data payload to the ESP32 as I moved the slider on the plug board. The messages consist of a string of characters such as the following example:{"at":"2018-04-09 …… ","value":46}
That looked very promising, the actual value indicating the slider position is located between the ‘:’ and ‘}’ characters. In the download below you will find the finished sketch with a little demo using the slider to remotely control the blue content of the light emitted by the pulsating RGB LED. The download folder also contains the modified libraries, which need to be added to the ‘libraries’ folder of the Arduino IDE.
I've found that MQTT commands are almost always received when I move the slider but 100% reliability is not guaranteed. In a critical control situation it would be necessary to introduce some feedback to acknowledge that the lamp has been set to the correct value.
Subscribe
Tag alert: Subscribe to the tag Journey into the Cloud - Article series and you will receive an e-mail as soon as a new item about it is published on our website! Read full article
Hide full article
Discussion (1 comment)