Knowing how to calculate an LED current limiting resistor is one thing, taking into account all other sorts of parameters as well is another.
In Part 1 you learned how to calculate a current limiting resistor to safely use an LED without damaging it. This article addresses some additional good-to-know things that will help you understand how to use an LED even better.
LED power
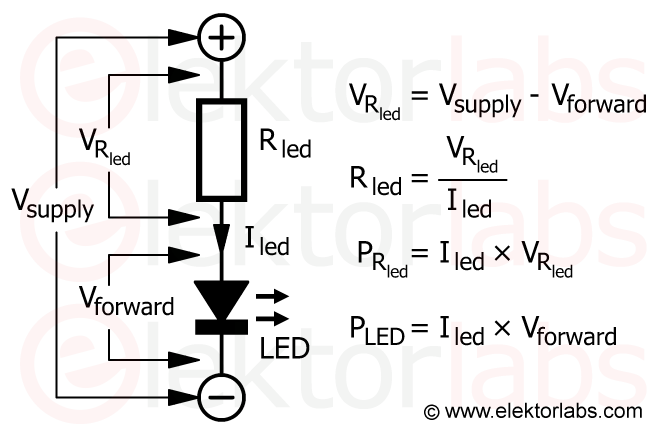
Part 1 ended with the calculation of the power dissipated by the LED's current limiting resistor. The LED itself must also be able to handle the heat it produces:
Pled [W] = Iled [A] × Vforward [V]
For our example in Part 1 this means that the LED must be rated for:
0.015 × 2 = 0.03 W = 30 mW
How to calculate an LED current limiting resistor.
That's not a lot and poses no problem for all but the tiniest of LEDs. However, with a current of say 500 mA for a high-power white LED this becomes 0.5 × 3.2 = 1.6 W. The LED may get hot and without proper cooling it will break down. Calculating heatsinks is another story and will not be treated here. Just stick the LED on a lump of metal. As long as it remains hand warm, you should be fine.
What about “high-voltage” LEDs?
High-voltage LEDs, like 12-volt or 24-volt types or even the ones that connect directly to the mains supply, consist of a string or an array of strings of LEDs, sometimes including a current limiting mechanism or a power supply. Most of these LED units, especially those designed for replacing incandescent light bulbs, are intended to be used at the rated voltage without external current limiting resistors. The calculations given before do not apply to these LED assemblies.
In the case of a string of LEDs without series resistor or built-in power supply, the above calculations do apply. Simply sum up the forward voltages of the individual LEDs and use the summing total in the equation as Vforward.
Do not read this...
After reading the above, you may be tempted to connect an LED to the mains supply using the given calculations. Well, don’t do it, it is very dangerous!
If you decide to do it anyway (Don’t!), know that resistors have a maximum voltage they can support without breaking down. When voltages increase to, say, 100 volts and higher, you will have to take this into account.
The resistor must be able to stand a maximum voltage of 1.4 × 230 VAC, i.e. 322 VAC. This is because the mains value is given as the effective value, not the peak value, which is 1.4 times higher. Replacing the single resistor by three (or four) identical ones connected in series, each with a third (or fourth) of the original value, helps handling the high voltage safely (Stop! Go back, don’t do this!).
Three identical resistors in series share the voltage across them equally.
When the mains is at 230 VAC and the LED current should be 15 mA, you will need a total resistance of about 15,200 Ω, i.e. three resistors of 5,067 Ω (or four of 3,800 Ω).
Don’t forget the power each of these three resistors must handle. In this case that would be:
0.0152 × 5067 = 1.14 W
This means that your LED connected to 230 VAC would consume almost 3.5 watts to produce a pinpoint of light. Clearly, a waste of energy, money, resources and your life (I told you not to do this!).
... read the manual instead
As always in electronics (and engineering in general), it is important to understand what you are doing. Knowing the technical specifications of the components is primordial. Therefore, read thoroughly the datasheet of every part you intend to use. It may be that your resistors only support 50 V or that the LED has a forward voltage of 1.6 V at 20 mA or will break when dissipating more that 10 mW or so. You want to know about such things before making mistakes and frying components.