
ESP32 FAQ, How-to & Getting Started
A tutorial explaining how to get started with the ESP32.
ESP32 and the Arduino IDE
The popular Arduino IDE can be used to develop applications for the ESP32. The Arduino IDE is available for Windows, Mac OS, and Linux (32 and 64 bit). Here is how to configure it for use with the ESP32.Last updated on January 8, 2025
1. Download and install the Arduino IDE (1.8.0 or higher, or 2.0 or higher) following the recommended procedures for your operating system.
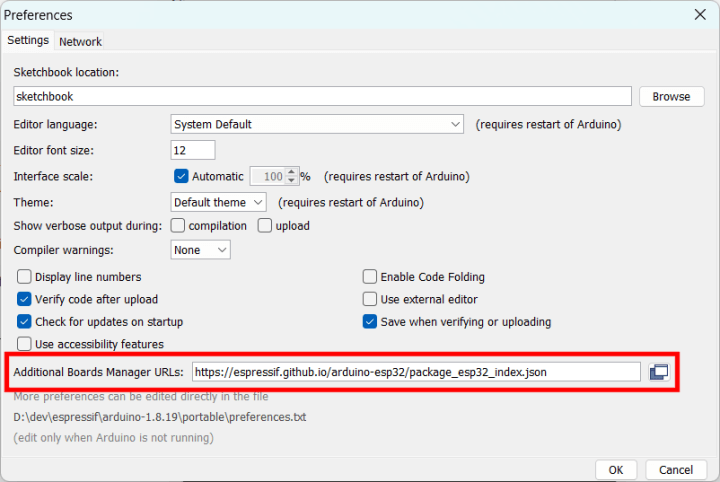
2. Start the Arduino IDE and open the Preferences window (menu 'Files' ⇾ 'Preferences').
3. Normally, this step can be skipped when using Arduino IDE 2. Enter 'https://espressif.github.io/arduino-esp32/package_esp32_index.json' into the 'Additional Board Manager URLs' field. (You can add multiple URLs by separating them with commas.) This link may change in the future, so if it doesn't work for you, check the Espressif GitHub page (probably the most reliable start URL) or the Espressif Arduino-ESP32 Online Documentation.
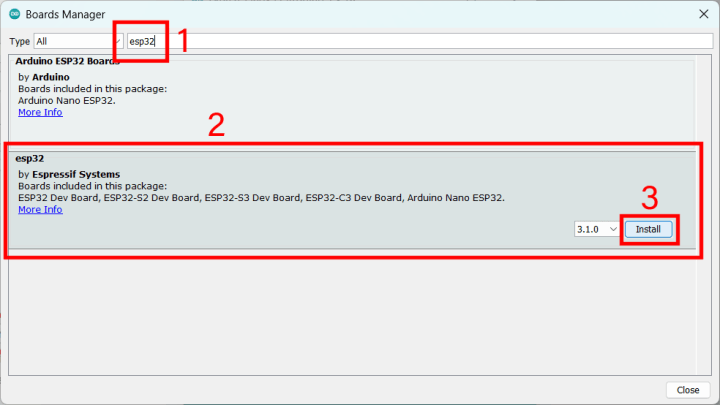
1. Type esp32 in the search box.
2. Scroll through the list of available Boards packages until you find 'esp32'. Click on the entry to make the Install button appear.
3. Click Install.

1. Type esp32 in the search box.
2. Scroll through the list of available Boards packages until you find 'esp32'. Click on the entry to make the Install button appear.
3. Click Install.
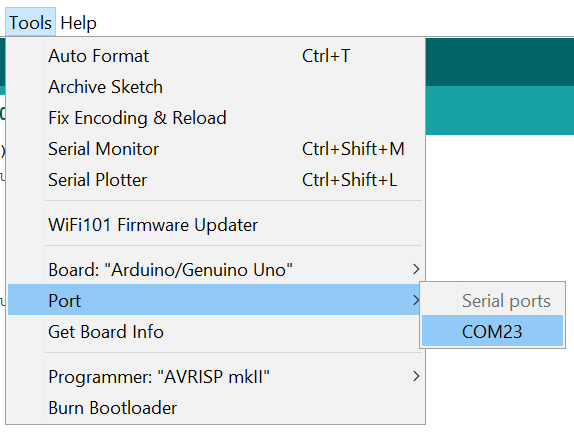
Arduino IDE 1.8.x - Select ESP32 Board & Port
5. After successful installation of the esp32 package, select your ESP32 board (menu 'Tools' ⇾ 'Board').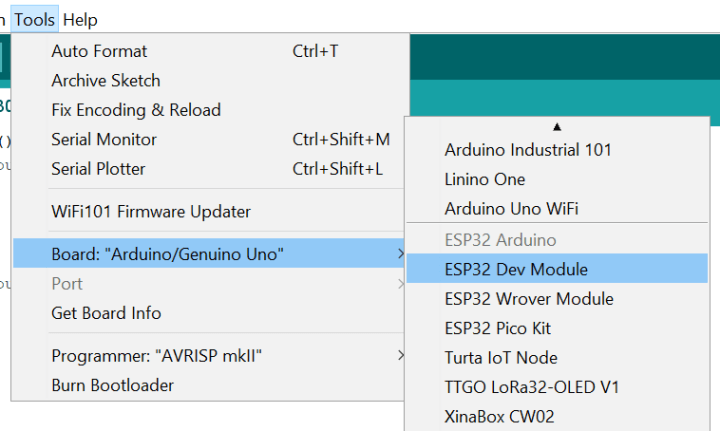
Arduino IDE 2.x - Select ESP32 Board & Port
The Arduino IDE 2.x detects the ESP32 board automatically as soon as it is connected to the computer. The name of the board should appear next to the Upload button at the top of the IDE.
Ready to go
7. From the menu 'File' ⇾ 'Examples' ⇾ '01.Basics' you can now load the 'Blink' example. Click the 'Upload' button (arrow to the right) or menu 'Sketch' ⇾ 'Upload'. If all goes well, after some time you will see an LED blink on your ESP32 board.
Not all ESP32 boards have a user LED
Please note that not all ESP32 boards have a user-programmable LED, and so the example may fail. When the compilation fails with the message,
'LED_BUILTIN' was not declared in this scope
then your board probably does not have the user LED. The ESP32 DevkitC for instance does not have a user-programmable LED.The example 'AnalogReadSerial' should work in most cases. Refer to the documentation of your board to locate the analog input pin.
The official Espressif ESP32 Arduino information is found at https://github.com/espressif/arduino-esp32
Arduino 1.8.x - SPIFFS - uploading sketch data
SPIFFS (SPI Flat File System, i.e., it does not know about directories or folders) is required when you want to store files on the ESP32 module. Typical use cases are webpages and illustrations, etc. that are served by a web server running on the ESP32. A special tool is required to upload your files into the SPIFFS. Here is how you install it into the Arduino IDE:1. Install the ESP32 Boards Package in the Arduino IDE 1.8.x as described above.
2. Download the SPIFFS tool from the 'Arduino ESP32 filesystem uploader' page.
3. Depending on your Arduino installation, there are two options:
- Arduino Standard Setup. Unpack the downloaded archive to [arduino]\tools. You should end up with [arduino]\tools\ESP32FS\tool\esp32fs.jar (note the path!)
- Arduino Portable Setup. Unpack the downloaded archive to [arduino]\portable\sketchbook\tools. You should end up with [arduino]\portable\sketchbook\tools\ESP32FS\tool\esp32fs.jar (note the path!)

Uploading the files to the SPIFFS
The files that must be copied to the SPIFFS must be placed in a folder named 'data' inside the sketch folder. Simply click 'ESP32 Sketch Data Upload' to start the upload.For the official SPIFFS uploader documentation, see https://github.com/me-no-dev/arduino-esp32fs-plugin
Arduino 2.2.x - Uploading files to the SPIFFS
Arduino IDE 2.x did not support SPIFFS uploading for a long time. However, as of v2.2.1 it is possible again by using this tool: arduino-littlefs-upload. See this Arduino forum thread for more information and other solutions, notably the command line solution.Access Point (AP) mode
The typical chicken-and-egg problem with Wi-Fi connected equipment is that before you can connect to it, you must somehow connect to it so you can connect it to the network. Get it? The ESP32 solves this paradox by providing a default Access Point (AP) mode.192.168.4.1
When the ESP32 is not connected to a network, you can often access it by connecting to the ESP32 network (or some other obvious network name or ID that shows up in the list of available networks) and then pointing a browser to the address 192.168.4.1. The computer, tablet, or smartphone running the browser must not be connected to another Wi-Fi network. When doing this with a smartphone, it is often preferable to switch off mobile data to prevent the phone from trying the mobile data network to find the address 192.168.4.1.Once connected to the ESP32 in AP mode, you can configure the parameters for the Wi-Fi network that it should connect to. Make sure to store these parameters in the module's flash memory and restart it. In most (normal use case) situations, the ESP32 will then automatically connect to the chosen Wi-Fi network.
Discussion (0 comments)