


Building a High-Quality Internet Radio with Ethernet and WiFi Connectivity
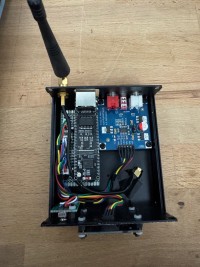
I wanted to build a high-quality internet radio that could connect to both my local Ethernet network and a WiFi access point. This setup allows me to record radio broadcasts—especially France Musique—on my fully restored REVOX B77 tape recorder. I had previously developed internet radios based on the ESP32, but the limited audio buffer (due to the absence of sufficient PSRAM) and occasional WiFi dropouts left me unsatisfied.
- Core Module: When I discovered the ESP32-S3-ETH module from Waveshare, I knew I had found the right foundation. The ESP32-S3 offers more power and features than earlier versions.
- Audio Output: For analog audio, I used a PCM5102A-based module with RCA outputs for higher quality than a 3.5mm jack. The power supply design keeps background noise very low (-96 dBm measured).
- Interface: Communication between the ESP32 and audio module uses an I2S port.
- User Interface: An OLED white 128x64 pixels screen module with an MCP23008 chip allows reading six switches and controlling two LEDs (green and red) via I2C (SDA and SCL lines).
- Remote Control: A remote (RC6) changes stations, adjusts volume, and mutes sound. Its ON/OFF button reboots the CPU.
- Enclosure & Antenna: The entire system is housed in an aluminum box for electromagnetic shielding. An external 2.4 GHz WiFi antenna is added, with a minor modification on the Waveshare module to switch antenna type (remove R3, add R1).
- Power and Configuration: Powered via USB-C and compact, the radio does not include an HTML server. WiFi credentials and station data are hardcoded; any changes require recompiling.
- Development Environment: Arduino IDE 2.3.5 is used, with libraries and CPU manager (v2.0.11) as explained in the program header.
- Buffer Size: The ESP32_audioI2S-master library was modified to increase the audio buffer to 2 MB, enabling uninterrupted streaming over Ethernet—even if the cable is unplugged for 15+ seconds.
- CPU Settings:
- Module: ESP32S3-DEV
- USB CDC on boot: Enabled
- Flash size: 16 MB
- Partition scheme: Huge
- PSRAM: OPI PSRAM
- Menu System: Accessible anytime by pressing CH- and CH+ simultaneously, it allows switching between WiFi and Ethernet and restoring default values (validated with VAL).
- Error Handling: For Ethernet connection failures (e.g., loose cable), a timer triggers a CPU reset after 10 seconds to avoid blocking.
on timeout ESP32_W5500_waitForConnect();
cancelHwTimeout(); // Cancel if connection succeeds
- Initial Setup: Remember to set WiFi SSID and password in the code (lines 92 and 93). On first start, press CH+ and CH- simultaneously, choose “restore” in the menu, and confirm with VAL.
Want to build a project?
Bring your design to life with the Elektor PCB Service, powered by Eurocircuits. Upload the project files and order professionally manufactured PCBs or assembled boards through a proven European production platform.
Supporting KiCad, Eagle, Gerber, and ODB++ formats, the service is suitable for everything from prototypes and validation builds to series production and volume manufacturing.
Made in Europe. Fast. Reliable. Professional.
Updates from the author