


DIY Lithium Battery USB Charger Booster
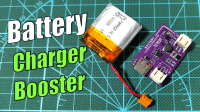
Compact Lipo charger & booster in one tiny PCB, USB-C input, 5V output, high efficiency, and open-source design!
Batteries power our world, but managing them efficiently requires smart circuits. In this project, I designed a compact lithium battery charger with a 5V boost converter, combining a TI BQ24075 charger IC and a Diodes Inc. PAM2401 boost IC into a tiny 24mm × 34mm PCB.
But the journey wasn’t smooth! A hidden schematic mistake turned my board into a toaster before I fixed it. In this Instructable, I’ll walk you through:
✔ Circuit design & PCB layout
✔ Assembly & soldering tips
✔ The debugging nightmare (and how I fixed it!)
✔ Final testing & performance
Let’s dive in!
Supplies
Electronics Components
- IC1:BQ24075 (LiPo Charger)
- IC2:PAM2401 (Boost Converter)
- L1: 2.2µH Inductor (2A saturation current)
- D1: Schottky Diode (SS34)
- USB-C Connector (SMD, 16-pin)
- JST 2.0mm Connectors (Battery + Output)
- LEDs (Power/Charge Status)
Tools & Materials
- PCB Fabrication:JLCPCB (Purple solder mask!)
- Soldering:
- Debugging:
- Design Software: Altium Designer
Circuit Design
The Two Key ICs
- BQ24075 Charger IC
- Why? Handles all lithium battery charging logic
- Key Feature: Built-in thermal regulation (no cooked batteries!)
- Setup: Identical to my previous project (USB-C in, 500mA default)
- PAM2401 Boost Converter
- Why? Converts low battery voltage 0.9V–4.2V battery voltage to a stable 5V/500mA output
- Key Specs: 1MHz switching, needs 2.2µH inductor (I used a 2A-rated one)
- Gotcha: LX pin requires careful PCB routing

Schematic Tips
- Isolate power paths! My mistake: Accidentally connecting charger/booster outputs (more in Step 4).
- Add reverse protection (Schottky diode on USB input).
Critical Design Choices
- Size: 24mm × 34mm (fits behind a battery)
- Ground Plane: Full copper pour under power components
- Component Placement:Inductor <5mm from PAM2401 (reduces noise)
- USB-C port on left edge for easy access
Design Tools Used
- Schematic Capture: Altium Designer
- Component Sourcing: Selected JLCPCB-compatible parts for easy assembly
Pro Tip: Run a Design Rule Check (DRC) before ordering PCBs!
Design Files:
Assembly
After getting the Circuit very well designed, I generated its related GERBER files and uploaded them to JLCPCB website to order these Purple color PCBs.

Soldering Steps
Tools Needed:
- Stencil + solder paste (I used Chip Quik TS391LT)
- Hotplate (or reflow oven)
- Precision tweezers (for 0402 components)
1. Apply solder paste using a stencil.

2. Place components with the aid of tweezers in this order:
- Start with the small parts (Capacitors, resistors)
- PAM2401/BQ24075 ICs
- Inductor and passives
- USB-C connector (check alignment!)

3. Reflow on a hotplate (220°C for 90 sec).

Check: Inspect joints under a microscope, look for bridged pins or cold solder.
Debugging the "Voltage War"
After getting the circuit very well assembled, I moved to do some tests targeting a 5V output voltage from a Lithium 3.7V battery so the needed result should be a boosted stable voltage coming from this circuit:

The Problem
- Booster output stuck at 3V instead of 5V
- Inductor overheating
- LX pin showing glitchy pulses (scope capture below)

Symptoms & Fixes
Inductor overheating ---> Output short ---> Check LX pin with scope
3V output (not 5V) ---> Booster disabled ---> Verify EN pin voltage
Erratic LX pulses Feedback ---> loop broken ---> Measure FB pin (0.6V?)
- Root Cause:
- My schematic accidentally connected the charger and booster outputs!
The Fix
- Cut the conflicting trace between ICs.
- Verified clean 5V output afterward.
- Check the output Pulses signal from the booster LX pin to the inductor

I then updated the Design files and fixed the GERBER as well :)
Performance Metrics
- Efficiency: 92% at 500mA load
- Output Stability: ±50mV ripple
- Charging Current: 500mA (adjustable via resistor)
Success! Now it charges batteries and delivers 5V reliably.

Want to build a project?
Bring your design to life with the Elektor PCB Service, powered by Eurocircuits. Upload the project files and order professionally manufactured PCBs or assembled boards through a proven European production platform.
Supporting KiCad, Eagle, Gerber, and ODB++ formats, the service is suitable for everything from prototypes and validation builds to series production and volume manufacturing.
Made in Europe. Fast. Reliable. Professional.
Discussion (3 comments)