The HT-03 Thermal Imaging Camera is an affordable and easy-to-use device with some practical features capable of capturing images and recording videos. It covers a wide temperature range from −20 °C to 550 °C (−4 °F to 1022 °F) with a 0.1 °C resolution and a precision of ±2%. Its emissivity parameter lets you adjust the camera to the subject for the best precision possible. Let's give it a try.
Like most of its competitors, the HT-03 Thermal Imaging Camera by HTi too comes as a handheld pistol scanner kind of device. For some reason, these cameras never look like photo/video cameras. Which is strange, if you ask me, because if it is so practical, then why don’t photo and video camera’s look like thermal cameras? Both take pictures and videos, point & shoot; it is just that they present the results in different ways. As a matter of fact, the HT-03 also integrates a normal, visible-light camera. Anyway.
HT-03 Thermal Imaging Camera by HTi
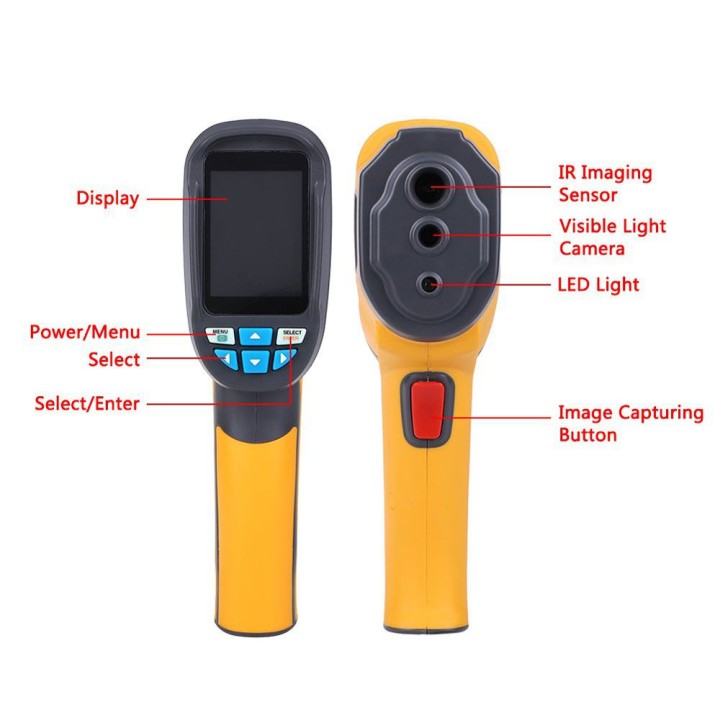
The camera comes in a nice cardboard box that you can use for storing the device when you don’t need it. The box also contains a manual in English (the camera itself speaks English, Chinese, Italian and German), a USB cable and a USB power adapter. The one in my box has American-style prongs, so, depending on where you live, you may need an adapter for the adapter. Front and read side of the HT-03 Thermal Imaging Camera. Pull the trigger for about 2 seconds to switch on or off the LED.
Interestingly, the box includes a card written in Chinese and English with detailed instructions on how to find leaks in radiant floor or under-floor heating systems. Is this an indication of the target audience of this product?
First Power-On
After charging the HT-03’s (removable!) battery (2200 mAh, good for 2 to 3 hours), I could switch it on. This is a bit long as you must press the On/Off button for at least four seconds. Then it takes another almost 15 seconds before you can start using the camera. (Power off is long, too.)
The HT-03 Has a Large Display
The 2.1” display (240 x 320 pixels; 120 x 90 pixels infrared resolution, 160 x 120 for the HT-04D) shows a live thermal image. The temperature in the center is shown, together with the lowest and highest values in the image. These two values tend to jump around a lot, which can be disturbing, and so you can switch them off in the settings menu. Their values remain visible at the bottom of the screen.
The HT-03 features two temperature ranges: −20 °C to +120 °C and 120 °C up to 550 °C. This is what makes this camera interesting to me, as I have found that an upper limit of 120 °C can be a bit tight (let alone those cameras that max out at 85 °C or so). Of course, you can switch to Fahrenheit if you prefer (the image processing utility does Kelvin, too).
What is the emissivity value for a cat?
Visible-Light Camera
The integrated visible-light camera (640 x 480) is practical as it can be mixed with the thermal image, allowing you to see what you are pointing at. A thermal image can be a bit confusing, and this option removes that. There are five mixing levels, from visible-light-only to thermal-only in steps of 25%.
Besides mixing the two images, you can adjust the brightness of the screen in three steps, and you can select a different temperature-to-color mapping. Navigating through the menus is easy and intuitive.
Emissivity is Important
The emissivity menu option is important. As with any measuring device, if you don’t know what you are doing, then don’t expect super precise results. For an infrared imaging camera like the HT-03, the emissivity of the subject under scrutiny is important for obtaining accurate temperatures. Not every surface has the same value. On the HT-03 you can set the emissivity from 0.01 to 1.00, or you can choose one of the four presets. The manual has a list of emissivity values for common materials.
Image and Video Capture
Photos are taken, or, if you prefer, images are captured, by pulling the trigger. You must confirm if you want to keep it (as JPG). To record a video (MP4), pull the trigger for a few seconds, then confirm (or not). Captured videos and photos can be played back on the device itself, or you can download them to a computer. The camera has about 3 GB eMMC memory available for your productions.
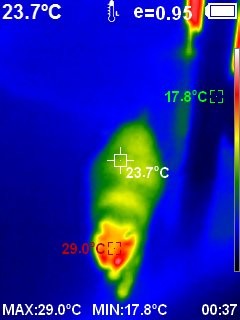
Captured a ghost? Oh no, it is just my reflection in the window. The blend slider works on captured images too.
The HT-03 Has PC Utility Built-in
After connecting the HT-03 to a computer, it is detected as an external drive with images in the IMGS folder and videos in the VIDEOS folder. The drive also contains an image processing IR ImageTools. If you install it, you can visualize your screen captures (not the videos). Now you can take measurements in points or in areas that you can draw in the image. An interesting feature here is the blend slider. With it, you can adjust the mix between the thermal and normal image. This is not possible with a normal JPG image viewer.
Summarizing
The HT-03 Thermal Imaging Camera is an affordable and easy-to-use device with some practical features capable of capturing images and recording videos. It covers a wide temperature range from −20 °C to 550 °C (−4 °F to 1022 °F) with a 0.1 °C resolution and a precision of ±2%. Its emissivity parameter lets you adjust the camera to the subject for the best precision possible. And, as with any precision tool, take some time to learn how to use it best.
Subscribe
Tag alert: Subscribe to the tag Thermal imaging and you will receive an e-mail as soon as a new item about it is published on our website!
Elektor Magazine has been one of the leading sources of information on electronics for engineers, designers, start-ups and companies for 65 years. Our magazine is powered by an active community of electronics engineers – from students to professionals – who are passionate about designing and sharing innovative ideas.
For them, we publish hundreds of items a year, in formats such as articles, videos, webinars, and other learning formats. Our mission is to share knowledge in every possible way and inspire readers with the latest developments within the electrical engineering sector.
Thank you for your vote!
Leave further comments in the fields below.
Thank you for your vote!
If you wish to leave a comment with your rating, please first use the login below. If not, just close this window.


Discussion (0 comments)