
555 Class D Power Amplifier [130144-I]
With this project, I like to build a small class D amplifier based on a 555 timer IC. I also like to use only “common” components, so this project has great educational value and is easy to build.My goal is to produce about 5W RMS power into 4ohm. Distortion level should be less than 1%.Circuit description VERSION1 (see circuit diagram below)
With this project, I like to build a small class D amplifier based on a 555 timer IC. I also like to use only “common” components, so this project has great educational value and is easy to build.
My goal is to produce about 5W RMS power into 4ohm. Distortion level should be less than 1%.
Circuit description VERSION1 (see circuit diagram below)
In order to build a class D amplifier, we must convert the analog signal to a digital signal. In fact we like to use a pulse with modulated signal that follows the analog audio signal. This way, we can switch 2 power MOSFETs on and off in a very efficient way.
I use the NE555 as the heart of the PWM encoder. At the input, we have a standard NPN transistor input (Q4) biased by R10 and R9. C1 blocks all DC at the input. The idea is to modulate the way the charging capacitor C3 is loading with the analog audio signal.
In most standard 555 timing configurations, the timing capacitor is charged with a constant voltage, resulting in severe non linearities, especially at high output levels. To improve linearity, I charge the timing capacitor with the constant current. Therefore I use a current source at the input (Q3, R2 and R7) and a voltage to current convertor in the feedback loop of the 555. (Q1, Q2, R1 and R3) This way we get a real triangle wave on C3. (see image below “signal on C3 no signal.jpg”)
Oscillation frequency of the 555 is around 300 kHz.
Output signal is 0V – 18V PWM signal that switches on and off M1 and M2.
D1, D2, R4 and R5 are dealing with “on” and “off” timings and avoid that M1 and M2 are “on” at the same time (and avoiding to short circuit the power supply). R12, R14 and Q5 form a feedback circuit that improves linearity and distortion levels even more. L1 and C4 is a LPF around 25 kHz, removing all high frequency switching components.
I use a SMPS laptop power supply of 18V to test with (cheap). Initially I had switching noise in the speaker. Therefore I add a coil of 100µH to filter this out. Working fine!
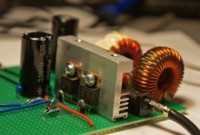
I built this circuit on a standard testing board, and I’m quite happy with the result. Audio sound “direct” and “clear” to me, with tight basses! I get about 6 W RMS power, what is fine for my first attempt J I do not have any distortion measurement equipment, so I’m not sure if my goal of <1% is reached.
About efficiency, the heat sink is cool at all levels, so this should be fine.
I attached some images and of course the schematic and also some scope prints of the output square wave and charging capacitor wave. I have also added a short video of the amp @ work. Don’t bother the bad sound quality of the movie; it’s the poor mic quality of my camera J
Possible improvements (VERSION2 tbc)
- Power MOSFETs must be controlled with 18V to be fully saturated (and “on”), if I raise the supply voltage on the MOSFETs and control with 18V from 555, MOSFETs are running hot as they don’t fully switch on. A voltage level shifter circuit is recommended here.
- I will to do some tests with IR2110 IC to achieve this, maybe there's a discrete solution? Maybe with a "charge pump"?
- Now we use “half bridge” 2 MOSFET configuration, therefore needing a big output capacitor, I did some tests with full bridge configuration (4 MOSFETs) in SPICE but I get a lot of cross over distortion. Need more investigation on this….
Any help, suggestions, or hints are welcome to improve this project!
Build This Project
Bring this design to life with the Elektor PCB Service, powered by Eurocircuits. Upload the project files and order professionally manufactured PCBs or assembled boards through a proven European production platform.
Supporting KiCad, Eagle, Gerber, and ODB++ formats, the service is suitable for everything from prototypes and validation builds to series production and volume manufacturing.
Made in Europe. Fast. Reliable. Professional.
Discussion (23 comments)