
Personal Speedometer
Personal Speedometer - It's a personal SPeedometer cum jogging tracker. It does not require any Internet connection - better than a smart phone.
Personal speedometer cum trip meter & logger
P relude: Speed is a scaler quantity which I’ve been trying to measure while I doing my morning jogging spree for quite some time. First I tried with a high frequency Doppler sensor but it fails to measure the self velocity. However when a big object passes by it’s side it can measure the relative velocity at that moment. The next I tried with a BME280 probe which measures the atmospheric pressure , temperature and humidity. I presumed that the change in velocity will change in the atmospheric pressure in the perpendicular direction but again it fails to measure that minute change in the pressure while in motion.
Therefore, lastly I fall back on the GPS receiver which when in contact with more than 3 satellites gives a pretty correct velocity of the self body in motion. Apart from the velocity it can be used as the measurement of time & distances I cover while jogging thereby, calculate the total trip distance and average velocity during the trip.
Measurement philosophy: Assume a situation when , while walking , you turn back and walk the same path – the distance which is a function of Latitude and Longitude of the path in that case will be zero but actually you have traveled the path twice! To tackle the problem I’ve inserted a push_button (P) on digital pin-6 which needs to be pressed when one finds the path is turned, bend , repeated or not straight.
Say, you are jogging from A to B to C and finally come back to A again. The total displacement is zero but you actually walked the path – AB+BC+CA. To get the total path distance first press the button (P) at Point A [this will start the calculation ] then press it at B and then press it again at C and finally after arriving at A press it again. The total path distance – AB+BC+CA along with time in seconds you took to run the path and the time when you walked the path will get stored in the EEPROM memory of ATMEGA328. The display will show the last path reading and the total path reading – BC / (AB + BC) or CA / (AB+BC+CA)
A second button (Q) is provided on digital pin-7 . Press it and hold it , the screen will clear first and then it will show the total distance you walked ,total time you took along with the time when you walked and average speed in KMPH during the trip. This data will remain in the memory even after switch off the power. However, once the other button (P) is pressed, this data will be replaced by a new data.
Construction:
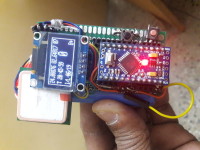
The construction is one of the simplest of the Arduino project. Find out a small piece of double sided PCB and then place the Arduino chip, OLED & the GPS receiver on the front side. The POT antenna of the GPRS is to be placed on the front side so that it can come in view of the GPS satellites. The Lipo cell may be clamped / soldered on the back side of the PCB. The digital pin-6 & 7 goes to switch P & Q respectively.
Testing: This is my moments of pleasure. Power the unit suitably with a Li-Ion battery and switch on the S1 and S2 both. In case you use bigger volt supply like 9V or 12V then keep the S2 in open mode.
Normal view (1) Switch-P pressed (2) Switch-Q pressed (3)
Take the unit to the open field – your area of morning workout. Take along your partner or girl friend to impress her with your new gadget ! Once the GPS receiver comes in view of the GPS satellite, the PPS led [Pulse Per Signal LED – usually 1 blink / second] will start and the OLED will get populated like in
picture (1) – When neither of P or Q is pressed
Latitude Longitude no_of_satellite
Time: HH:MM:SS Instant_Velocity
picture (2) – When P is pressed 1st time
Latitude Longitude no_of_satellite
Time: 05:23:27 Instant_Velocity
l/L: AB/AB 00 00
[00 – number count starts and 00 is the second count starts ]
picture (2) – When P is pressed other than 1st time
Latitude Longitude no_of_satellite
Time: 05:55:57 Instant_Velocity
l/L: CA/(AB+BC+CA) 03 1950
[03 – count number , 1950 – seconds elapsed ]
picture (3) – When Q is pressed
T:1950 L=2345 6.25
Time: 05:55:57
[1950 – seconds elapsed, 2345 - meters covered and 6.25 is the average speed in KMPH ]
Every time switch-P is pressed ,three data – the time elapsed, the distance covered and the time of pressing the switch-P goes into the EEPROM of the Arduino chip. I prefer Arduino ATMEGA328 for this exercise as they have 1024 bytes of ROM memory to work with.
On pressing switch-Q these data will reappear on the OLED like in picture (3). Every time you press switch-Q these data will reappear !
However, once the switch-P is pressed , it will be replaced by a new set of data.
BOM: Arduino Nano = $2.5
OLED 64x128 = $2.5
Ublox GPS = $7.0
Li-Ion cell = $3
= $15
Well, the major elements are the Arduino ,OLED, GPS Receiver and Li-Ion cell which costs around $15 from Aliexpress.com .The additional casing, PCB, Soldering etc. can be sourced from the local markets.
Aftermath:My daughter asks me why I prefer this device instead of a smart phone app - quite justified for new generation people. But I've my reasons too.
1> I hate to carry my cell while jogging - it's a distraction.
2> In the name of jogging there are more than 30 apps available in play store from 7MB to 181 MB. It
confuses me totally which one to use.
3> Few of the apps asks a good number of settings - stride length, body weight, height etc. I just run 6 /
7 kilometers everyday at 9 to 10 kmph and then relax. Don't need so much settings.
Had I need then I would have stood on a trademill first.
4> Almost all apps need Internet to work unlike this one.
5> This is a small unit, comes under one's grip / fist. Can be made into a key-ring if the
Nano is replaced by the SMD ATMEGA328 ,stripping all other things.
6> A smart phone comes not less than $150 but this one is 1/10 th of that.
Prototype:
Shown above.
Arduino Sketch: Attached
Aftermath:
As few of my friends used this personal speedometer during their daily workout session, they asked me few modifications which have been incorporated as follows. During the normal view (2) when the switch-P is pressed once, the meter will reset to zero. Now as the walker moves along, the run meter will increase in l/L parameters where l=instant distance ; L=Total distance. On the same line extreme right a battery monitor is added. As long as the voltage of the LiPo battery is more than 3.3 it will show ‘B+’ sign. Once it goes below 3.3 the sign will change to ‘B-’ which is the indication for recharging the Lipo battery.
For monitoring the health of battery I’ve added a voltage divider using a 390K & 330K resistor across the battery. Also I’ve used HT7333-1 3 pin regulator for it’s low drop out voltage and low quiescent current loss.
Modified normal view (1)
Modified Schematic:
Modified sketch: attached.
Bye, bye
Bera S
P relude: Speed is a scaler quantity which I’ve been trying to measure while I doing my morning jogging spree for quite some time. First I tried with a high frequency Doppler sensor but it fails to measure the self velocity. However when a big object passes by it’s side it can measure the relative velocity at that moment. The next I tried with a BME280 probe which measures the atmospheric pressure , temperature and humidity. I presumed that the change in velocity will change in the atmospheric pressure in the perpendicular direction but again it fails to measure that minute change in the pressure while in motion.
Therefore, lastly I fall back on the GPS receiver which when in contact with more than 3 satellites gives a pretty correct velocity of the self body in motion. Apart from the velocity it can be used as the measurement of time & distances I cover while jogging thereby, calculate the total trip distance and average velocity during the trip.
Measurement philosophy: Assume a situation when , while walking , you turn back and walk the same path – the distance which is a function of Latitude and Longitude of the path in that case will be zero but actually you have traveled the path twice! To tackle the problem I’ve inserted a push_button (P) on digital pin-6 which needs to be pressed when one finds the path is turned, bend , repeated or not straight.
Say, you are jogging from A to B to C and finally come back to A again. The total displacement is zero but you actually walked the path – AB+BC+CA. To get the total path distance first press the button (P) at Point A [this will start the calculation ] then press it at B and then press it again at C and finally after arriving at A press it again. The total path distance – AB+BC+CA along with time in seconds you took to run the path and the time when you walked the path will get stored in the EEPROM memory of ATMEGA328. The display will show the last path reading and the total path reading – BC / (AB + BC) or CA / (AB+BC+CA)
A second button (Q) is provided on digital pin-7 . Press it and hold it , the screen will clear first and then it will show the total distance you walked ,total time you took along with the time when you walked and average speed in KMPH during the trip. This data will remain in the memory even after switch off the power. However, once the other button (P) is pressed, this data will be replaced by a new data.
Construction:
The construction is one of the simplest of the Arduino project. Find out a small piece of double sided PCB and then place the Arduino chip, OLED & the GPS receiver on the front side. The POT antenna of the GPRS is to be placed on the front side so that it can come in view of the GPS satellites. The Lipo cell may be clamped / soldered on the back side of the PCB. The digital pin-6 & 7 goes to switch P & Q respectively.
Testing: This is my moments of pleasure. Power the unit suitably with a Li-Ion battery and switch on the S1 and S2 both. In case you use bigger volt supply like 9V or 12V then keep the S2 in open mode.
Normal view (1) Switch-P pressed (2) Switch-Q pressed (3)
Take the unit to the open field – your area of morning workout. Take along your partner or girl friend to impress her with your new gadget ! Once the GPS receiver comes in view of the GPS satellite, the PPS led [Pulse Per Signal LED – usually 1 blink / second] will start and the OLED will get populated like in
picture (1) – When neither of P or Q is pressed
Latitude Longitude no_of_satellite
Time: HH:MM:SS Instant_Velocity
picture (2) – When P is pressed 1st time
Latitude Longitude no_of_satellite
Time: 05:23:27 Instant_Velocity
l/L: AB/AB 00 00
[00 – number count starts and 00 is the second count starts ]
picture (2) – When P is pressed other than 1st time
Latitude Longitude no_of_satellite
Time: 05:55:57 Instant_Velocity
l/L: CA/(AB+BC+CA) 03 1950
[03 – count number , 1950 – seconds elapsed ]
picture (3) – When Q is pressed
T:1950 L=2345 6.25
Time: 05:55:57
[1950 – seconds elapsed, 2345 - meters covered and 6.25 is the average speed in KMPH ]
Every time switch-P is pressed ,three data – the time elapsed, the distance covered and the time of pressing the switch-P goes into the EEPROM of the Arduino chip. I prefer Arduino ATMEGA328 for this exercise as they have 1024 bytes of ROM memory to work with.
On pressing switch-Q these data will reappear on the OLED like in picture (3). Every time you press switch-Q these data will reappear !
However, once the switch-P is pressed , it will be replaced by a new set of data.
BOM: Arduino Nano = $2.5
OLED 64x128 = $2.5
Ublox GPS = $7.0
Li-Ion cell = $3
= $15
Well, the major elements are the Arduino ,OLED, GPS Receiver and Li-Ion cell which costs around $15 from Aliexpress.com .The additional casing, PCB, Soldering etc. can be sourced from the local markets.
Aftermath:My daughter asks me why I prefer this device instead of a smart phone app - quite justified for new generation people. But I've my reasons too.
1> I hate to carry my cell while jogging - it's a distraction.
2> In the name of jogging there are more than 30 apps available in play store from 7MB to 181 MB. It
confuses me totally which one to use.
3> Few of the apps asks a good number of settings - stride length, body weight, height etc. I just run 6 /
7 kilometers everyday at 9 to 10 kmph and then relax. Don't need so much settings.
Had I need then I would have stood on a trademill first.
4> Almost all apps need Internet to work unlike this one.
5> This is a small unit, comes under one's grip / fist. Can be made into a key-ring if the
Nano is replaced by the SMD ATMEGA328 ,stripping all other things.
6> A smart phone comes not less than $150 but this one is 1/10 th of that.
Prototype:
Shown above.
Arduino Sketch: Attached
Aftermath:
As few of my friends used this personal speedometer during their daily workout session, they asked me few modifications which have been incorporated as follows. During the normal view (2) when the switch-P is pressed once, the meter will reset to zero. Now as the walker moves along, the run meter will increase in l/L parameters where l=instant distance ; L=Total distance. On the same line extreme right a battery monitor is added. As long as the voltage of the LiPo battery is more than 3.3 it will show ‘B+’ sign. Once it goes below 3.3 the sign will change to ‘B-’ which is the indication for recharging the Lipo battery.
For monitoring the health of battery I’ve added a voltage divider using a 390K & 330K resistor across the battery. Also I’ve used HT7333-1 3 pin regulator for it’s low drop out voltage and low quiescent current loss.
Modified normal view (1)
Modified Schematic:
Modified sketch: attached.
Bye, bye
Bera S
Want to build a project?
Bring your design to life with the Elektor PCB Service, powered by Eurocircuits. Upload the project files and order professionally manufactured PCBs or assembled boards through a proven European production platform.
Supporting KiCad, Eagle, Gerber, and ODB++ formats, the service is suitable for everything from prototypes and validation builds to series production and volume manufacturing.
Made in Europe. Fast. Reliable. Professional.
Discussion (1 comment)