Trying Out the Joy-it JT-PS1440-C 1.5 kW Power Supply (Review)
In these days of e-bikes, electric scooters and other vehicles, powerful programmable power supplies are essential for testing motors and charging batteries. Your faithful old adjustable 30-V, 2-A bench supply simply isn’t up to the job. Time to invest in a 1.5 kW programmable power supply? Check out the Joy-it JT-PS1440-C 1.5 kW power supply.
In these days of e-bikes, electric scooters and other vehicles, powerful programmable power supplies are essential for testing motors and charging batteries. And what about those huge, colorful LED displays with thousands of LEDs? They consume serious power, too. Your faithful old adjustable 30-volt, 2-ampere bench supply simply isn’t up to the job. Check out the Joy-it JT-PS1440-C 1.5 kW power supply.
JT-PS1440-C In the Box
In such situations, the Joy-it JT-PS1440-C can be just what you need. With an output voltage of up to 60 V DC and an output current of up to 24 A, it can supply almost 1.5 kW (1440 W to be exact). Furthermore, it has a special battery charging mode with its own output and capacity measurement.
The JT-PS1440-C comes in a cardboard box together with a power cord (European CEE 7/7 plug), a temperature sensor, a spare fuse, a safety notice and a printed manual in German, English and French. The set weighs 3.5 kilograms; the PSU itself weighs a bit over 3.3 kg. It measures 17 cm by 9 cm and is 33 cm deep. These are very modest figures for a PSU capable of supplying almost 1.5 kW.
Colorful Display
The box and manual proudly mention that the JT-PS1440-C is ready-to-use (why wouldn’t it be?) and indeed, after plugging it in and switching it on, it is ready to use. The 2.4″ display is colorful and shows a lot of information. It features eight parameters plus status bars at the top and bottom. The bar at the top displays the time and date (why?) and some status icons. The bar at the bottom has four indicators and a parameter that continuously cycles through three values: Ah, Wh and temperature. A setup menu lets you choose between three display types, and you can adjust the color for each parameter.
Subscribe
Tag alert: Subscribe to the tag Power & Energy and you will receive an e-mail as soon as a new item about it is published on our website!
Outdated Manual
When playing around in the setup menu, it becomes quickly clear that the manual is outdated. The real menu doesn’t look like the printed menu, and the available options are different. Unfortunately, there is no recent version of the manual on the product's webpage.
As mentioned before, the printed manual is in German, English and French, but two additional languages are available for the PSU’s user interface: simplified Chinese and Russian. There are three instead of two screen layouts, while the possibility to adjust colors is not mentioned at all. Also, it mentions two cryptic ‘Call’ settings that in reality are even more cryptic: ‘Take Ok’ and ‘Take Out’. They refer to presets (‘data groups’ in the manual). When ‘Take Ok’ is activated, the user must confirm the change of a preset. When ‘Take Out’ is activated, you don’t get (simplified) Chinese food, but the PSU’s output will be switched on as soon as you choose a new preset.
Also, the setup menu shows four icons or buttons at the bottom, but nowhere is mentioned how to use them nor what they are for.
Under the Hood of the JT-PS1440-C
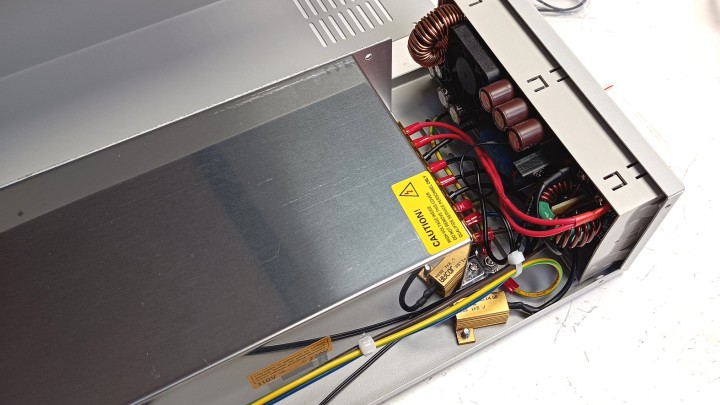
The safety notice included in the box shows a somewhat different product. It has the same user interface, but it looks only about 5 cm deep. It also mentions an input voltage of up to 70 V DC, which is surprising for a device with a 230 V AC power cord. The explanation is that the JT-PS1440 is a modular design, like the Joy-it RD-6006. They even look identical, the only difference being the model number printed on them. The RD-6006 is a programmable DC/DC converter that requires an external DC power supply. A kit to turn it into a regular bench supply is available for it. The JT-PS1440-C (note the ‘C’) follows the same design, except that it comes fully assembled.
If you remove the cover, you see a shiny 1500 W AC/DC converter module connected to the DC/DC converter and control module JT-PS1440 (without ‘C’). It all looks very neat. Note that you are allowed to remove the cover, as doing this provides you with access to the replaceable fuse. The warranty seal doesn’t seal anything. Also, it is possible to plug a Wi-Fi module on the controller module. This is probably the same ESP8266-module as the one for the RD-6006 (ref. JT-RD6006-Con).
Subscribe
Tag alert: Subscribe to the tag JOY-iT and you will receive an e-mail as soon as a new item about it is published on our website!
PC Software
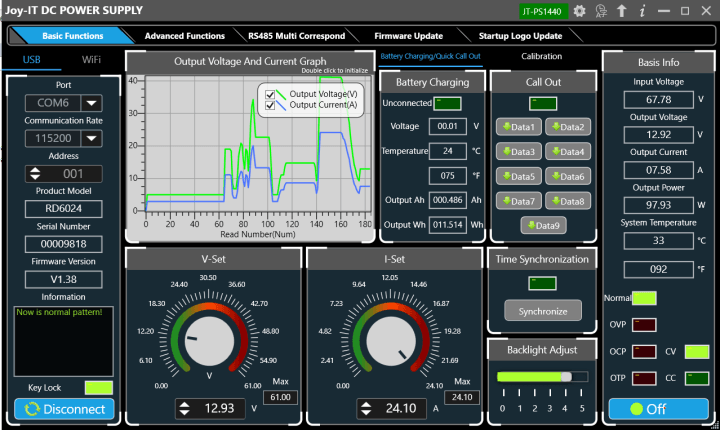
The JT-PS1440-C has a USB interface on the front panel to connect it to a computer. The corresponding software is somewhat challenging to find, as it isn’t listed on the product’s webpage. I did find a link on the product page of the RD-6006 and since the JT-PS1440 looks very much like it, I downloaded and tried that program. No installation is required (you may need to install a CH340 serial port driver) and after launching it looked exactly as shown in the user manual. However, after clicking the ‘Connect’ button, a pop-up told me “No support this product model!”.
The solution is to click the ‘Software Update’ button. This shows a link from where you can download the most recent version. Copy this link into a browser and download the file (as the program doesn’t do it for you). Launch the new program and click the ‘Product selection’ cog wheel to select the JT-PS1440. Now you can control the PSU. Joy-IT DC Power Supply V1.0.0.15 or higher is required.
Looking closely at the program, you’ll notice a ‘Product Model’ number ‘RD6024’. Also, the name of the program in the Windows taskbar is ‘Riden Power Supply Software’. Indeed, the JT-PS1440-C is the Joy-it version of the Riden RD6024. Once you know this, you can find a more recent manual for it on the internet.
Note that when the PC controls the power supply, the PSU's buttons cannot be used. All adjustments are done on the computer.
Try the JT-PS1440-C
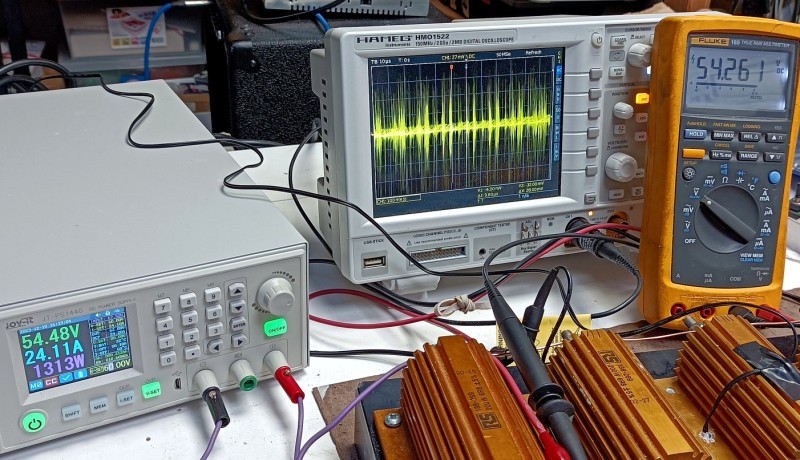
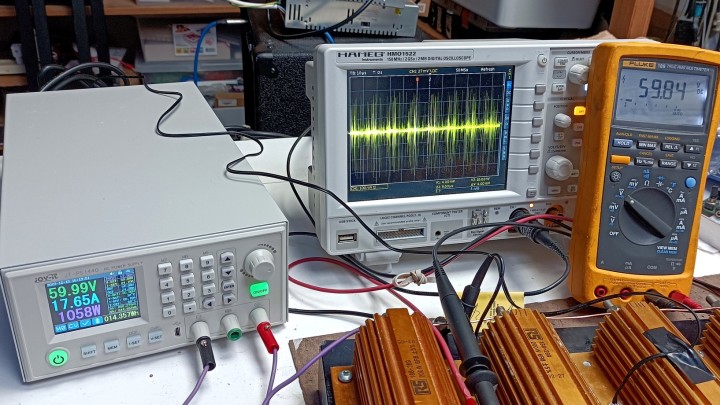
Reporting about issues in the user interface is amusing, of course, but it doesn’t tell you much about the power supply’s performance. Unfortunately, I do not have a 1.5-kW load like a big electric DC motor* or a battery, but I do have four 200 W, 6.8 Ω power resistors. Mounted in parallel (on a heat sink), they measure 1.7 Ω. I connected this passive load to the PSU ‘+’ and ‘−’ outputs (red and black) with a voltmeter and an oscilloscope in parallel, so I could observe the voltage drop and noise. I set the current limit, overcurrent protection and overvoltage protection to their maximum values (24.1 A, 24.2 A and 62 V respectively).
Starting at 5 V, 2.92 A, I pushed 14.57 W in my load (according to the PSU). The PSU showed 4.99 V, the multimeter 4.98 V. The oscilloscope showed 70 kHz spikes with a peak-to-peak value of 100 mV and an average of approx. 20 mVPP. At 10 V, the current went up to 5.85 A (58.44 W). The PSU showed 9.99 V, the multimeter 9.95 V. The spikes became somewhat bigger with a peak-to-peak value of 110 mV.
The next stop was 100.1 W (VOUT: 13.07 V; IOUT: 7.66 A). The multimeter showed 13.01 V; the spikes went up to 130 mVPP. Doubling the output power at every step, I went up to 800.3 W (VOUT: 36.85 V; IOUT: 21.72 A). At this power level, the spikes no longer have a discernible frequency. The average noise amplitude was 100 mVPP with spikes of approx. 500 mVPP. My test maxed out at 982.5 W because I had reached the maximum output current of 24.1 A (VOUT: 40.77 V; 40.56 V on the multimeter). The average noise amplitude was 150 mVPP with spikes of approx. 700 mVPP.
Disconnecting one resistor from the passive load increased its resistance to 1.96 Ω. This allowed me to push the output power to 1,313 W (i.e. 1.3 kW; VOUT: 54.48 V; IOUT: 24.11 A). The average noise amplitude was 200 mVPP with spikes of approx. 800 mVPP. 1313 W into a resistive load. The oscilloscope's settings are vertical: 100 mV/div; horizontal 10 µs/div.
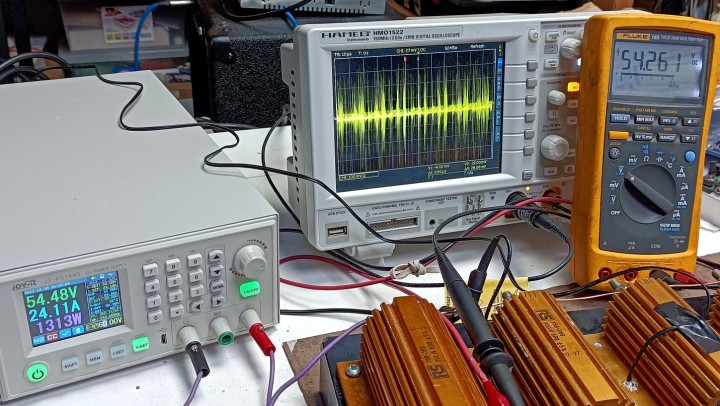
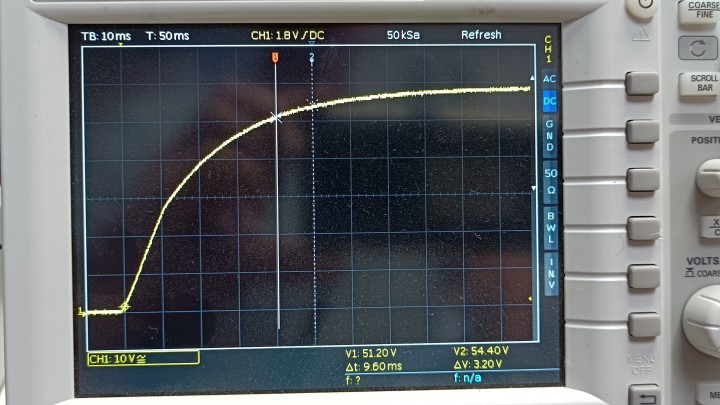
Disconnecting a second resistor increased the resistance of the load to 2.65 Ω. Now the output voltage could go all the way, but not the current, and the output power dropped to (a mere) 1,058 W (VOUT: 59.99 V; IOUT: 17.65 A). The average noise amplitude was 100 mVPP with spikes of approx. 600 mVPP. A quick & dirty rise time check at this setting gave about 240 ms from 10% to 90%.
Not the fastest power supply at 1 kW output power, but no overshoot.
Battery Charger
Battery-charger mode is a kind of manual affair without fancy features like cell balancing. All you can do is specify a charge current and a maximum voltage and a maximum battery temperature. A temperature sensor to do this is included and connects to the rear of the JT-PS1440. When charging is in progress, the capacity counter runs, but I didn’t see a timer. When the charging current drops below the programmable cut-off current, or when the temperature becomes higher than the (programmable) cut-off temperature, the charger switches off.
Testing battery charger mode with a passive load only is not possible. Without a minimum voltage of something like 0.9 V connected to the battery output connector, the PSU does not activate battery-charger mode. I had hoped to test the battery over-temperature protection of the battery charger, as this doesn’t apply to power supply mode. However, not having a suitable battery at my disposal, I was unable to do this.
Subscribe
Tag alert: Subscribe to the tag battery charger and you will receive an e-mail as soon as a new item about it is published on our website!
Conclusion
The JT-PS1440 seems to be a capable power supply, living up to its specifications. It is compact and lightweight, especially considering the power it can deliver. It doesn’t seem to have any difficulties pushing out hundreds of watts. Of course, a more in-depth test is needed to find out what it really is capable of, but at around €300, i.e. about €0.25/W, it is certainly not too expensive.
The PS1440 is also a basic battery charger, but I didn’t try that function because I didn’t have a suitable battery at my disposal. However, I am not even sure if I had dared to try it at the power levels the PSU is capable of. I’ll leave it to the more adventurous to burn their lab down.
Warning: high power requires proper cabling. Banana test leads are usually rated for 3 A max. I used solid copper mains wiring soldered to banana plugs. 60 V, 1 kW into a resistive load. The oscilloscope's settings are vertical: 100 mV/div; horizontal 10 µs/div.
* According to the manual of the JT-PS1440-C, you should not connect inductive loads unless you also provide reverse current protection.
Elektor Magazine has been one of the leading sources of information on electronics for engineers, designers, start-ups and companies for 65 years. Our magazine is powered by an active community of electronics engineers – from students to professionals – who are passionate about designing and sharing innovative ideas.
For them, we publish hundreds of items a year, in formats such as articles, videos, webinars, and other learning formats. Our mission is to share knowledge in every possible way and inspire readers with the latest developments within the electrical engineering sector.
Thank you for your vote!
Leave further comments in the fields below.
Thank you for your vote!
If you wish to leave a comment with your rating, please first use the login below. If not, just close this window.

Discussion (2 comments)