I have been using drones for educational courses (online and classroom based) where drone programmability has been an important concern. The drone I have mainly been using, the Ryze/DJI Tello, has been withdrawn from commercial sale, and I am looking for inexpensive alternatives to use in my courses instead. When the M5Stamp Fly was announced, I was hoping that this platform could be the alternative I was looking for. Does it qualify in this regard?
I have been using drones for educational courses (online and classroom-based) where drone programmability has been an important concern. The drone I have mainly been using, the Ryze/DJI Tello, has been withdrawn from commercial sale, and I am looking for inexpensive alternatives to use in my courses instead. When the M5Stamp Fly was announced, I was hoping that this platform could be the alternative I was looking for. Does it qualify in this regard?
Introduction
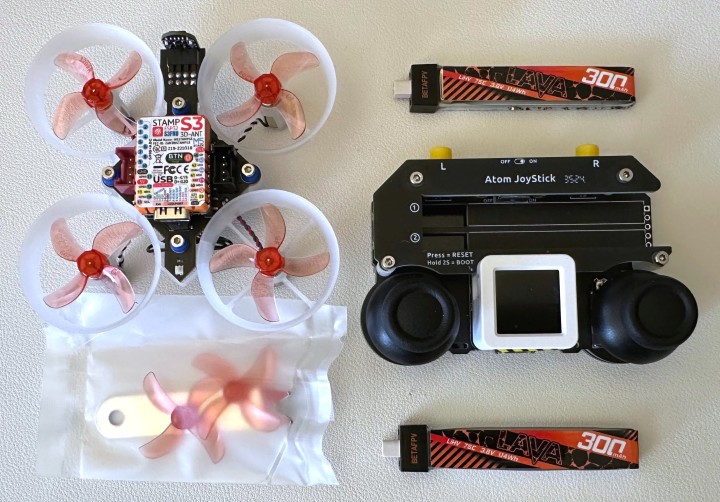
The controller and drone come as separate products, but out of the box, there is no way to fly the M5Stamp Fly without the M5Atom Joystick.
M5 Stamp Fly and M5Atom Joystick Unboxed.
Here is what you get in the two product boxes:
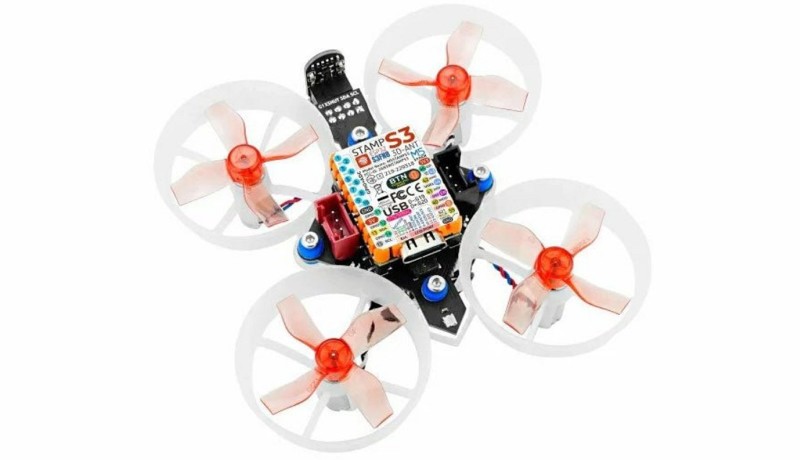
M5Stamp Fly drone
Two batteries (one in each box)
Two spare propellers with a propeller removal tool (one for right rotation and one for left rotation)
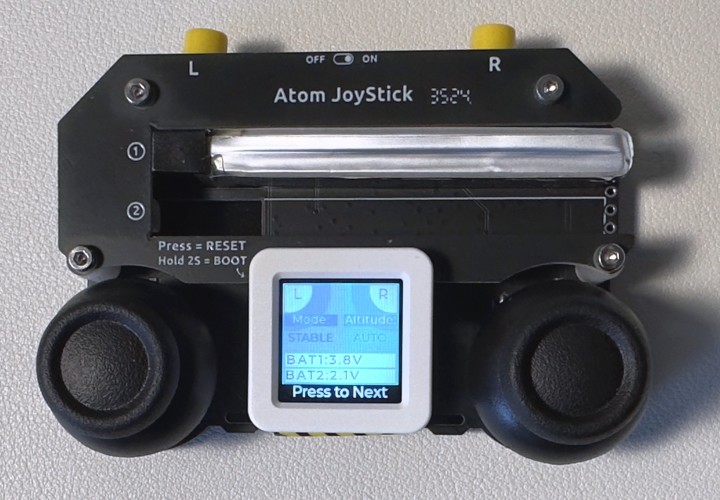
M5Atom JoyStick Controller
There are two charging slots in the body of the Joystick device where both batteries can be recharged using a USB-C charging cable (not supplied in either box).
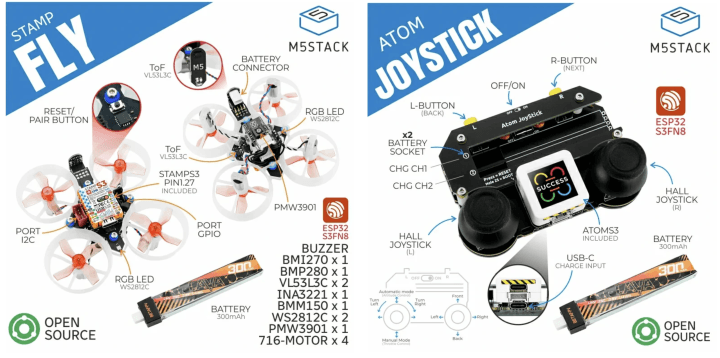
M5Stamp Fly Product Summaries
The Elektor Product Pages can be found here: M5Stamp Fly and M5Atom Joystick. These pages contain M5STACK-supplied pictorial summaries of the Stamp Fly and Atom Joystick Controller as shown below. Side by side Stamp Fly and Atom Controller summaries.
The product pages both have a reference to the same video that documents the pairing process for the Fly and Joystick controller. While there is a brief flying demo at the end of the video, there is no help within the video to orient a new user on how to use the joystick controls to safely fly the drone. Hints on this are provided in the First Flight discussion below.
Notable included features of these devices are highlighted in each figure. Each device is based on an ESP32S3FN8: StampS3 on the drone and Atom CoreS3 on the Joystick. Both are connected to the main PCB through pin headers and are thus removable.
In addition, the Stamp Fly includes a BMI270 IMU sensor, a BMM150 magnetometer, a BMP280 pressure sensor, two VL53L3C Time-of-Flight (ToF) sensors, a PMW3901 optical flow sensor, a Reset/Pair button for pairing and calibration reset, and two WS2812C status RGB LEDs (top and bottom).
The Atom Joystick includes an additional MCU (STM32F030), two buttons for settings changes, two Hall effect joysticks, two RGB LEDs for battery charge monitoring for each charge bay (red means charging is happening and green means charging is complete), and a USB-C charge port.
Setting Up the M5Stamp Fly
While not necessary, there are instructions here: Updating Firmware on how to update the firmware to the latest official version. I performed a firmware update because I wasn’t sure whether the behavior I observed during a takeoff attempt in Altitude Auto mode was expected. After updating the firmware, the Joystick and Fly must be paired again if you have paired the drone and controller previously. Once paired, you are ready to fly the drone with the controller.
Pairing Process
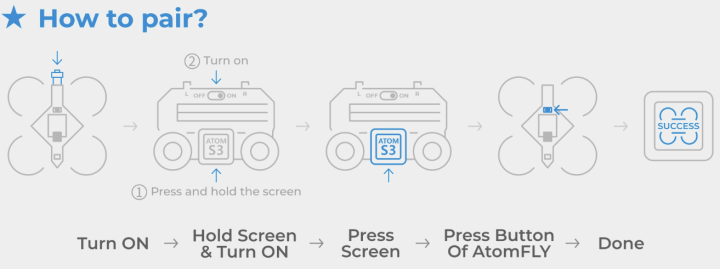
The pairing process is summarized in the following figure. Stamp Fly and controller pairing process.
Press and hold the center button on the Atom to power on, then follow the screen prompts to enter pairing mode by pressing the button again.
Press the reset button on the Stamp Fly to send the pairing signal.
Wait for pairing to complete.
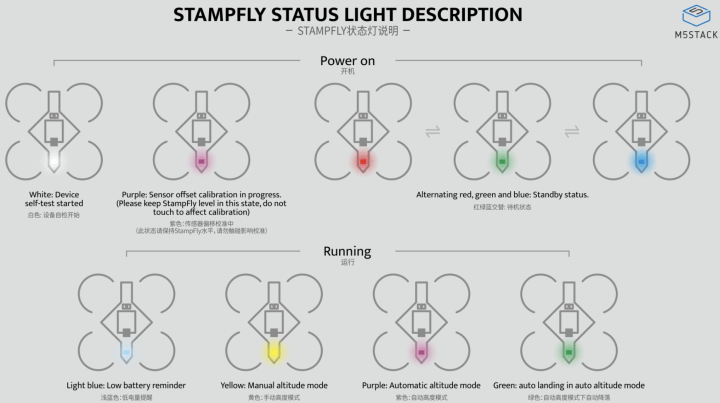
LED Status Lights of the M5Stamp Fly
Before flying, it is helpful to learn the meaning of the LED status light colors that appear on the rear of the Fly, as seen here. The same LED status light effects are shown on the LED at the bottom of the Stamp Fly. Stamp Fly status light meanings.
The top set of illustrations documents Power On effects, and the bottom shows operational ones. You can cause a self-check with the Fly on the ground by pushing the reset button on the top front of the Fly just below the M5Stamp S3 board. This will rerun the self-check.
Power On
White: Device self-check initiated.
Purple: Sensor offset calibration in progress (keep the Stamp Fly level and avoid touching to prevent calibration interference).
Red, green, and blue alternating: Standby mode (ready for takeoff).
Operation
Light blue: Low battery warning.
Yellow: Manual altitude mode.
Purple: Auto altitude mode.
Green: Auto descent in auto altitude mode.
First Flight
The firmware documentation page summarizes the two function modes as follows, along with the “trick” flight effect of a flip.
Left front button on Atom Joystick (Control Mode switch)
Stabilize Mode: Provides stable control, suitable for regular flight and cruising.
Sport Mode: Offers maximum control freedom, allowing for complex maneuvers but requiring high operational skill.
Right front button on Atom Joystick (Altitude Mode switch)
Auto Altitude: Maintains a stable altitude at the set level; pushing the left joystick up or down will change the set altitude.
Manual Altitude: Full throttle control of altitude, requiring higher operational skill.
Center button on right joystick (Aerial Flip action)
Controller Operation
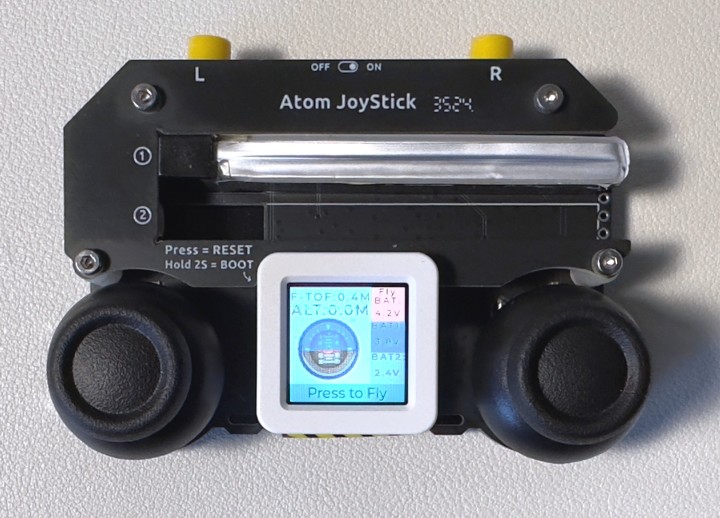
When in Auto Altitude mode (recommended for inexperienced fliers), the screen button on the controller is used to initiate takeoff when the Ready-to-Fly message appears on the screen, as shown in the Artificial Horizon illustration below. While in flight, press the controller screen button to land.
You should make sure the Controller screen indicates that the flight modes are set as shown in the next picture of the CoreS3 controller screen. Flight modes are set with the yellow buttons at the top of the Controller as shown in the unboxed controller picture above. Flight modes set for first flight.
M5Stamp Fly Flight Experience
After the firmware was updated, I was a little braver in my flight actions and in auto altitude. Once takeoff happens, I can assert control with the right joystick to keep the Fly from drifting off. The altitude gets a little higher when that happens. The altitude holding wasn't very good but still did not need a lot of micromanaging using the left joystick. The drone did yaw a bit without joystick intervention, but I could use the left joystick to compensate. Usually, the altitude changed a little too, when I did this, but not drastically. Most of the time, the land button (center screen button) worked to land the Fly. You need to always be attentive with the right joystick to keep the Fly stable.
When flying, the LCD screen on the AtomS3 shows an artificial horizon that indicates the Fly's flight orientation in real-time. Flight controller artificial horizon view.
If you leave the right joystick in a center/home position without hands-on, the joystick does NOT provide drift-free/hover behavior, and the Fly will drift unless controlled using the right joystick. I expected that this takeoff and hover positioning would have occurred based on my experiences flying the Tello drone. I think my expectation was incorrect because the Altitude Auto setting (sometimes called Altitude Hold for other drone platforms) is not the same as Position Hold, which the Tello does support. In Position Hold mode, the drone would assume a hover position with only a minimal amount of drift without touching any joystick.
Open-Source Considerations
Both the M5Stamp Fly drone and the Atom controller have GitHub pages. The code is presented as running using the PlatformIO framework rather than the Arduino IDE. I looked for but did not find instructions to help with programming the M5STACK devices reviewed here using Arduino. Other M5STACK devices seem to be well supported from the Arduino perspective and perhaps I am just missing an illustrative example to learn to perform some basic programming of alternate flight control patterns, such as implementing Position Hold.
ESP-NOW
The main communication protocol used for controller-to-drone communication is ESP-NOW. This protocol is very well documented and numerous examples exist, including many that work inside the Arduino IDE for ESP32 platforms in general. In fact, the picture at the top of the ESP-NOW page shows a dual Joystick controller that looks very much like the controller sold as the flight controller for the Stamp Fly drone.
There is no high-level description of the basic API, at least none that I have been able to find. There is nothing like the Tello drone API information that was published by the Tello production company Ryze/DJI, which has been used in a number of independent projects, including a robust Python library called DJITelloPy.
Note that the Tello uses WiFi communication to receive flight commands from external devices like the ESP32 controller I have built for my courses. This communication style is well documented.
Since the Stamp Fly and Atom Joystick firmware source is available on GitHub, it should be possible to reverse engineer both a rudimentary API and the ESP-NOW communication mechanisms used between these devices.
Conclusion
For manual flight, the Stamp Fly performs as minimally documented in the M5STACK online information pages. There are no significant printed materials included in the product boxes except the status light summary as a small paper insert and the pairing process printed on the rear sides of each box. Each of these is summarized above in the review.
Manual Flight
With proper coaching, the drone is easy enough to control so that kids might enjoy flying the drone using Stable Control Mode and Auto Altitude. If someone has experience with drone flying with the same Joystick setup: Throttle and Yaw with the Left Joystick and Pitch and Roll with the Right joystick, they can fly with Sport Mode and Manual Altitude. Since I was testing this product in an indoor location with limited air space, I did not try this method of flying.
Programmed Flight
This product is not yet positioned to take the place of the Tello in the educational drone space. For this to happen, the API documentation must be refined to describe the basic communication patterns employed as well as a list of commands that can be sent from the controller to the drone. Also, programmable flight requires at least an approximation of Position Hold flight behavior so that a Takeoff and then Hover opening flight action without joystick intervention must be possible.
I plan to do some research of my own to see if I can learn the inner workings of the Stamp Fly and drone to controller communication. I would like to adapt my own ESP32 controller that flies the Tello to also fly the Stamp Fly.
Elektor Magazine has been one of the leading sources of information on electronics for engineers, designers, start-ups and companies for 65 years. Our magazine is powered by an active community of electronics engineers – from students to professionals – who are passionate about designing and sharing innovative ideas.
For them, we publish hundreds of items a year, in formats such as articles, videos, webinars, and other learning formats. Our mission is to share knowledge in every possible way and inspire readers with the latest developments within the electrical engineering sector.
Thank you for your vote!
Leave further comments in the fields below.
Thank you for your vote!
If you wish to leave a comment with your rating, please first use the login below. If not, just close this window.

Discussion (0 comments)