
Review: Raspberry Pi Power over Ethernet HAT
A closer look to the PCB
The HAT coms with a small fan that will cool your CPU automatically. If your system runs on heavy load, for example decoding DAB+ via an SDR approach with Welle.io, the fan will prevent throttling of the CPU due to over temperature. The profile that sets the fan speed can be altered by modifying the PoE HAT overlay file. Be aware that currently there are changes ongoing in the driver for the fan and that using the latest files for the overlay may lead to a not working fan. So currently if the fan is working and you don’t have a reason to change it, you should not try to mess around with the file until the driver becomes stable.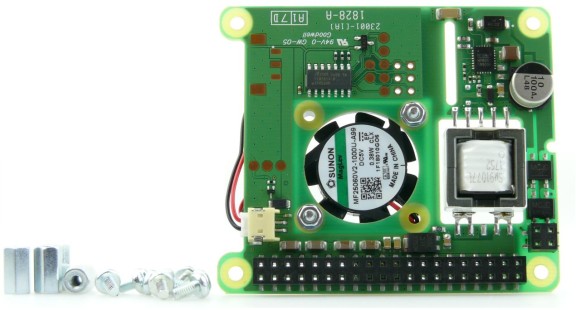 As you have read so far you may ask, what kind of magic they put on the HAT to make it work. As you can see from the photo they used a Atmel ATtiny814 for the fan PWM control and also emulate a I²C EEPROM to supply the HAT information to the Pi. The fan is not directly connected to the AVR as the current would be unhealthy for the IO-pins but they have used a small transistor to handle the current. For the PoE part they have used a MPS MP8007 in a flyback configuration. This means you get a power supply with a galvanic isolation from the power source. This also avoids, in a case of a failure on the power side, that the Pi or the use get harmed, or you may have currents flowing around your PoE devices that are undesired. But the power supply produces a small high pitch whipping noise, depending on the load the system has. If you easily annoyed by such sounds, than be aware of this.
Some small anoying parts
Concerning noise, we also have the fan. During normal operation it will sometimes kick in an cool the system, running at gently speed and noise, during a longer period of high CPU load the fan speeds up and increases noise. As we have a small 25x25 mm one, this sound is like the one you get for the earlier netbook models.If you put the Pi with the HAT in a remote location or a server rack, this is not really a problem. If you already have a Pi 3B+ and installed cooling elements already on the chips, be warned that you could run out of space and won’t be able to attach the HAT at all. Also if you like to add an additional Shield on top of the Pi, like 3,5” TFT, you need to add stackable header and change the spacer. It’s sort of a pity that the kit doesn’t include the required components to stack more shields on it. If you need to remove the HAT, here are some words of warning. The small 2x2 header should be one of the first things to be disconnected when lifting up the HAT, else, if it is the last one, you may sheer this component from the PCB.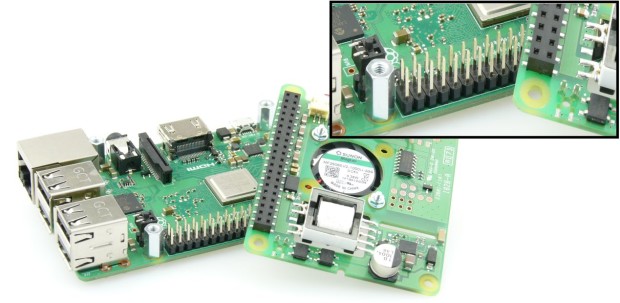
As you can see from the images, during the usage, this has happened. Luckily the PCB was not damaged and the part could be attached back to the HAT. Besides the small weaknesses, this is a solid HAT, and if you like to power your Raspberry Pi 3B+ over ethernet, this might the shield to be used.
Read full article
Hide full article
Discussion (0 comments)