
HW 083 Hack evolution charger
I was faced with two problems: the first concerns my tracker, I needed to recharge a 6V 1.2Ah PB battery the second, my cabin in the woods, I needed a 5V2A charging station to charge my smartphone.
There are different methods for the two problems, and, taking into account a few details, I opted for a charger of type HW083.
During my tracker test, I noticed that, with the 12v vehicle battery disconnected, the 6V tracker battery voltage returns to the HW083 charger and turns on its led!
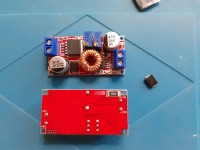
The product corresponding to my choices, I made a small modification on the output of the HW083.
As the charger does not have an output diode, I cut the + Vout track and I insert a schottky diode in series type B360 that I had in my drawers .
Disadvantage:
we deprive the voltage regulator of feedback. (not useful in my prototypes)
The B360 schottky diode delivers 3A which limits the output current, quite sufficient for my prototypes.
Advantages :
ideal for recharging a PB type battery (which with TinyTilt team MonTracker ... coming soon :))
make a charging station calibrated at 5V 2A (which I use in the woods with a 12V battery to recharge my smartphone)
1. Power supply current: 3A (Or maximum 5A with a schottky supporting this current )
2. Input voltage: 5-32V
3. Output voltage: 0.8-30V (minus diode voltage 29,6V)
4. Switching frequency: 300KHz
5. This module is an adjustable step-down module, and the output voltage can be changed by adjusting the blue adjustable resistor on the module.
The input and output voltage difference is 1V, and the small voltage can output 0.8V.
6. Working temperature: -40 to 85 degrees Celsius
7. Size: 51x26.3x14mm
Battery charging method:
1. Determine the float voltage and charging current of the rechargeable battery you need, and the input voltage of the module;
2. Adjust the constant voltage potentiometer to adjust the output voltage to about 5V.
3. Measure the output short-circuit current with the 10A current block of a multimeter, and adjust the constant current potentiometer to make the output current reach the predetermined charging current value;
4. The default shipping current of the charging lamp is 0.1 times the charging current (constant current value).
5. Adjust the constant voltage potentiometer to make the output voltage reach the float voltage;
6. Connect the battery and try charging.
////////////////////////////////////////////////////// FR
J'ai été confronté à deux problèmes :
le premier concerne mon tracker, j'avais besoin de recharger un accu PB de 6V 1,2Ah
le deuxième, ma cabane des bois, j'avais besoin d'une station de charge 5V2A pour recharger mon smartphone.
Il existe différentes méthodes pour les deux problèmes, et , en prenant en compte quelques détails, j'ai opté pour un charger de type HW083.
Lors de mes test tracker, je me suis aperçu que, batterie 12v véhicule déconnectée, la tension de batterie tracker 6V retourne dans le chargeur HW083 et fait allumer sa led !
Le produit correspondant à mes choix, j'ai pratiqué une petite modification sur la sortie du HW083.
Le chargeur ne disposant pas de diode en sortie, je coupe la piste +Vout et j'insère une diode de type schottky en série.
Inconvéniant :
on prive le régulateur de tension de feed back. (non utile dans mes prototypes)
Avantages :
idéal pour recharger une batterie de type PB (qui avec TinyTilt équipe MonTracker...à venir :))
réaliser une station de charge calibré à 5V 2A (qui me sert dans les bois avec une batterie de 12V pour recharger mon smartphone)
Caractéristiques initiales
1. Courant d'alimentation : 5A
2. Tension d'entrée : 5-32 V
3. Tension de sortie : 0,8-30 V
4. Fréquence de commutation : 300 KHz
5. Température de fonctionnement : -40 à 85 degrés Celsius
6. Taille : 51 x 26,3 x 14 mm
Méthode de charge de la batterie :
1. Déterminez la tension d'entretien et le courant de charge de la batterie rechargeable dont vous avez besoin, ainsi que la tension d'entrée du module ;
2. Ajustez le potentiomètre à tension constante pour ajuster la tension de sortie à environ 5V.
3. Mesurez le courant de court-circuit de sortie avec le bloc de courant 10A d'un multimètre et ajustez le potentiomètre à courant constant pour que le courant de sortie atteigne la valeur de courant de charge prédéterminée ;
4. Le courant d'expédition par défaut de la lampe de charge est de 0,1 fois le courant de charge (valeur de courant constante).
5. Ajustez le potentiomètre à tension constante pour que la tension de sortie atteigne la tension flottante ;
6. Connectez la batterie et essayez de charger.
Want to build a project?
Bring your design to life with the Elektor PCB Service, powered by Eurocircuits. Upload the project files and order professionally manufactured PCBs or assembled boards through a proven European production platform.
Supporting KiCad, Eagle, Gerber, and ODB++ formats, the service is suitable for everything from prototypes and validation builds to series production and volume manufacturing.
Made in Europe. Fast. Reliable. Professional.
Updates from the author