
Talking colorimeter with AI-generated voice
People with visual impairments find it difficult or even impossible to recognize colors. Be it in the choice of clothes or in the preparation of food, for example, to distinguish red, yellow and green peppers. There are countless other examples to show how helpful it would be to have a device that tells you what color an object is. Red-green weakness in particular is widespread. This colorimeter is designed to help solve this problem.
- White balance with storage of the determined RGB offset values
- Output of the determined color with AI-generated voice
- Broadband recognition of the colors red, green, blue, yellow, orange, pink, violet, brown, grey, cyan, black and white
The hardware
The hardware effort is quite low, as ready-made modules are used:
- Arduino Nano
- JOY-IT Colorimeter TCS3200
- Speaker 8 Ohm
- Coil 1mH
- DFPlayer - A Mini MP3 Player
- Micro SD Card FAT32 formatted
- Button
- Diode 1N4001
The most interesting component is the colorimeter with the chip TCS3200. It has an 8x8 photodiode matrix, i.e. 64 sensors, which are equipped with a red, green, blue and a clear filter. The color filters are used to weight the primary colors of the incident light. Based on the output frequency generated, conclusions can be drawn about the intensity of the respective color in the light spectrum. The typical output frequency is between 2 Hz and 500 KHz. The output frequency can be scaled in four stages, depending on the use case: no scaling, 2%, 20%, and 100%. For my use case, the 20% scaling has established itself as the best variant.
Since the DFPlayer Mini MP3 Player produces minimal noise, I connected a coil with an inductance of 1mH in series to the speaker. This 6 dB low-pass filter with a cut-off frequency of 1500 Hz is sufficient to achieve very good voice audio quality.
The software
The following libraries must be included in the Arduino program code:
- DFRobotDFPlayerMini.h (Provides functions for controlling the Mini MP3 Player)
- SoftwareSerial.h (Provides serial communication capabilities with the Mini MP3 Player)
- EEPROM.h (Provides functionality to use the Arduino EEPROM)
In order to realize an easily understandable voice output, I decided to use MP3 files. DFPlayer supports various ways to play MP3 files. I decided to use the playMp3Folder variant, which expects the files to be numbered in the MP3 directory on a FAT32 formatted micro SD card. It is important to make sure that the file name consists of 4 digits, a point and the suffix mp3. In my application, for example, the file name 0001.mp3 stands for the color red.
Since I didn't like my own voice, I resorted to an AI-generated voice after some experimentation. There are many ways to convert text to speech on the https://ttsmp3.com website. Personally, I ultimately liked an AI-generated female voice the most.
If you want to hear the color names in a different language or with another voice, you have to adjust the following MP3 files:
0001.mp3 = Red
0002.mp3 = Green
0003.mp3 = Blue
0004.mp3 = Yellow
0005.mp3 = Orange
0006.mp3 = Pink
0007.mp3 = Violet
0008.mp3 = Brown
0009.mp3 = Gray
00010.mp3 = Cyan
00011.mp3 = Black
00012.mp3 = White
0013.mp3 = White balance completed successfully
0014.mp3 = Unknown color
When selecting the supported colors, I decided on 12 colors, which are recognized relatively widely. In the program code, anyone can expand the bandwidth in the program code or go into more detail about the resolution. To make this task easier, an output for the serial monitor is already implemented in the program code in the IDE, in order to be able to immediately read the determined values for the individual colors based on your own measurements.
Construction and commissioning
The construction of the circuit is quite simple and can be done quickly, as only wire connections to the individual boards have to be made, without any board assembly.
In order to be able to get started right away during the first commissioning, the color offset values were predefined in the program code. For example, if you have a red sheet of paper at hand, place the colorimeter with the LEDs on the paper and briefly press the S1 button. Now the correct color should be named immediately. If no color is detected, a corresponding voice output should be heared.
I recommend carrying out a white balance before using it for the first time, as the sensors can have slight deviations. To do this, place the colorimeter on a white sheet of paper or a white surface and press the S1 button for about 10 seconds. After releasing the button, a message should be heared indicating that the calibration has been successfully completed. The determined values are stored in the EEPROM of the Arduino and used as new reference values.
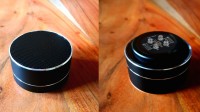
The image colorimeter.png shows what the finished color measuring device could look like - here installed in the housing of a small Bluetooth speaker.
Want to build a project?
Bring your design to life with the Elektor PCB Service, powered by Eurocircuits. Upload the project files and order professionally manufactured PCBs or assembled boards through a proven European production platform.
Supporting KiCad, Eagle, Gerber, and ODB++ formats, the service is suitable for everything from prototypes and validation builds to series production and volume manufacturing.
Made in Europe. Fast. Reliable. Professional.
Discussion (3 comments)