
Build a Tiny Shiny Christmas Star
December 21, 2021
on
on
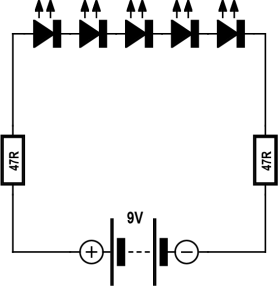
Let's take a look at a nice little decoration to light up your home during the holiday season! As the schematic diagram shows, the real challenge is to make a nice-looking Christmas star construction, like we did. The circuit itself is not exactly rocket science. The five LEDs and two resistors are all connected in series with the battery. The resistors serve to limit the current through the LEDs to a safe value.
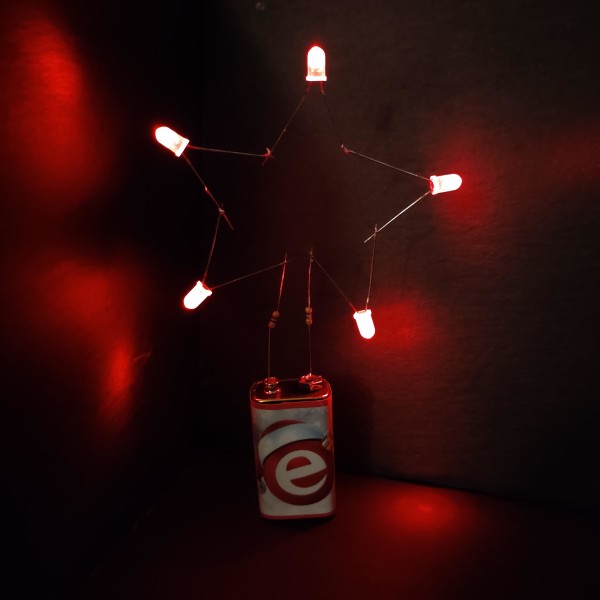
When you have done this, the resistor connected to the LED with a shorter lead can be soldered to the negative battery terminal. To switch on the Christmas Starlet, insert the other resistor (connected to the LED with the longer lead) into the positive terminal of the battery. The battery can be decorated with a wrapper or enclosure of your own design.
Easy enough and nothing can go wrong if you pay attention to the polarity of the LEDs and the battery, or… There is a catch though! The forward voltage of a red LED can be in the range of 1.6 V to 2 V. With five in series, the total voltage across the LEDs will (roughly) be between 9 V and 10 V, depending on the type of LEDs used. A new, uncharged 9V battery will have an open terminal voltage of 9.3V, enough to at least light up most of the red LEDs, though not at full power and brightness.
BOM
Tools required for the project:
We wish you a merry and shiny Xmas!
Soldering
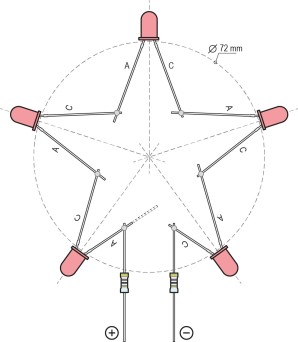
Solder the leads of the LEDs and the resistors together in the formation shown in the picture. The longer lead of a LED must always be connected to the shorter lead of the neighboring LED.When you have done this, the resistor connected to the LED with a shorter lead can be soldered to the negative battery terminal. To switch on the Christmas Starlet, insert the other resistor (connected to the LED with the longer lead) into the positive terminal of the battery. The battery can be decorated with a wrapper or enclosure of your own design.
Easy enough and nothing can go wrong if you pay attention to the polarity of the LEDs and the battery, or… There is a catch though! The forward voltage of a red LED can be in the range of 1.6 V to 2 V. With five in series, the total voltage across the LEDs will (roughly) be between 9 V and 10 V, depending on the type of LEDs used. A new, uncharged 9V battery will have an open terminal voltage of 9.3V, enough to at least light up most of the red LEDs, though not at full power and brightness.
BOM
- 5 pcs. red LEDs
- 2 pcs. 47 Ω resistors
- 1 pc. 9 V battery
Tools required for the project:
- Soldering iron
- Solder wire
- Small cutters
We wish you a merry and shiny Xmas!
Read full article
Hide full article
Discussion (0 comments)