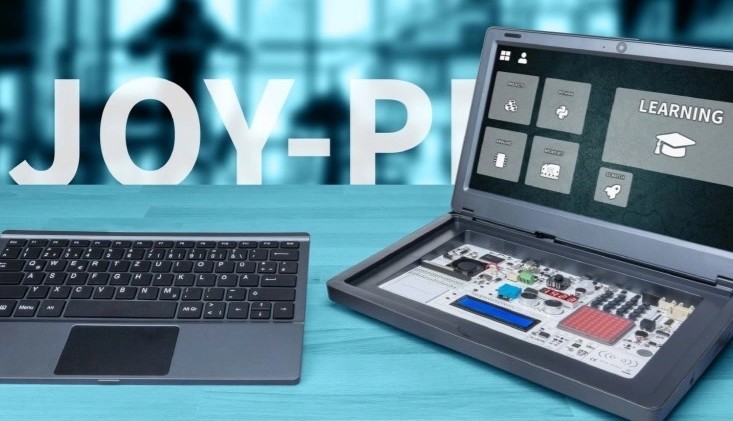
Want a fun alternative to an expensive notebook computer? The Joy-Pi Note is a clever case that turns a Raspberry Pi board into a notebook computer with built-in electronics experimenter kit.
Would you like a fun alternative to an expensive notebook computer? With the Joy-Pi Note, you can turn a Raspberry Pi board into a notebook computer with keyboard, mousepad, webcam, and 11.6" full-HD IPS display.
For those who don’t like mousepads, the Joy-Pi Note includes a wireless mouse as well. Plus, you get a 12-V power supply. The Joy-Pi Note doesn’t have a battery, but you can add one — a USB powerbank for instance — because it can also be powered from 5 V. For this a micro-USB port is available on the side. You can store the powerbank (or something else) inside the little drawer on the rear side of the Joy-Pi Note.
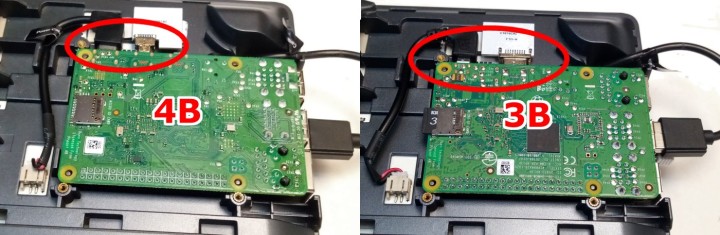
It is important to note that you must bring your own Raspberry Pi board to play with the Joy-Pi Note. Even though a Raspberry Pi 4B with at least 4 GB of memory is recommended, the Joy-Pi Note is also compatible with Raspberry Pi 2B and 3B boards. It does not accept A-type boards nor Zeroes or Compute Modules.
Joy-Pi Note: A Built-in Experimenter's Kit
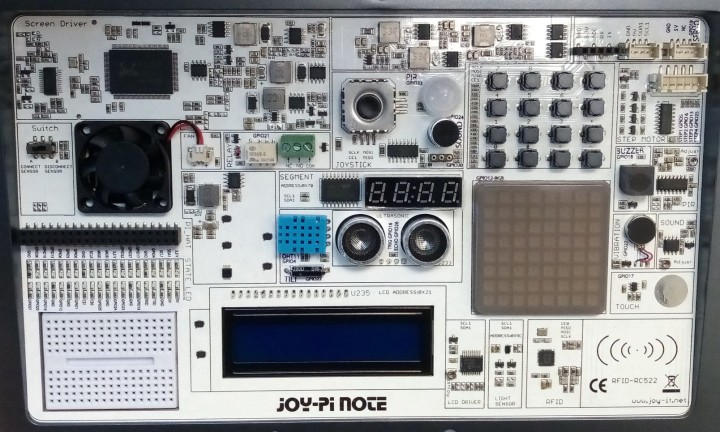
Besides turning a Raspberry Pi into a notebook, the Joy-Pi Note is also an electronics experimenting and maker kit. The keyboard is actually a wireless keyboard that can be taken out. When you do so, you will discover a white surface loaded with sensors and actuators, displays, pushbuttons and even a tiny breadboard. The full list of available peripherals is pretty long as there are more than 20. Hours of fun hide behind the wireless keyboard of the Joy-Pi Note...
Arduino & BBC micro:bit Supported Too
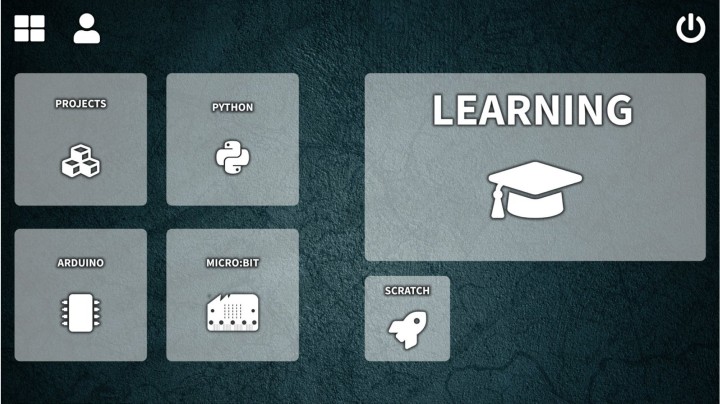
The Joy-Pi Note comes with a preloaded microSD card containing the operating system for the Raspberry Pi together with programming examples for use with the experimenter kit. It also features support for Arduino and the BBC micro:bit. Scratch can be used too, of course.
Note that the default software is in German. An English microSD card image is available from the website.
Joy-Pi Note Installation & Power-On
Installing the Raspberry Pi board in the Joy-Pi Note is easy, especially when you have a 4B as the Note is preconfigured for it. If you use a 3B (or even a 2B, allthough not recommended) you must change the power supply cable and the HDMI adapter, which is easy to do. Everything you need for this is included in the box. The Joy-Pi Note supports both Raspberry Pi 4B and 3B (and 2B) boards.
The webcam connects to one of the USB ports of the Raspberry Pi outside the case.
After installing the board and connecting the power supply you can switch the system on with a pushbutton on the side. The Off/On button on the keyboard is only for the keyboard itself and does not control the Raspberry Pi. You must, of course, switch it on before you can use the keyboard.
Learning Center
You now have a nice laptop computer to surf the Internet with. However, the fun really starts when you remove the keyboard. Now you have access to the experimenter’s surface with the sensors and displays and stuff. To get quickly started with these, you can have a go at the Learning centre. Here you will find detailed and well-commented Python application examples for most, if not all, of the peripherals of the kit. I tried out a couple of them and found them all working fine. The Joy-Pi Note's desktop features direct access to several popular maker platforms.
The examples are a great starting point for your own applications. With the large choice of sensors and peripherals included in the Joy-Pi Note, a wide field of applications can be addressed, from weather stations to alarm systems and from graphics and games to motors, RFID, and more. And if you can’t find what you need, because you have a very special application, then there is always the internet that you can browse if your Raspberry Pi is connected to it.
Breadboarding & HAT Connector
Custom circuitry can be plugged on the little breadboard. A bag with parts like resistors and LEDs is included together with jumper wires to hook them up to the 40-pin Raspberry Pi HAT expansion header. All pins of the HAT (“Hardware Attached on Top”) connector, except for the GND pins, have an LED connected to them so you can quickly see which pin is high and which is low.
Joy-Pi Note Review Video
An All-in-One Solution
I must admit that I am quite impressed by the Joy-Pi Note. Even though is feels a bit plasticky -- it is not made of brushed magnesium/aluminium like my laptop -- it is a high-quality case with much attention paid to mechanical details. Everything fits snugly, nothing rambles, it just looks and feels good.
Its compact size makes it easy to store in a drawer or so when you don’t need it.
Furthermore, it is a clever design. With the keyboard in place anyone would think that it is a normal notebook computer and not a disguised Raspberry Pi experimentation kit with lots of peripherals. And, as all the parts are soldered on a PCB, bad contacts will not be an issue.
On the software side it is very complete too, offering not only examples in Python, but also support for Arduino and the BBC micro:bit. The Joy-Pi Note is indeed an all-in-one solution for makers.
Elektor Magazine has been one of the leading sources of information on electronics for engineers, designers, start-ups and companies for 65 years. Our magazine is powered by an active community of electronics engineers – from students to professionals – who are passionate about designing and sharing innovative ideas.
For them, we publish hundreds of items a year, in formats such as articles, videos, webinars, and other learning formats. Our mission is to share knowledge in every possible way and inspire readers with the latest developments within the electrical engineering sector.
Thank you for your vote!
Leave further comments in the fields below.
Thank you for your vote!
If you wish to leave a comment with your rating, please first use the login below. If not, just close this window.

Discussion (0 comments)