
Artificial Intelligence for Beginners (1): What Is AI?
on

The use of artificial intelligence is on the increase in many areas, and it is finding its way into many types of device and application. This year it is estimated that worldwide business applications in the field of artificial intelligence will generate revenues of some $4.8bn, and that figure is predicted to rise to over $30bn by 2025. Anyone with knowledge of the subject area can look forward to enhanced employment prospects, as expertise in artificial intelligence is urgently sought after. It is therefore worthwhile to take a little time to get to grips with the topic and the new worlds of possible applications that it opens up. And, last but not least, it’s a lot of fun!
The term ‘artificial intelligence’ is generally considered to cover the creation of systems exhibiting intelligent behaviour. One part of this is ‘machine learning’, whereby instead of having an application function specified in all its detail by the developer, a general-purpose programming framework in the form of a neural network (NN) is used, which learns the required function by itself using a large corpus of training data. One class of machine learning is called ‘deep learning’, where more complex and optimized program structures are used to improve results further. We will be looking at these ideas in more detail later in this short series of articles.
However, artificial intelligence is not a new subject: its beginnings can be traced back to the 1950s. The breakthrough that occurred a few years ago was the result of considerable increases in the amount of computational power available. Graphics cards with hundreds of processor cores operating in parallel and highly-specialized artificial intelligence chips enabled artificial intelligence systems to be implemented and trained. That opened the door to automatic speech recognition, as used in many personal assistants, and image recognition of objects of all kinds. artificial intelligence also plays an important role in autonomous vehicles. In some areas AI has already surpassed human abilities: artificial intelligence systems can beat world champions in the games of chess and go, and can detect tumours more reliably than human medical specialists. But do not worry: the systems are only superior in the particular areas in which they have been trained, and the areas in which the systems are trained will continue to be chosen by humans.
A low-cost introduction
A good low-cost introduction to this world is the Maixduino, which in the form of the ‘MAix BiT’ kit including the board, camera and small LCD panel can be obtained from Elektor: see the text box. The board has the same format as an Arduino Uno (from which it gets its name), but the hardware it includes is considerably more comprehensive. The board is manufactured by the Chinese company Sipeed. Alternatives to the Maixduino include the Nvidia Jetson Nano, the ROCK PI N10 Model A, the Intel Neural Compute Stick 2 and others, but these all cost considerably more.
In this first installment of this series we will look at the rich hardware environment offered by the Maixduino and how it can be programmed with the help of the Arduino IDE. As well as a couple of typical Arduino-esque applications, we will look at how to use the camera and the screen. And the final highlight will be a demonstration of how to use the board to recognize objects.
In the second and third installments we will delve deeper into the topic of artificial intelligence, describe the structure of neural networks, install MicroPython and its accompanying IDE and demonstrate how facial recognition works. We will also look at how you can program your own AI applications and how to communicate with the Internet.
A deep dive into the ‘super Arduino’
The specifications of the Maixduino will have hardware enthusiasts licking their lips! The overall size and construction of the board is broadly aligned with that of the Arduino Uno, but you will immediately notice the higher component density and that many additional connections are available. At the heart of the board there are two large modules. The first is the Sipeed M1 AI processor module based on the Kendryte K210 device, whose interior workings we will look at later, and the second is an ESP32 module for communicating over WLAN and Bluetooth and for acquiring analogue signals. The ESP32 contains two processor cores clocked at 240 MHz and so by itself offers a considerable amount of processing power, and it can be used to offload communication functions from the main processors. The ESP32 has already featured in many articles in this magazine, and so we will not go into further detail about it here.
The header connectors correspond in number and arrangement to the original Arduino, and the pin assignments are mostly identical. But beware that the inputs and outputs are designed for 3.3 V or even 1.8 V operation, and the input circuitry will be destroyed if 5 V is applied.
Further details are shown in Figure 1. Two 24-pin sockets are provided for interfacing to the camera and to the LCD panel. A slot is provided for a microSD card which can be used to make a large amount of storage available to the Maixduino. The USB connector is the modern type-C kind and is used for programming and monitoring. And, to allow the processing of audio data, the board includes a digital microphone and an audio amplifier with a 3 W output driven by a digital-to-analogue converter. So there is plenty of hardware on the board to let you get started on a range of possible projects without having to add extra boards.
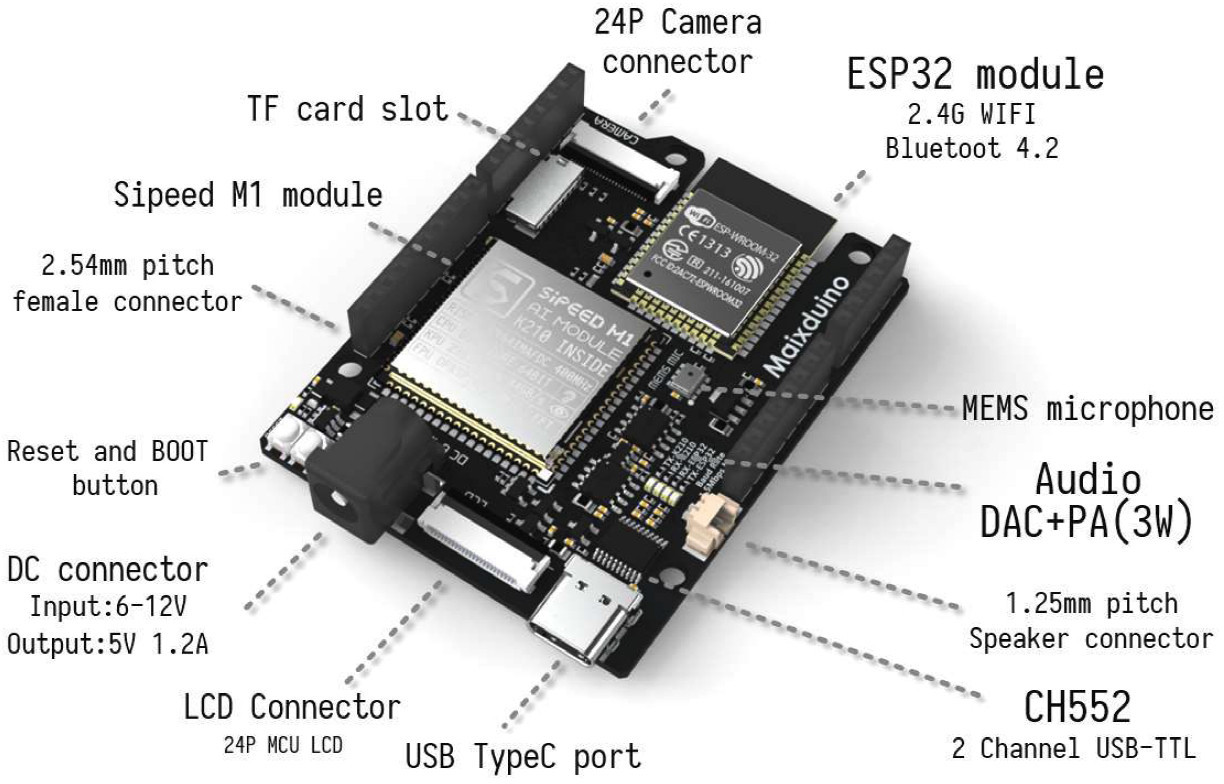
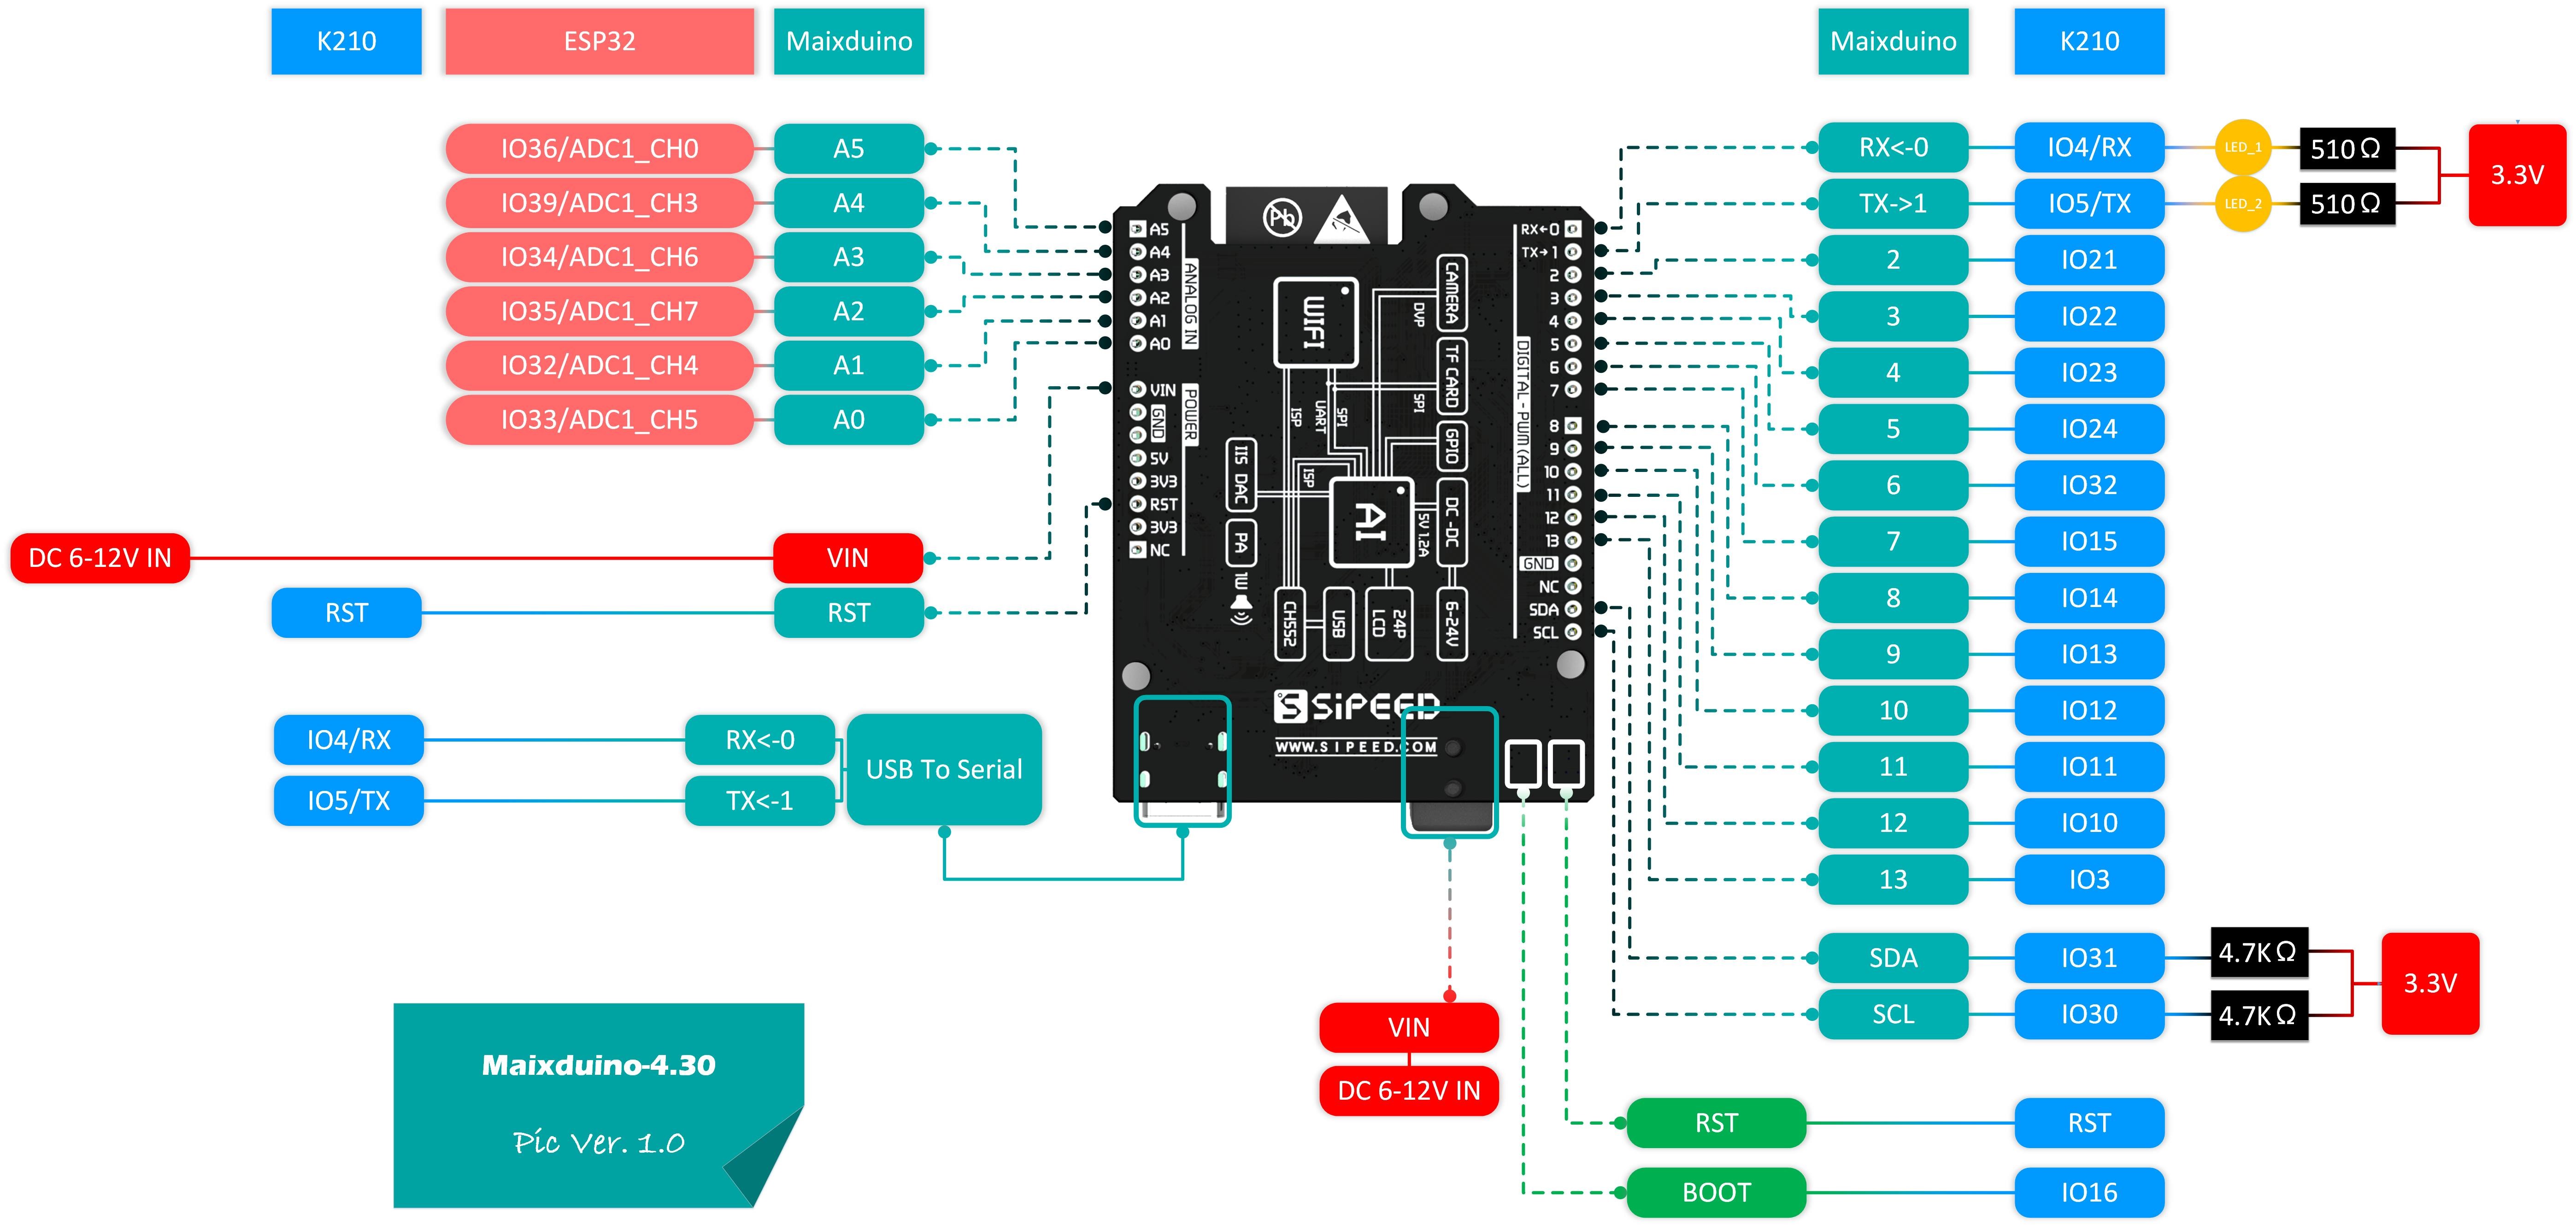
The pinout of the board (see Figure 2) closely resembles the original. The supply voltage can be provided over the DC barrel jack or using the VIN pin at 6 V to 12 V; alternatively, 5 V can be supplied over the USB connector. Six of the ESP32’s GPIOs are brought out; these are the ones that can alternatively be used as analogue inputs A0 to A5. On the opposite edge of the board are the inputs and outputs of the K210 module. These can be controlled using the usual Arduino commands, with the ‘Arduino pin number’ being the number of the input or output bit of the K210.
#define LED 12 // K210 IO12, Maixduino pin 10
pinMode(LED, OUTPUT); // configure port as output
digitalWrite(LED, HIGH); // port to high (3.3 V)
The RST pin is designed to operate at 1.8 V and external circuitry should not apply a higher voltage than that to it. Outputs IO36 to IO47 are also designed for low-voltage operation: these are not brought out to the headers, but are used internally, for example to drive the LCD panel. The serial RX and TX ports and the I2C interface are provided with suitable pull-up resistors fitted on the board.
Unfortunately the K210 datasheet does not specify the maximum output current available at the outputs. However, they should be capable of driving an LED at up to say 10 mA or so; for higher currents a driver IC should be added.
The big enchilada: Kendryte K210
The K210 SoC (system on a chip) made by the Chinese company Kendryte is at the heart of the Maixduino. It is made using a low-power silicon technology on a 28 nm process and has been available on the market since September 2018. For carrying out ‘normal’ work it offers two 64-bit processor cores that are clocked at 400 MHz, with overclocking up to 800 MHz possible. These cores are based on the RISC-V specification: this saves the manufacturer from having to pay licensing fees to Arm and so helps to contribute to the low total cost of the device. Both processors come with an FPU (floating-point unit) that operates in both single and double precision. Figure 3 shows in more detail what is inside this chip.
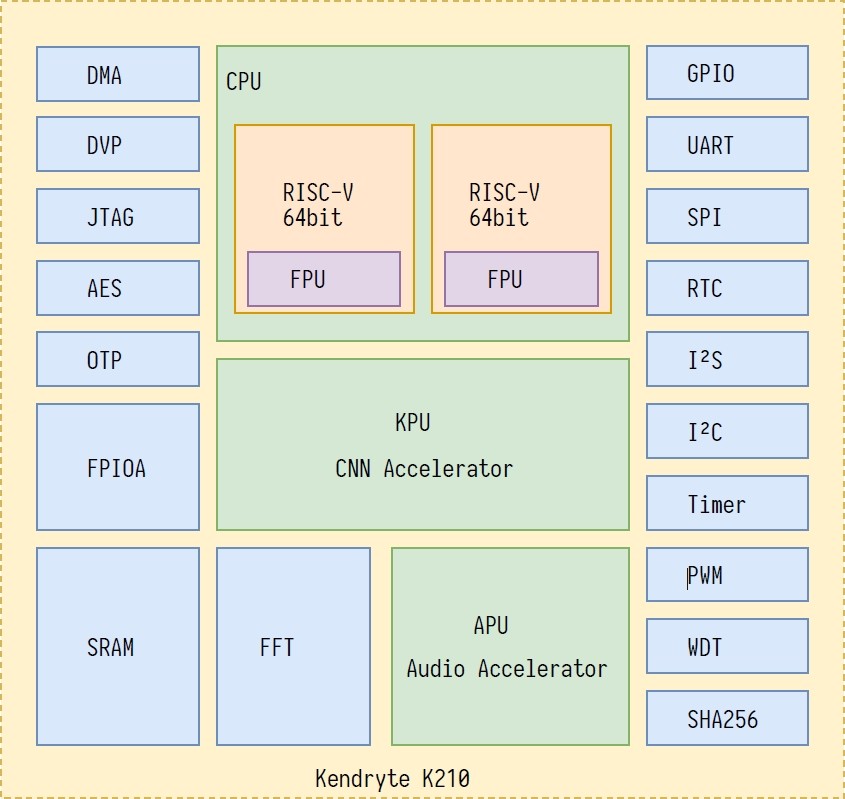
The special feature of the K210, however, is its KPU (knowledge processing unit) that can be used to construct and execute neural networks. The total compute power available is astonishing at this price point: 0.46 Tops, or 460 billion operations per second. With overclocking this figure can even be doubled, allowing, for example, up to 60 objects per second to be recognized. The high processing performance is achieved using 64 arithmetic units operating in parallel and a bus width of 576 bits. Also, the power dissipation of just 0.3 W is very low in comparison to other artificial intelligence systems. For example, Nvidia recommends using a 5 V 4 A (hence 20 W) power supply for its Jetson Nano, which at 0.4 Tops offers comparable computing power.
The KPU can implement advanced neural network architectures, including convolutional networks. These have a particularly efficient filter structure that makes them especially well suited to image processing applications: more on this in the second instalment of this series. The main memory included in the SoC has a capacity of 8 MB, divided into 2 MB for the main processors and 6 MB for the KPU. That means that up to 5.9 MB is available for storing the neural network configuration, which is enough to implement a medium-sized network.
However, the K210 has more hardware tricks up its sleeve. These include an audio processing unit (APU) which is particularly helpful for pre-processing in speech recognition applications. The unit can handle up to 8 channels (or 4 stereo channels) at input sample rates of up to 192 kHz. An FFT (fast Fourier transform) unit is available to carry out analysis of the frequency spectrum of a signal.
Also noteworthy are the AES and SHA-256 accelerators provided to speed up cryptographic functions.
And of course the device includes the usual complement of peripherals including UART, I2C, SPI, I2S, timer, RTC and PWM.
Sipeed has added 16 MB of flash memory on the board alongside power supply circuitry, the microphone and 3 W power amplifier, and the excellent ESP32 module.
What more could you wish for? More information on the operation of the board, the circuit diagram and other details can be found here, here and here.
Software development
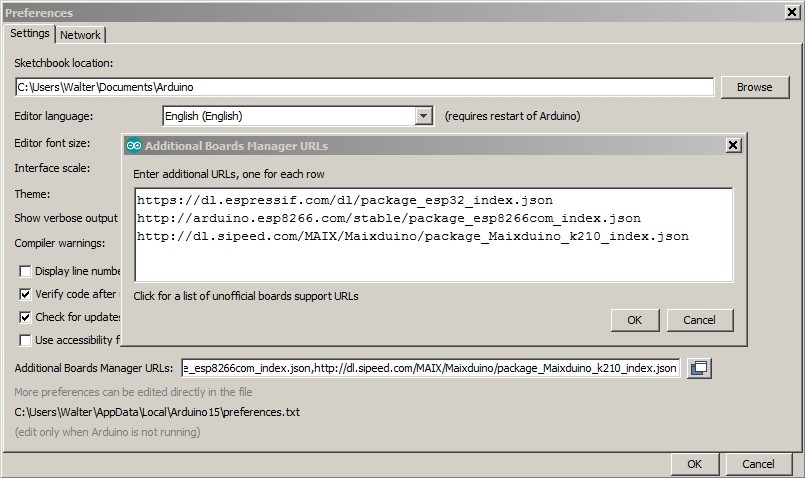
It is not just the shape of the board that is similar to the original Arduino: the board uses the same Arduino IDE, with the Maixduino core being integrated into the environment in the same way as the ESP8266 or ESP32. Under File -> Preferences it is necessary to add a new board manager URL: if you right-click on the button to the right of the text entry box a small window will open to make entering the URL easier (see Figure 4). If you only want to program the Maixduino, then only the ‘sipeed’ line needs to be added; then the on-board ESP32 will also be programmed using it.
To install the Maixduino board tools select the menu item Tools -> Board -> Boards Manager. Enter the search term ‘Maix’ (as shown in Figure 5) and then proceed to install the tools.

Now we can start to do some programming. Rather than the conventional ‘hello world’ program, we will jump straight into to testing the camera and screen. Connect the Maixduino over USB and in the Tools menu set the following parameters.
Board: Sipeed Maixduino
CPU Clock Frequency: 400 MHz
Burn Tool Firmware: open-ec
Burn Baud Rate: 1.5 Mbps
Tool Install Location: Standard
Port: <COM port that you are using>
Programmer: k-flash
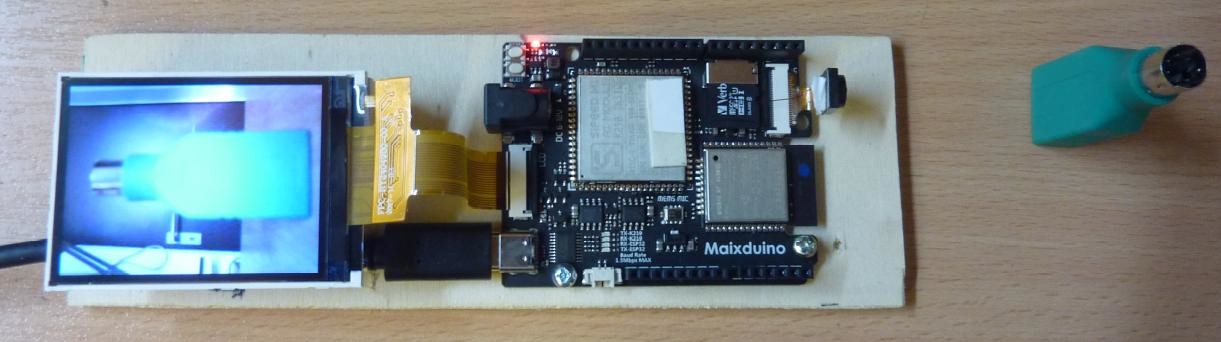
A demonstration program that captures an image and displays it on the LCD is already available within the IDE. Call it up using File Examples Sipeed_OV2640 selfie and once it is uploaded to the board (you may need to press the reset button at this point) you can run it. The code is shown in Figure 6.
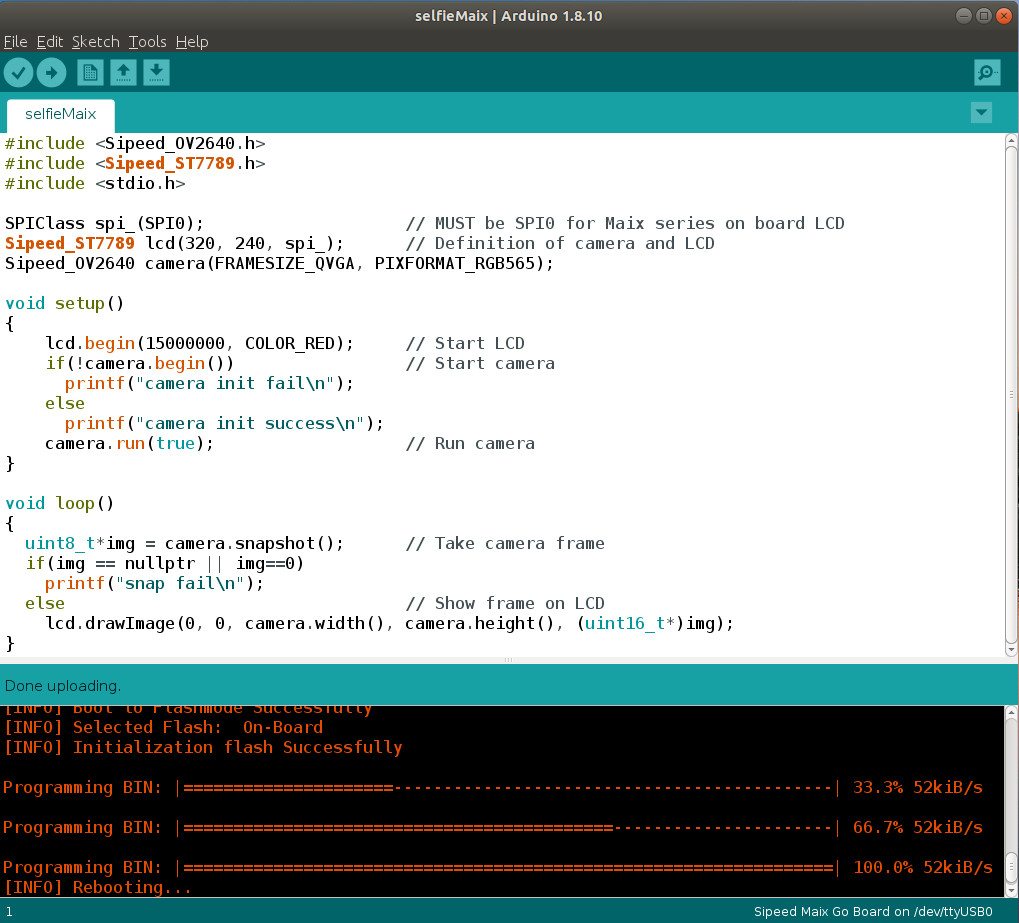
The program starts by bringing in the functions from the Sipeed libraries for driving the camera and LCD, which are connected to the board using an SPI bus. The image format chosen is QVGA resolution (320 by 240 pixels) with RGB565 colour. The setup routine initializes both devices, and in the main infinite loop the captured images are transferred directly to the LCD: it could hardly be simpler.
The image is not particularly contrasty, but it is sharp and updates are smooth. Figure 7 shows the results.
As you can see, the Maixduino is as easy to use as an Arduino Uno. However it offers many more possibilities and we can immediately start to build more sophisticated applications.
Our first AI model
We will be looking in more detail at deep learning aspects of artificial intelligence in the second article in this series, but here we can demonstrate a simple application. We will be using ‘MobileNet’: nothing to do with mobile phones, but rather an image classifier that can recognize and identify 1000 types of everyday objects. This uses a neural network, which is a software structure built from nodes organized in layers trained using a lengthy process in which it is presented with thousands of images.
Since the file containing the training image set runs to some 200 GB and the training process itself is very time-consuming, it is not really practical to carry it out on the Maixduino. However, it is possible to install a ready-trained model and immediately set it to work recognizing images. The steps to achieve this are as follows.
The required software can be found here. It consists of the following components.
mobilnet_v1.ino: main C++ program for running the demonstration
MBNet_1000.h: header file for the demonstration routines
MBNet_1000.cpp: C++ routines for acquiring, recognizing and displaying objects
names.h: header file with object descriptions
names.cpp: C++ routine for describing the recognized objects
Download these files and place them all in the same directory. The pre-trained artificial intelligence model mobilenet_0x300000.kfpkg can be downloaded from link [5]: compressed, it is just a few megabytes long. After decompressing it with 7zip you should find a folder mobilenet_0x300000 in which there are two files: the model is the one called ‘m’. Copy this file onto a microSD card in the root (top-level) directory and insert the card into the slot on the Maixduino.
A glance at the program code in Figure 8 shows that it is possible to program even very complex applications with little effort. That is of course all down to the powerful libraries: in the field of artificial intelligence there are very many highly efficient libraries available. The first part of the program declares the camera, LCD and the KPU along with their parameters. The camera resolution is configured to the same format as the training images, 224 by 224 pixels. Finally, the object mbnet marshals together the KPU, camera and LCD resources.

The setup routine initializes the demonstration code, and then in the main loop we have the classification of the objects in the images acquired by the camera and their display on the LCD panel. Again, it is hard to imagine that an object recognition program could be any simpler.
As a test we can put a photograph of a cat in front of the camera (as shown in Figure 9). The system immediately recognizes it as a tabby or Egyptian cat (Figure 10). The application is capable of classifying about five images per second and is therefore capable of producing useful results even if the camera is moving. The most important things are to have good lighting and not too busy a background to the image.
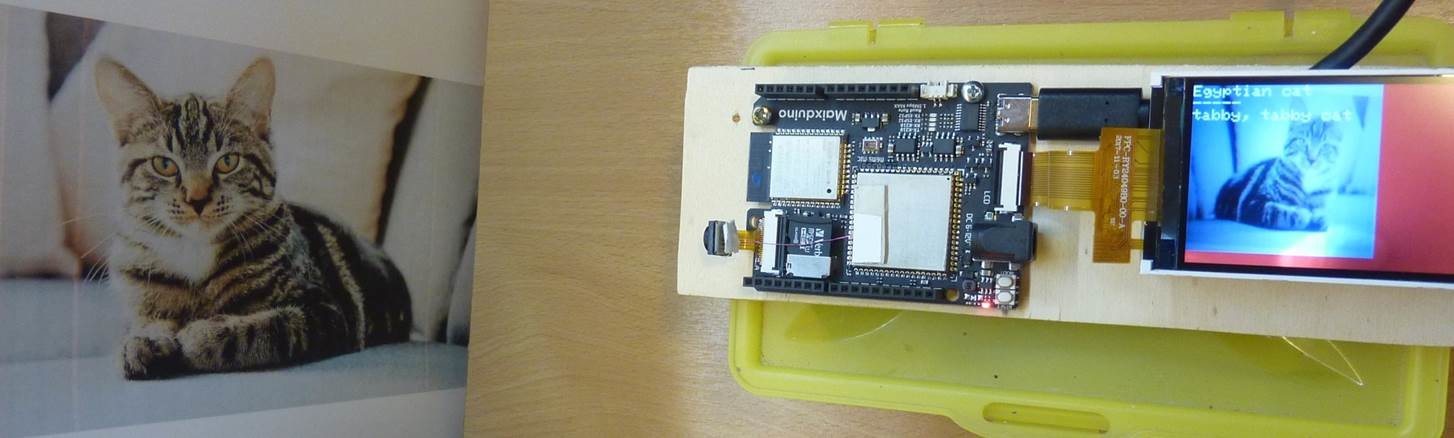
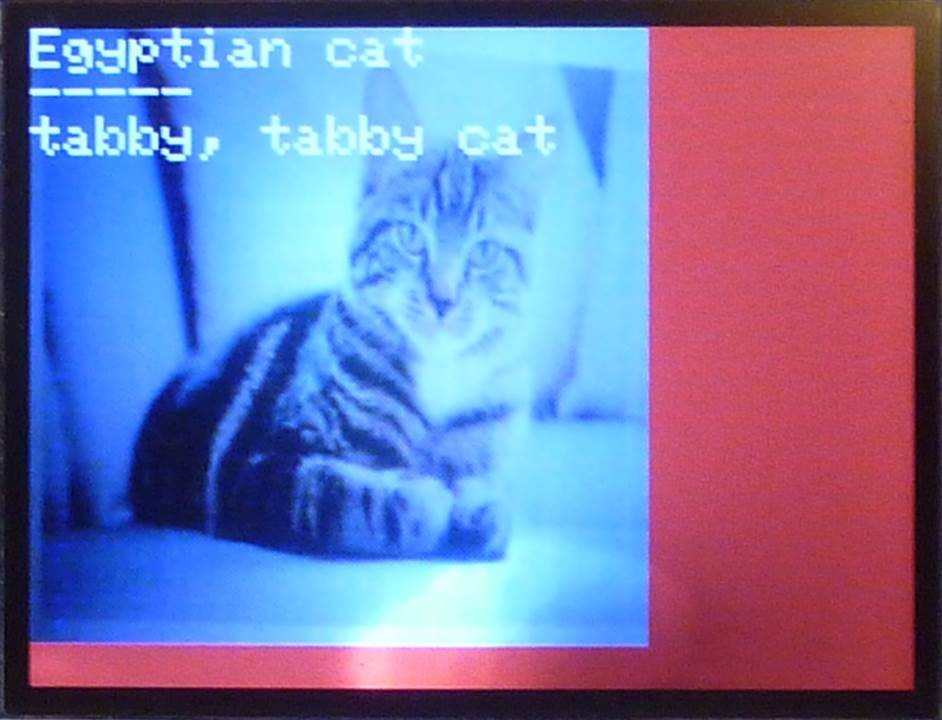
As can be seen from Figure 10 the acquired image uses only a blue and white colour palette, in the interests of increasing the recognition rate. This is a commonly-used method: instead of using all three colour channels in an image we use only one to reduce the amount of pixel data and hence the amount of processing power required. The technique of using a ready-trained network, or in other words of carrying out training and classification on different platforms, is also widespread in this type of application. Many users take advantage of the large amounts of processing power available on AWS, Microsoft Azure or Google Cloud to train their neural networks, while running them (which requires considerably less in the way of resources) on smaller-scale platforms. The semiconductor industry is already responding to this demand: Intel recently announced their Nervana NNP-T and NNP-I neural network processors, where the ‘T’ version offers higher processing power for training, and the ‘I’ version is a lower-performance device aimed at inference and classification applications.
Coming up...
The demonstration application we have looked at in this article can only scratch the surface of the topic of artificial intelligence, but with luck your interest in the possibilities of machines that learn has been piqued.
In the next instalment of this series we will look at the structure and function of a neural network in more detail. That will come with a new development environment: we will be introduced to the temptations of Linux and the Python programming language, as that is where the most powerful libraries and frameworks are available. These frameworks make the creation of a neural network as easy as plugging together Lego bricks. We will also look at a face recognition application and at how to develop your own neural network structures. If you are too impatient or curious to wait for that, the book Make Your Own Neural Network by Tariq Rashid is recommended.
Go to Part 2
Want more great Elektor content like this?
The take out an Elektor membership today and never miss an article, project, or tutorial.
Discussion (9 comments)