
Introducing the Raspberry Pi Debug Probe
on
The engineers at Raspberry Pi needed a simple solution for debugging Arm-based microcontrollers, such as their own RP2040 chips. They developed a solution, “dog-fooded” it so you don’t have to, and now the open-source board is available to the public: the Raspberry Pi Debug Probe.
As you work on the products you design, you sometimes find that you need a custom tool to help. Then, your little project evolves to put out tendrils into a meta project to make a jig to tool the tool.
That’s what happened with the folks at Pi Towers working on their RP2040 microcontrollers — the powerhouse of the Raspberry Pi Pico line of low-cost gum-stick-sized microcontroller boards: They had a need to debug the Arm Cortex M0+-based MCUs efficiently, at the hardware level.
The Raspberry Pi Debug Probe Is Born
No doubt they already had a drawerful of debug tools and wires like the rest of us do. (How many USB-to-UART / FTDI boards do you have?) They wanted to neaten things up and purpose-design something that was almost plug-and-play. Well, at least from external appearances — debugging assembly on a microcontroller is hardly plug-and-play, but we can try to make the workbench a little tidier.
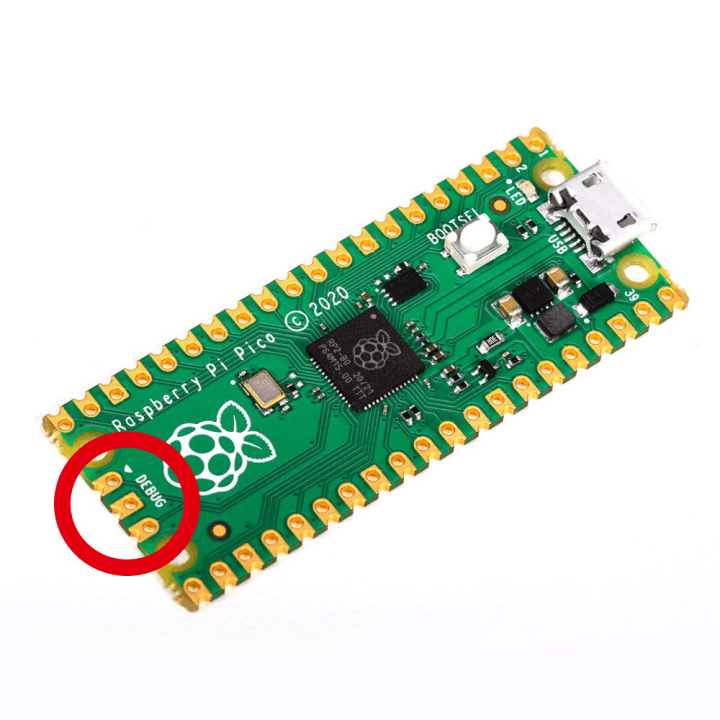
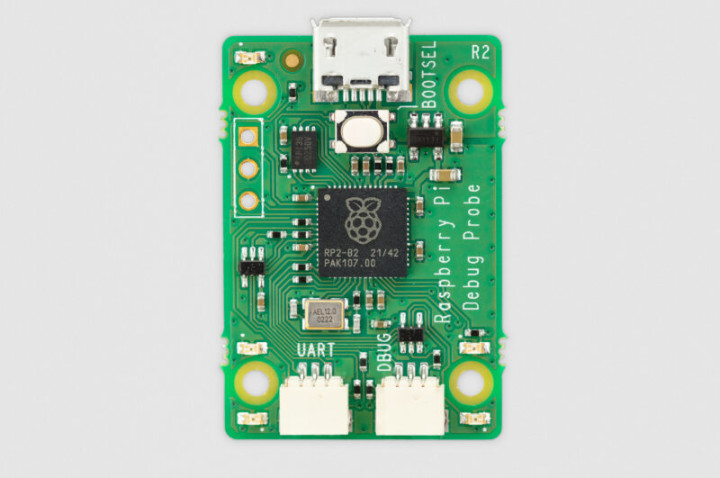
Since the Raspberry Pi Foundation’s debut in-house RP2040 microcontroller consists of two Arm cores, they exposed a two-wire Serial Wire Debug (SWD) port directly on two of the RP2040’s pins.
In fact, your RP2040-based Raspberry Pi Pico board even exposes this two-wire interface (plus ground) on a special header (which may or may not be populated, depending on whether you buy the ‘H’ variant of the board). But, it's useful to have there if you do a lot of in-the-field debugging.
People have already been using bigger Raspberry Pi siblings to program the Raspberry Pi Pico rather neatly using just this two-wire interface, but, when you’re using a PC or Mac as your main development terminal, having all that compute sitting on a Raspberry Pi 3 or 4 that's just being used as middle man, with its HDMI, camera connector, display connector, USB, etc. all sitting idle, it’s a little wasteful. Besides, we all know there’s a shortage of those sought-after bigger boards, so there’s no sense leaving them underutilized.
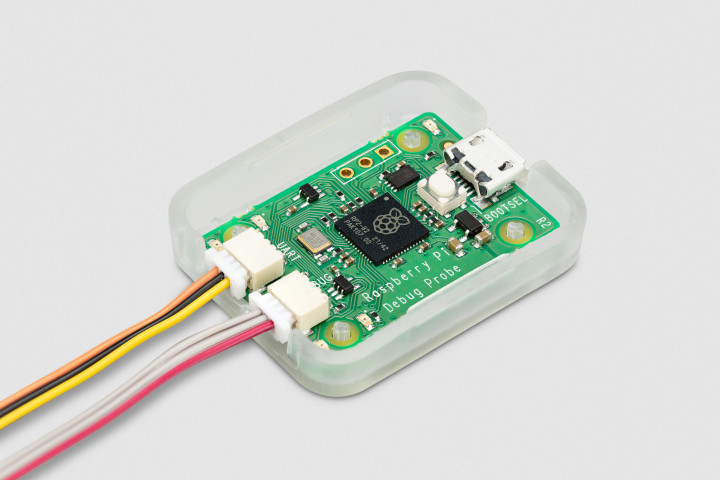
The Raspberry Pi Debug Probe is now available to the public, as Eben Upton announced in a blog post this week. It neatly encapsulates the required “tool for the tool.” In fact, the tool is based on the tool, meaning that this device — which you’ll log many a mile on when debugging RP2040-based devices such as the Raspberry Pi Pico — is an RP2040-based device.
The first thing that the team, headed up by hardware lead James Adams and Jonathan Bell in software, attacked when designing this solution, was the USB-to-UART, or ubiquitous FTDI boards, typically distributed randomly throughout any embedded lab like LEGO bricks in a playroom. The Debug Probe takes care of that right out of the box, so, even if you don't use the debugging features at all, you've already got yourself talking UART whenever you need to.
Granted, FTDI adapters can be had for half the price at Amazon and the like, but UART adapters serve only that (albeit very necessary) purpose.
Enter the debugging interface on the Probe. Right next to the 3-pin UART header is the DBUG header. Both are of the 1.0 mm pitch 3-pin JST ‘SH’ variety and conform with the Raspberry Pi 3-pin Debug Connector Specification, so we must be sure to put the correct plug into the correct socket if we want to talk to the correct device.
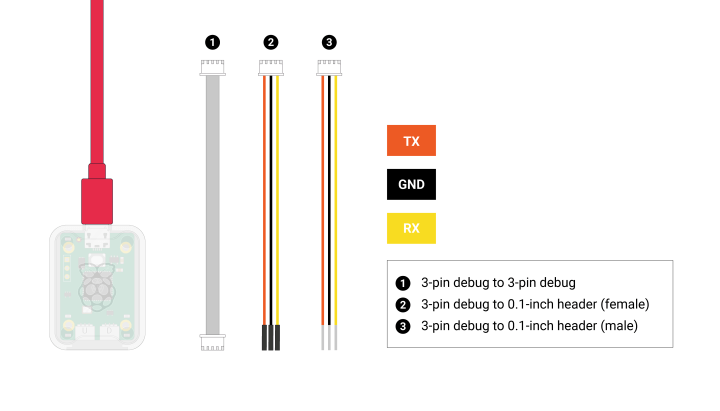
As is evident above, your needs are taken care of in the JST cable department – all three of these are included in the package.
So, that's a USB-to-UART bridge on the left, and a USB-to-SWD bridge on the right. Check.
The debugging interface is CMSIS-DAP-compliant, so talking to Arm-based chips immediately is hassle-free.
In terms of the debugging software used on the computer side, people at Pi House favor OpenOCD, the open-source debugging tool that started out as a diploma thesis. It’s as simple as apt-get install openocd to install on Debian variants such as Raspbian on a Raspberry Pi 4, should you choose to use that as your debugging terminal. Of course, packages for Windows and Mac are also available.
So, as some of our intrepid engineers might say, since the device is based on Raspberry Pi Pico hardware and runs the open-source Raspberry Pi Picoprobe firmware, why not just use a Raspberry Pi Pico and flash it with some debug firmware and solder on some test leads? Well, you could, of course, but given that the Debug Probe offers an elegant purpose-built solution at such a low price, it's hardly worth the effort. You already have your hands full programming your Arm-based target device; you don't need the distraction of reinventing this wheel.
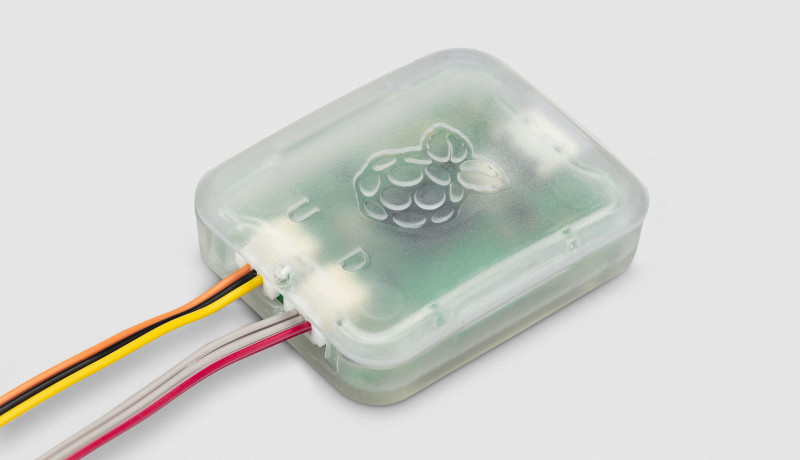
Plus, speaking of elegant, it comes with an attractive semitransparent plastic case with a stylish design, through which the on-board LED blinks useful notifications. Then, it has all the connector headers already mounted on the board. Moreover, it has all the cables you need — from USB to JST — to plug in and get going.
Looking at the comments on Eben’s post, there was some grumbling about having opted for Micro-USB instead of USB-C as the computer-side interface. For me, since the Raspberry Pi Pico, which already has a Micro-USB connector, is likely to be my primary target device for debugging, I'm not too keen on having one type of connector for the Pico and another for the Probe. Besides, the Probe already comes with the USB-A-to-Micro-USB cable, so you can plug it in to just about any computer, as you already likely do with your Pico.
Bearing in mind that the Debug Probe comes in at a sub-€15 price point, it’s just a neat, unobtrusive solution that will take a small, but prominent, place in any Arm developer’s toolkit.
It’s clearly documented and prettily (but not excessively) packaged, as you would expect from a Raspberry Pi product, so you can get up and running immediately, instead of googling 6 different manufacturer websites from around the world to start getting a grasp.
Besides documentation, support also counts, and Raspberry Pi has committed to manufacturing this product until at least 2030, in their obsolescence statement.


Discussion (6 comments)