
Save money with this Speed monitoring by GPS !
Today the speed on the roads is limited in all countries. I developed this device to avoid fines due to speed excess.
Save money with this SM-GPS !
Speed monitoring by GPS (SM-GPS)
Today the speed on the roads is limited in all countries. I developed this device to avoid fines due to speed excess. The most recent cars are equipped with GPS to go to the target (with a very beautiful map). The most expensive cars are equipped with speed limit shields recognition. But not everybody has a recent or expensive car.
The SMGPS cost is only a few euros : save money !
I developed this device using the Arduino IDE . . . because the other tools are too complicated. Such a simple device doesn’t need sophisticated tools.
The predefined speed limits can be set . These limits can be selected by 4 keys. When the vehicle speed exceeds the limit speed, the buzzer sounds 2 times, and a message is displayed, or the current speed colour changes. These speeds can be redefined by the user, .
The display selection is done by 1 key.
After the splash-screen display, the device has 3 displays:
There is 3 main screens:
This speed monitoring device is useful to avoid speed exceeding during travel. The set has 3 displays: 2 screens are easy to read during driving, the third displays the raw data received by the GPS module.
The third screen displays all the data given by the GPS module, plus the current speed: date and time, longitude, latitude, the satellite number, the altitude(in meters) and the speed (in km/h). In addition, the selected limit speed is displayed. When this screen is displayed, the buzzer sounds too.
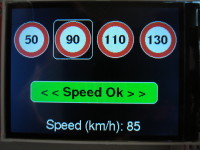
Screen 1: Display with the 4 shields
Screen 2: Display by 7 segments
Screen 3: Display of the raw data given by the GPS module
The time and date are the UTC values.
Because the used font has not the degree symbol (°), I replaced it by the * character.
I didn’t use the touch screen because the car driver must have a reliable touch contact during driving.
I first loaded the STM32 bootloader : this makes the sketch download easier but uses FlashRom (about 2 k-bytes). The program uses about 52400 bytes of 65535, this make improvements possible.
The speed limits are saved in an EEPROM . They are preset by the user.
It’s the first time I use the BluePill, and programming with the Arduino IDE is not easy: documentation lacks, not all the Arduino libraries run with this uC, and the BluePill doesn’t operate like the Arduino Uno or Mega2560 during the use of the Serial Monitor and uC reset.
The GPS module is equipped with a NEO-6M from Ublox: Ublox developed a software called u-center. To use it, connect a GPS module to a RS232/USB converter, and connect the USB converter to your laptop. Launch the u-center software and it will display all the available data and graphics. You can “see” the satellites over your place.
>>>> IMPORTANT NOTICE <<<<
The antenna cable must be as far as possible from the other electronic components, else the GPS module will not receive the satellite frames. The minimum distance is 2.5 centimeters !
Speed monitoring by GPS (SM-GPS)
Today the speed on the roads is limited in all countries. I developed this device to avoid fines due to speed excess. The most recent cars are equipped with GPS to go to the target (with a very beautiful map). The most expensive cars are equipped with speed limit shields recognition. But not everybody has a recent or expensive car.
The SMGPS cost is only a few euros : save money !
I developed this device using the Arduino IDE . . . because the other tools are too complicated. Such a simple device doesn’t need sophisticated tools.
The predefined speed limits can be set . These limits can be selected by 4 keys. When the vehicle speed exceeds the limit speed, the buzzer sounds 2 times, and a message is displayed, or the current speed colour changes. These speeds can be redefined by the user, .
The display selection is done by 1 key.
After the splash-screen display, the device has 3 displays:
There is 3 main screens:
This speed monitoring device is useful to avoid speed exceeding during travel. The set has 3 displays: 2 screens are easy to read during driving, the third displays the raw data received by the GPS module.
The third screen displays all the data given by the GPS module, plus the current speed: date and time, longitude, latitude, the satellite number, the altitude(in meters) and the speed (in km/h). In addition, the selected limit speed is displayed. When this screen is displayed, the buzzer sounds too.
Screen 1: Display with the 4 shields
Screen 2: Display by 7 segments
Screen 3: Display of the raw data given by the GPS module
The time and date are the UTC values.
Because the used font has not the degree symbol (°), I replaced it by the * character.
I didn’t use the touch screen because the car driver must have a reliable touch contact during driving.
I first loaded the STM32 bootloader : this makes the sketch download easier but uses FlashRom (about 2 k-bytes). The program uses about 52400 bytes of 65535, this make improvements possible.
The speed limits are saved in an EEPROM . They are preset by the user.
It’s the first time I use the BluePill, and programming with the Arduino IDE is not easy: documentation lacks, not all the Arduino libraries run with this uC, and the BluePill doesn’t operate like the Arduino Uno or Mega2560 during the use of the Serial Monitor and uC reset.
The GPS module is equipped with a NEO-6M from Ublox: Ublox developed a software called u-center. To use it, connect a GPS module to a RS232/USB converter, and connect the USB converter to your laptop. Launch the u-center software and it will display all the available data and graphics. You can “see” the satellites over your place.
>>>> IMPORTANT NOTICE <<<<
The antenna cable must be as far as possible from the other electronic components, else the GPS module will not receive the satellite frames. The minimum distance is 2.5 centimeters !
Want to build a project?
Bring your design to life with the Elektor PCB Service, powered by Eurocircuits. Upload the project files and order professionally manufactured PCBs or assembled boards through a proven European production platform.
Supporting KiCad, Eagle, Gerber, and ODB++ formats, the service is suitable for everything from prototypes and validation builds to series production and volume manufacturing.
Made in Europe. Fast. Reliable. Professional.
Updates from the author