
Elektor Lab Notes 25: sensors, ESP32, Wireless Audio and More
on

Welcome back to Elektor Lab Notes! Every few weeks, our engineers and busy editors at Elektor post a few lab notes and updates about new DIY electronics projects, tech industry news, and helpful engineering tips. In this edition of Lab Notes, we talk about sensors, ESP32 adapter boards, DIY audio transmission, frequency references for the lab, and upcoming articles of Elektor Magazine. Please share your thoughts in the Discussion section at the bottom of this page. Feel free to post your own lab notes and let us know what you are working on at your electronics workbench!
Jean-François Simon (Engineer, Elektor)
Rubidium Frequency Standard Adapter: A few months ago, I mentioned my acquisition of a Rubidium frequency standard. In the 2010s, these could be found in large quantities for cheap on eBay, but those days are long gone! Thus, choices were much more limited and I went for one which wasn’t too expensive, in that case the SA.22C from Symmetricom (now Microchip). These oscillators have excellent stability, and although their absolute accuracy is not as high as the best GPS-disciplined oscillators (GPSDOs), Rubidium oscillators are generally used as a backup in case of GPS hardware failure. In the lab, they can serve as a reference for interesting experiments, such as measuring the stability of various oscillators. A breakout board is separately available under the BG7TBL brand, well known among DIY frequency reference enthusiasts.
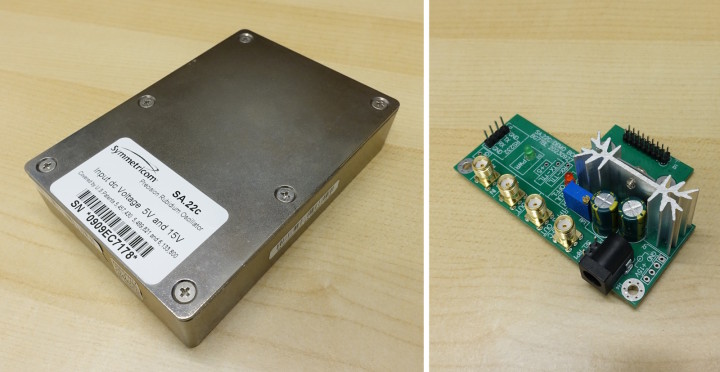
As the SA.22C is meant to be mounted on a PCB, its connector is on the underside. The PCB needs to be large enough, with enough copper area, to act as a heat sink; in case those conditions are not met, the manufacturer recommends additional heat sinking. I plan to use an old PC heat sink, at least thirty years old, to help with cooling. However, for quick bench testing, it would be more practical to have the hot side facing up for better natural convection. With the current design of the adapter board, access to the connectors, indicator LEDs, and adjustment potentiometer is made harder when the hot side is facing up.
To fix this, I desoldered the connectors and most of the through-hole components and resoldered them on the other side. Connectors can now be easily accessed again, and the two electrolytic capacitors are now further away from the 7805’s heat sink, which can only be better for reliability. If you do this, make sure to preserve the proper wiring of the 7805 voltage regulator; I chose to slightly raise the heat sink with washers and route the pins underneath. Four rubber feet under the SA.22C make the whole setup stable on the bench.
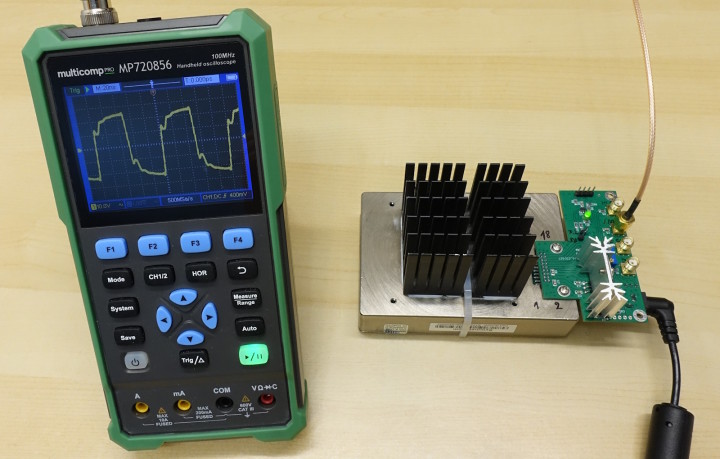
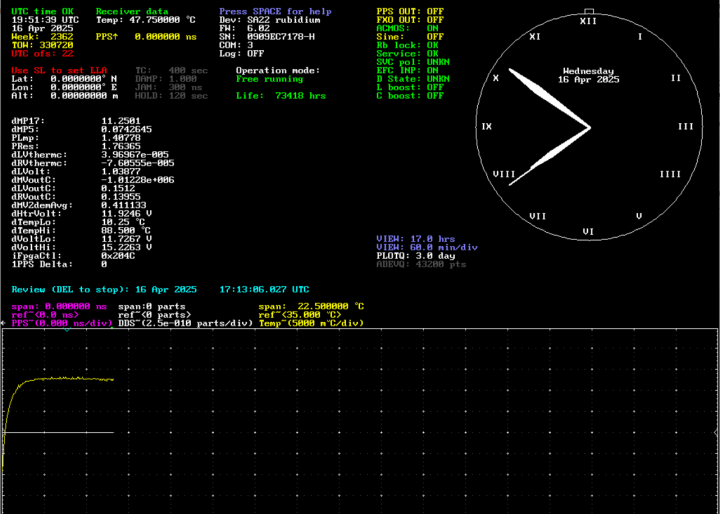
The 10-MHz output signal is not perfectly square, but it will do the job just fine as a frequency reference. For more information on this particular unit (runtime, wear status, etc.), the SA.22C’s serial interface can be used (see the manual for details). It’s also possible to use a piece of software named Lady Heather, developed by Mark Sims aka “texaspyro” and which supports a whole range of GPS receivers and frequency standards. I have several ideas for using this Rubidium unit, including using it as a reference and comparing it with the well-known GPSDO design published by “lars” on the EEVBlog forum. For this, I’ll need more time to get familiar with the theory. More to come later!
Radar and Time-of-Flight Sensor Testing: In preparation for an upcoming article, I’ve been looking into different types of motion, distance, and speed sensors. Some time ago, I came across the A121 sensor from Acconeer and wanted to try it out. It’s a radar sensor in the 60 GHz band and can detect motion and measure distances with remarkable accuracy. The A121 can distinguish between stationary and moving objects, enabling features like gesture recognition. To facilitate prototyping, it’s also available as an affordable solderable module, the XM125, which contains the sensor as well as an STM32L431CBY6 microcontroller from ST that makes it easier to use the Acconeer software. The XM125 is also available pre-mounted on a small breakout board with power supplies and serial converters, sold by SparkFun.
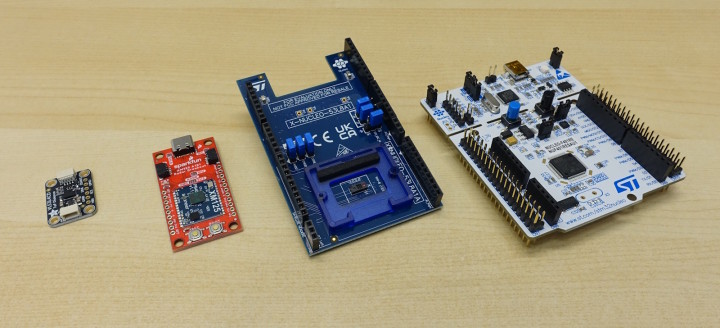
In addition to radar sensors, time-of-flight (ToF) sensors are also very interesting. In the previous photo, you can see an evaluation kit for the VL53L8CX from STMicroelectronics, which is an 8x8 multi-zone ranging sensor at the top end of their Time-Of-Flight lineup. Since it is multi-zone, gesture detection is also possible. Also worth mentioning is the VL53L4CD, also from ST, which is a lower-cost sensor optimized for short distances. Testing is ongoing; stay tuned for more!
Jens Nickel (Editor-in-Chief, Elektor)
A Versatile ESP32 Board: In Lab Notes 23, I showed a prototype of an ESP32-based board which can sample (and output) audio on the one hand, and send (and receive) an audio stream via a Nordic nRF24 radio module on the other hand. In the meantime, I received and soldered the first samples of a KiCad PCB (which was refined by my colleague Saad, who is far more familiar with this tool, especially with the ground area functions). In the photo, you can see two of the three boards I built, here used as audio sender and receiver. Interestingly, the official Espressif footprint I used for the ESP32-S3 dev board in the middle did not fit the dev boards I purchased on Amazon – and this was (of course) the only thing I did not check properly in advance. With a bit of bending, I could get it to work, and it turned out that there are two form factor variants of the ESP32-S3 DevKitC, with 0.9 and 1 inch widths. In fact, some baseboards I found on the internet are made compatible with both, using a double pin header, and that is exactly what Saad and I are planning for the second version of that board. We want to present this in the next circuit special, but our ESP32-based board – with additional connectors, an extra power supply, and more plug-on boards – will be suitable not only for audio, but also for a wide range of IoT applications. Stay tuned for our updates on that!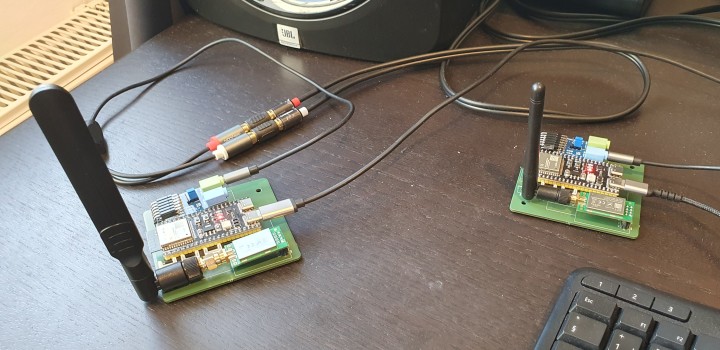
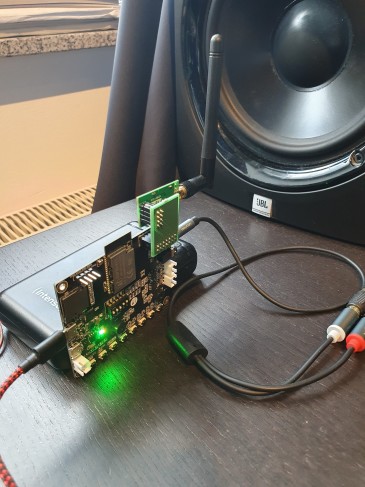
A Cheap Trick: Connected to that is my pet project I’m working on with a friend: independent loudspeaker stations with a built-in battery, amplifier, wireless audio receiver, and remote volume control. We are now moving from analog to digital audio transmission, and with some forceful tinkering I managed to get a reliable connection with very low latency, which is crucial for DJ applications (believe me, more than once I was close to giving up). A small drawback is that you need one sender for each audio channel, and with four receivers, I would need six of the "Versatile ESP32 boards" described above. The Pmod I2S2 sampling/playing module to be plugged in costs about 35 euros – these modules alone would add up to a substantial amount of money for a full-blown sound system. Unfortunately, I had bad experiences with many cheaper I2S input and output boards. However, one board available from a Chinese company was definitely worth the time I had to spend getting it to run. The ESP32 Audio-Kit from AI Thinker is based on a special ESP32-based SoC, also integrating an ES8388 audio codec in the metal housing. The board includes an SD card slot, two microphones, and a small amplifier chip – all not needed in my case – but even so, the whole board is much cheaper than my preferred I2S module alone. However, there aren’t many accessible pins for extensions, and many are also used for other functions on the board. I had to remove some SMD resistors to free up pins I could use to interface the Nordic nRF24 radio module, but in the end, I managed to get it running, and I created a small adapter PCB to reduce interference. Since this hacked, low-cost board can also handle volume control, my friend and I managed to bring the cost down from about 150 euros for wireless reception and remote volume control to about 40 bucks per station – and the solution is also much more compact. By the way, in the latest Lab Talk, my colleagues and I talk about our pet projects – you should definitely watch the video!

Discussion (0 comments)