
A Matter of Collaboration: Develop with the Thing Plus Matter Board and Simplicity Studio
on
Until now, getting into the home automation game meant choosing an ecosystem. Well, those days are in the past as Matter aims to make it easy for every IoT device to communicate using this new, open-source protocol. In this article, we are developing a small Matter-compatible demo application, with the new SparkFun Thing Plus Matter Development Board and the Simplicity Studio IDE from Silicon Labs.
By now, we’re all well aware of the Internet of Things, or IoT, as it’s more commonly called. But, even now, it continues to be rather scattered, with multiple communication protocols. This forces developers, as well as consumers, to decide how they want their devices to communicate, and then locks them into that environment. Those days are coming to an end, with the introduction of Matter, a unified, open-source application-layer connectivity standard built to enable developers and device manufacturers to connect and build reliable and secure ecosystems, and increase compatibility among connected home devices.
A Brief History of Matter
Matter started out as Project CHIP, which stands for Connected Home over IP, in 2019. Major, and previously competing, players such as Amazon, Apple, Google, along with the Zigbee Alliance, and a number of other companies such as Nordic Semiconductor, got together in an attempt to develop a single communication protocol that would be used to unify the entire Internet of Things. Matter is an open-source, royalty-free protocol that allows devices to communicate over Wi-Fi, Ethernet, Bluetooth Low Energy, and Thread networks. This means that devices that are Matter-certified will be able to communicate with each other seamlessly, regardless of the wireless technology used.
Now, developers, manufacturers, and consumers no longer have to choose between Apple’s HomeKit, Amazon’s Alexa, or Google’s Weave components. For manufacturers, this means simplified development. For consumers, it means increased compatibility.
One of the key benefits of Matter is that it simplifies the setup and management of smart home devices. With Matter-certified devices, end users will be able to set up their smart home systems quickly and easily, without the need for specialized knowledge or technical skills. And, because safety is of the utmost importance, the protocol also supports end-to-end encryption, ensuring that the data transmitted between devices is secure.
Another key benefit, especially for most of us, is that Matter is completely open source. All of Matter’s information is available in their GitHub repository, including source code, documentation, scripts, examples, and everything that any developer would need to create Matter-compatible components.
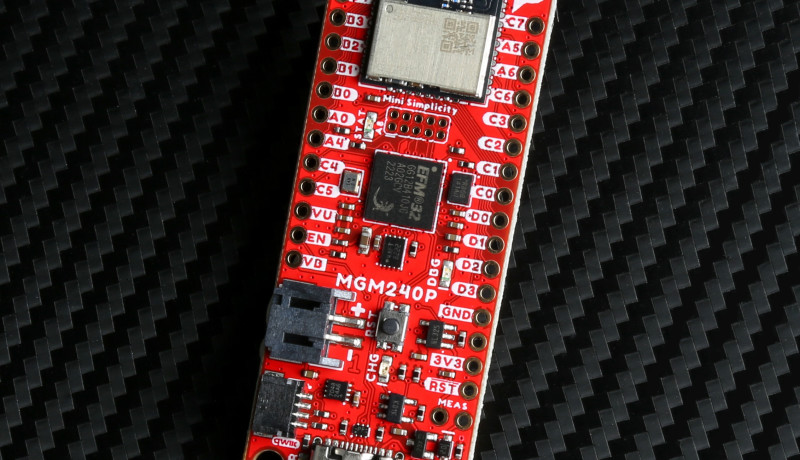
As nice as this is, most of us have still been relegated to the role of consumer, with no way to prototype components without starting completely from scratch. Luckily, that’s all changing, with the recent release of the SparkFun Thing Plus Matter Development Board, from SparkFun Electronics, which is available in the Elektor Store (see Related Products). This is the first easily accessible board of its kind that combines Matter and SparkFun’s Qwiic ecosystem for agile development and prototyping of Matter-based IoT devices. The MGM240P wireless module from Silicon Labs provides secure connectivity for both 802.15.4 with Mesh communication (Thread) and Bluetooth Low Energy 5.3 protocols. The module comes ready for integration into Silicon Labs’ Matter IoT protocol for home automation. SparkFun’s Thing Plus development boards are Feather-compatible and include a Qwiic connector for easy integration into their Qwiic Connect System for solderless I2C circuits.
Getting Set Up with Simplicity Studio
To take our first steps as an IoT developer using Matter, we need to start by connecting the Thing Plus Matter Board to a Google Nest Hub. But, before that, we’ll install Simplicity Studio from Silicon Labs. We’ll go through the steps quickly here, but you can find a much more in-depth tutorial on SparkFun’s website.
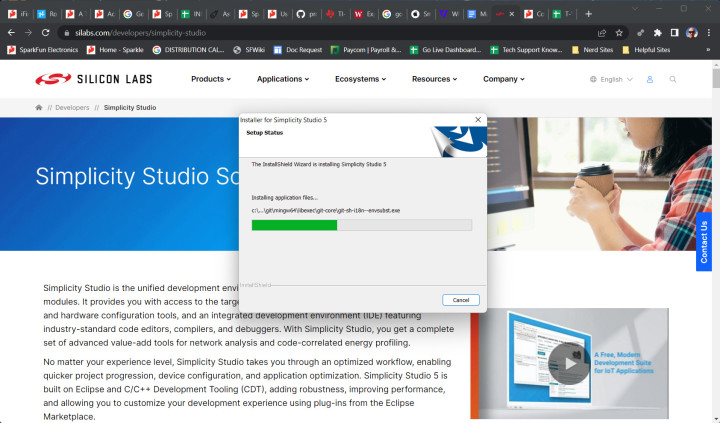
If you go to the Silicon Labs website, you can download the current version (Simplicity Studio 5 at the time of this writing) for your operating system. When you click the installer button for your particular operating system, you’ll be taken to a login page. If you don’t already have an account, create one now, as you’ll be asked for it in order to open Simplicity Studio. Once you’ve downloaded it, run the setup application, as shown in Figure 1.
After you’ve installed and run Simplicity Studio for the first time, you’ll be brought to Installation Manager, which will search for any updates available, and, if necessary, list them all for you. Here, you can just hit Update All to make sure that you have the latest versions of everything that Simplicity Studio uses to run. If there are no additional updates, or your system is configured to update them automatically, Installation Manager will immediately skip to the next step.
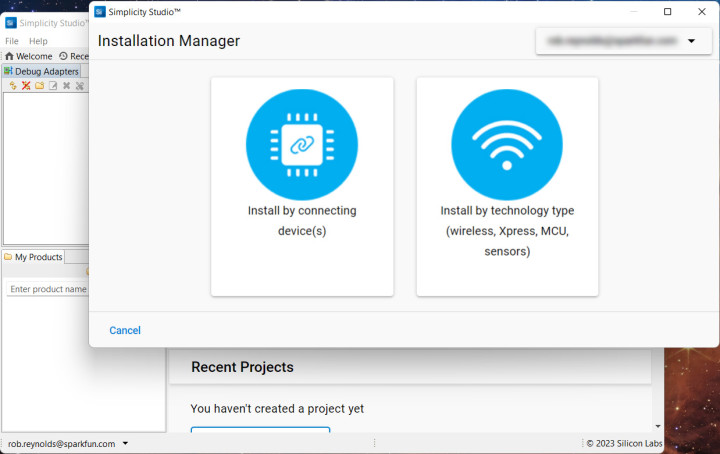
Once Simplicity Studio restarts (if a restart was necessary), you’ll be brought back to Installation Manager, but, this time, it will ask if you want to install your device by connecting the device(s), or if we want to install by technology type (wireless, Xpress, MCU, sensors). Here we’ll select Install by connecting devices (Figure 2) and connect our SparkFun Thing Plus Matter board via USB.
You’ll be asked if you want to install required packages, which we do, so go ahead and hit Yes. Once that installs, the Installation Manager should read “1 Device Found”, named something like:
[checkbox] J-Link (000449050174)(ID: 000449050174)
Check the checkbox and hit Next, and you’ll be brought to Package Installation Options. Selecting Auto installs all the necessary packages, with all the bells and whistles that we want. There’s also an Advanced option that lets you choose exactly which packages you do and do not want installed, but, if you’re working at that level, you’re probably not reading this article. Go ahead and select Auto, then Next, as shown in Figure 3. You’ll be given a Master Software License Agreement to accept, and then the installation will begin. This one will take some time, and requires a restart at the end, so now might be a good time to go get a beverage or a snack.

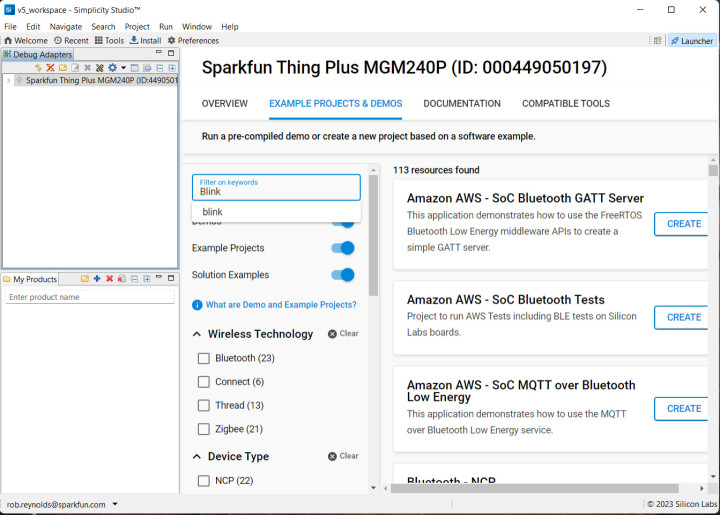
When you return and restart Simplicity Studio, you’ll be greeted by another EULA, and then, finally, we arrive at the Welcome to Simplicity Studio screen! Under Connected Devices, you should see the SparkFun Thing Plus MGM240P. Hitting Start will bring up the Thing Plus information page, where you can see an overview of the board, plus example projects and demos, documentation, and compatible tools. If you navigate to the Example Projects and Demos tab, then, in the filter field, type in the keyword “Blink.” This should bring up a number of resources. Find the Platform - Blink Bare-metal resource, and click the Create button (Figure 4).
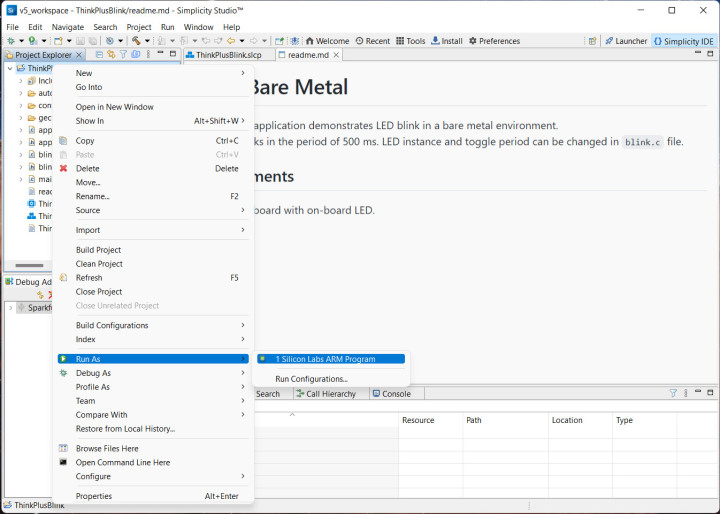
This will open a window that will allow you to change the name or location of the file. I suggest renaming the file to something that makes sense to you, like FirstBlinkDemo, then click Finish. Once the project is built, you will see on the left side of your Simplicity Studio app a Project Explorer window. Look for the main project folder, which should be named MatterBlinkExample. Right-click on that, then navigate to Run as/1 Silicon Labs ARM Program (see Figure 5).
Clicking on that will compile the sketch and flash it to your Thing Plus Matter board. The board’s blue LED should now be blinking at half-second intervals. Now, chances are that when you first connected your Thing Plus board via USB, it started blinking at half-second intervals before you even did anything. To verify that your code is actually being flashed to the board, you can change the blink interval by going to the blink.c file in the Project Explorer, and changing the interval. Somewhere around line 31 (Figure 6), you should find
#define TOOGLE_DELAY_MS 500
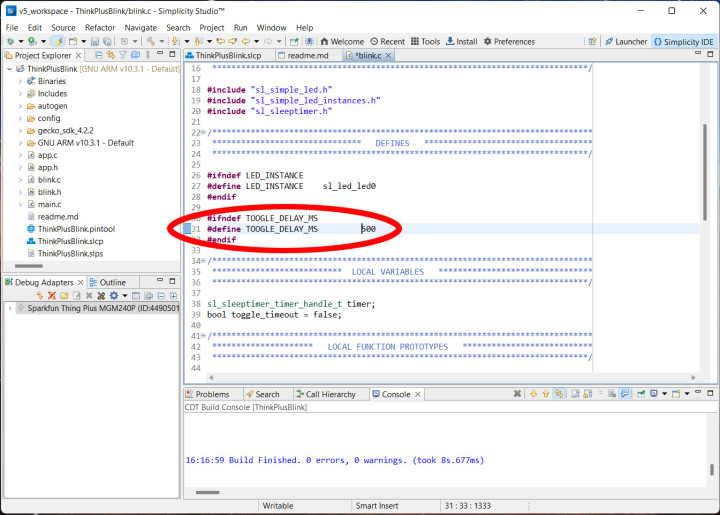
Simply change the value to something that will make it clear that the LED is blinking at a different tempo. Changing it to 100 for an extremely rapid blink, or 3000 for a slow blink, and you’ll know for certain that the board is being flashed with your code. Once you’ve changed that value, you can right-click on the MatterBlinkExample folder again, navigate down to Run as/1 Silicon Labs ARM Program, click that, and watch the board’s blue LED change the frequency of its blinks.
Connecting the Board to Google Nest Hub
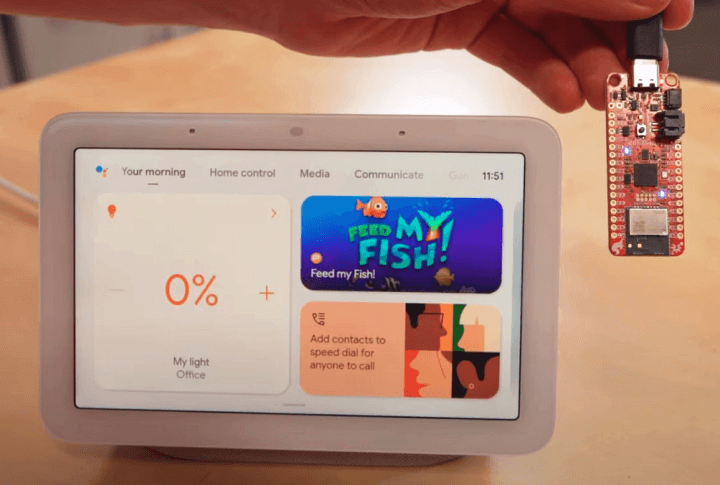
Congratulations, you are now communicating with your Thing Plus Matter board using Matter with the Silicon Labs Simplicity Studio. From here, things really start to get interesting. Communicating with Google Hub allows you to integrate your own custom builds into your Smart Home, with boards such as this SparkFun Thing Plus Matter board (Figure 7). If you’re excited to keep moving forward, SparkFun Engineer Drew, along with Creative Technologist Mariah, have put together a video and tutorial explaining exactly how to do that.
Since this technology is extremely new, examples and tutorials are still fairly limited, but their numbers are growing every day. Getting started now with Matter will put you well ahead of the pack, as this unifying protocol continues across all platforms, and helps to unify the smart home industry.
Editor's note: This article (230224-01) appears in Elektor July/August 2023.
Questions About Matter or This Article?
Do you have technical questions or comments about this article? Email SparkFun's Support team at support@sparkfun.com or contact Elektor at editor@elektor.com.
About the Author
Rob Reynolds has been at SparkFun since 2015, and in the role of Creative Technologist for the past five years. With an extensive background in the arts, his experience helps him to create projects, tutorials, and videos that are usually as entertaining and amusing as they are informative. You can find him on Twitter at @thingsrobmade.
Discussion (0 comments)