
BlueRC: An IR Remote Control with Smartphone and ESP32
on
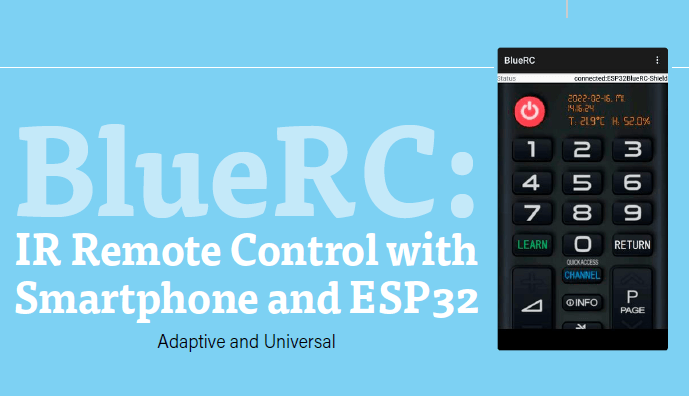
There was a time when infrared (IR) transmitters on mobile phones were common, but, that is no longer the case. This project offers a solution: Use your mobile phone with its Bluetooth connectivity to control an ESP32 board that can both send infrared commands and learn new ones.
An IR Project
I decided that I wanted to be able to control my infrared devices using my phone. I did some research by comparing several projects on the web. Most of them worked with predefined codes, meaning that the IR codes had to be known in advance and stored in an array. I wanted to build a fully learning remote control that required no prior knowledge of any proprietary remote control codes. The codes need to be updated by the circuit in real time and on the fly.
The Hardware
There are just two main building blocks for this project:
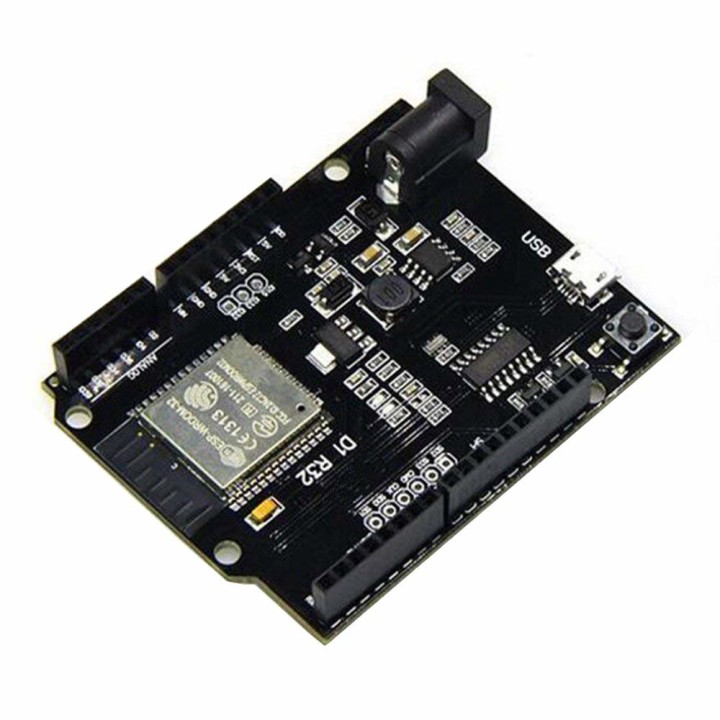
- A microcontroller board (Figure 1) with a connected infrared receiver for learning existing codes from other remotes, and an infrared transmitter for performing the main job of sending commands to your TV, set-top box, etc. The board also stores the learned codes.
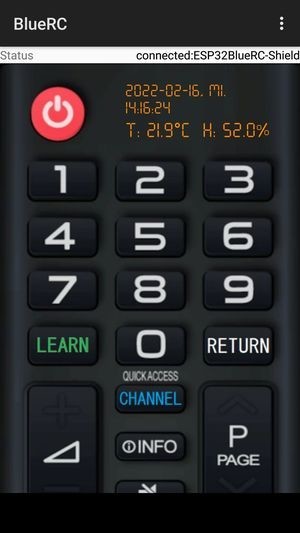
- An Android phone to run an app, which just acts as the user interface for the microcontroller board. The app provides you with an on-screen remote control interface (Figure 2), which allows you to press the buttons you need to control your infrared devices. You can also start the learning sequence using a key press in this user interface, but the learning procedure itself is performed on the microcontroller board.
I was looking for a commercially available solution that would check all the hardware boxes, but unfortunately found nothing that was 100% suitable. So, for the microcontroller side, I chose an ESP32 board, as it has both Bluetooth and Wi-Fi. The D1 R32 development board from WeMos has an Arduino UNO-compatible pin layout and works well with the Arduino IDE.
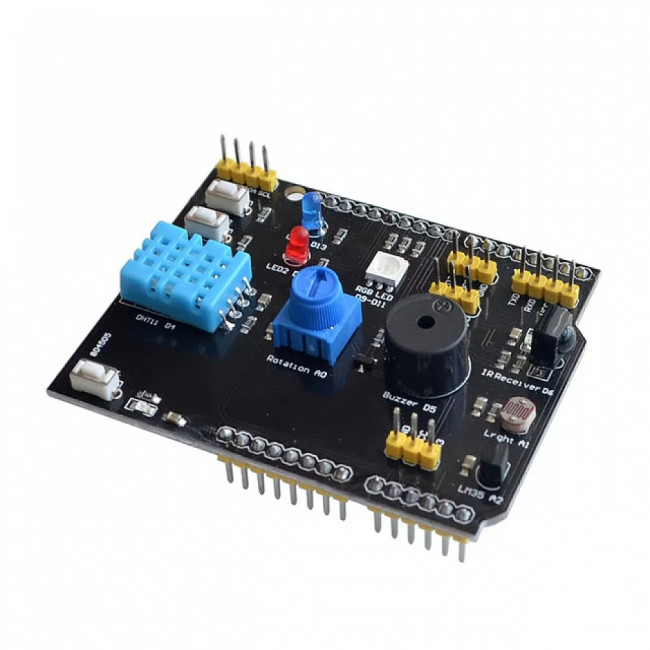
I added a multiple sensor shield (Figure 3) on top. This shield has a plethora of other sensors, such as a humidity sensor, a buzzer, a potentiometer, a photocell, an RGB LED, and a couple of buttons — all of which put a lot of versatility in your hands for future home automation ideas. I’ve used the sensors to display the temperature and humidity in the Android app, but our most important on-board sensor is the infrared receiver!
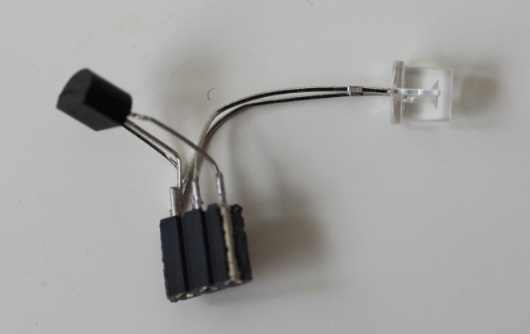
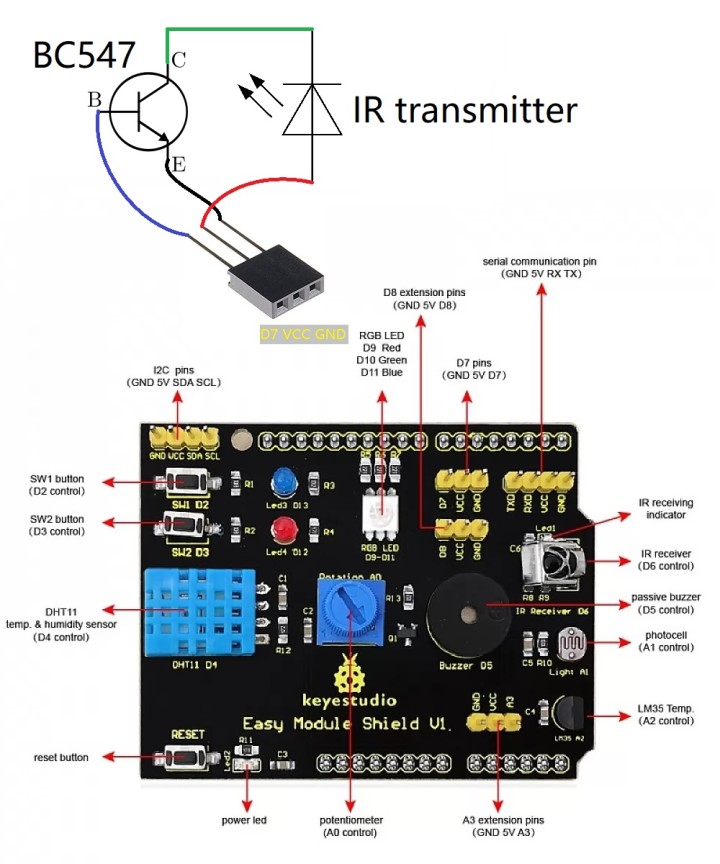
While the shield does have a built-in IR receiver, there is no transmitter, so I had to build my own quick-and-dirty driver/transmitter module. It consists of only 3 components — a 3-pin header socket, a BC547 NPN transistor, and an IR transmitter LED, shown very simply constructed in Figure 4. After soldering, I plugged the socket header into port pin D7 on the sensor shield, which uses port pin D14 as an output to drive my IR transmitter, while the shield’s IR receiver uses port pin D27 as an input by default.
The Software
My software is relatively simple: The ESP32 acts as Bluetooth server, and an Android app as client. The ESP32 simply awaits Bluetooth messages from the Android app. There is minimal Bluetooth communication between the two devices, as remote control key presses — as well as the command to begin the learning sequence (“^”) — from the Android app are sent to the ESP32 as single characters.
At first, I tried the standard IR library for Arduino. It worked fine, but is not fully supported on the ESP32, as the ESP32 makes use of a proprietary on-board hardware Remote Control Transceiver (RMT) with a lot of protocol and modulation logic built-in for IR signals. After much trial and error, I finally found a fully working IR library for the ESP32, IRremoteESP8266, by Ken Shirriff et al. Thank you, Ken.
Originally, I wanted to store the IR codes in EEPROM, but when I wrote my firmware, I realized that the ESP32 has no EEPROM at all. However, it does have the ability to save data permanently in flash via the Preferences.h library.
Because my original remote control had RC5 coding, I only implemented the RC5 encoding scheme. You may have to modify the Arduino sketch if your own remote control uses another protocol.
Programming
For the WeMos board, download the BlueRC Arduino sketch. It’s a single .ino sketch that you can upload using the Arduino IDE.
To set up the Android app, follow these steps:
1. On your Android device, download BlueRC-app-V1.1.apk from the GitHub page. You will need to set your phone to allow downloading apps from external sources (other than Google Play Store).
2. Power up the WeMos board running our BlueRC .ino firmware.
3. Launch the Android app. If Bluetooth is not active, the app will request permission; tap on Accept.
4. Tap on the “kebab menu” on the top-right, and then on Connect BT Device. If this is your first time pairing with the ESP32, tap Scan for devices and wait for ESP32BlueRC-Shield to appear under Other Available Devices. Tap on this, then confirm the pairing.
5. In the Status bar at the top, you should now see connected:ESP32BlueRC-Shield.
Once you’ve paired your hardware, there’s no need to perform the scan process again — just tap ESP32BlueRC-Shield under Paired Devices in future.
With the app installed and working, you can now carry out the learning process:
1. Long-tap on the LEARN button in the UI, and the app will respond with “Learning begins, please press a button within 10 seconds...” The Android app then sends the special character “^” to the ESP32, after which the blue LED on the shield will turn on.
2. On the user interface, tap the button that you want to teach the ESP32 board. The phone will send the corresponding character to the ESP32, so the ESP32 board awaits the next step.
3. Point your old infrared remote control at the ESP32 board and press the corresponding button on the remote. The IR code for this button will automatically be stored in the ESP32’s memory.
4. Repeat steps 1 and 2 for all the buttons you want to record.
5. Close the app by tapping Menu Exit program.
That’s it. You may now enjoy controlling your infrared devices from your BlueRC device, making use of the app on your Android phone.
For ESP32 troubleshooting, your best bet is to turn it off and back on again! You can see a video in action on my YouTube channel.
This article (220103-01) appears in the May/June 2023 edition of Elektor Mag. Do you have technical questions or comments about this article? You are welcome to contact the Elektor editorial team.
Discussion (1 comment)