The ESP32 seemed to appear from nowhere. Now it is everywhere! Simplifying connectivity with Wi-Fi networks and Bluetooth devices, it has become a staple of the maker community. We take a look at its brief history, how to get started, and the development support that is on offer.
The ESP32 has become a catch-all term for a range of maker-friendly, Wi-Fi-capable development boards and chips. They rely on silicon from Espressif, a fabless silicon vendor based in China founded in 2008. Its first product, a 2.4-GHz Wi-Fi system-on-chip (SoC), was brought to market in 2013. Named the ESP8089, it targeted tablets and set-top box applications. But it is the ESP8266, released in 2014, which brought this family of products to the attention of the maker community.
The vision of Espressif focuses on bringing cutting-edge Artificial Intelligence of Things (AIoT) solutions to market through wireless-capable, low-power technology. The ESP8266 drew these threads together by providing an easy-to-use, single-chip device coupled with the software needed to communicate via Wi-Fi networks.
Subscribe
Tag alert: Subscribe to the tag ESP32 and you will receive an e-mail as soon as a new item about it is published on our website!
What's Powering the ESP32?
Deep inside, the ESP8266 is powered by a Tensilica Xtensa L106 32-bit RISC processor. This rather exotic architecture is supplied as licensable intellectual property (IP) by Cadence and, according to a press release from 2007, it provided more Dhrystone MIPS performance than an Arm Cortex-M3. Furthermore, they claimed the core operated at a lower mW per MHz, which would be attractive when addressing battery-powered Internet-of-Things (IoT) applications.
The maker community first became aware of these devices when, in 2014, Hackaday announced the introduction of a new, $5 Wi-Fi module sold through Seeed Studio. Known as the ESP-01, this module was built by third-party manufacturer Ai-Thinker, also based in China. With just eight pins, two of which provided a UART interface to control the module via AT commands, the module was easy to integrate with the Arduino platform, providing even simple boards such as the Arduino Uno with internet connectivity. The only sticking point: all the documentation was written in Chinese. This was, however, a minor hindrance to the maker community as volunteers set about translating the available documentation using Google Translate and writing software libraries.
How Can the ESP32 Be So Cheap?
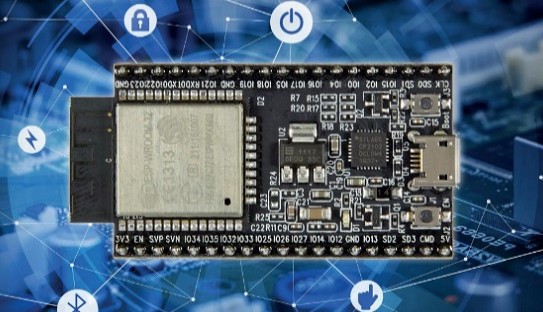
The beauty of the modules based upon the ESP8266 (Figure 1) was the limited number of components required to build a functional Wi-Fi module. Assuming that a 3.3-V supply was available, designs only needed a handful of resistors and capacitors, a PCB antenna, an external QSPI serial flash, and a crystal operating between 24 and 52 MHz. On powering up, the ESP8266 pulls its firmware from the flash and then copies it into internal SRAM from where it is executed.
Figure 1: The ESP8266 providing Wi-Fi connectivity to a clock application.
Of course, it was blatantly obvious that the modules were also fully-fledged microcontroller solutions. The processor featured general-purpose input/outputs (GPIOs), pulse-width modulated (PWM) outputs, an analog-to-digital converter (ADC), as well as all the standard serial interfaces. So, why develop code for an Arduino or another processor when you can cut out the middle man and simply program the ESP8266 itself?
By the end of 2014, Espressif had released a Software Development Kit (SDK) that allowed user code to be built that ran alongside the Wi-Fi software. At last, IoT-type applications could run standalone on modules like the ESP-01. The SDK came in two flavors: a version based upon the real-time operating system FreeRTOS and another that relied upon callbacks and timers to ensure user code shared processing time fairly with the Wi-Fi software stack. According to the datasheet, developers were left with around 50 kB of memory for their code.
New ESP32 Products Hit the Market
Since then, Espressif has been steadily building on the success of its wireless SoCs. Not only do they supply the silicon, but they also offer a range of ready-to-use modules that enable makers and developers to prototype their applications quickly.
The ESP32 series devices currently available feature a dual-core Tensilica Xtensa LX6 32-bit microprocessor. With 48 pins, they provide 520 kB of SRAM and, for some devices, between 4 and 8 MB of flash memory. 2.4 GHz Wi-Fi and Bluetooth/Bluetooth LE version 4.2 are available on the connectivity side. An ultra-low-power (ULP) co-processor, which is basically a programmable finite state machine (FSM), is also available. This can monitor some peripherals during sleep mode, making it ideal for detecting wake signals from sensors in battery-powered applications.
With the 56-pin ESP32-S2 (single-core) and ESP-S3 (dual-core) series, developers benefit from the Xtensa LX7 32-bit processor. This 240 MHz core offers vector instructions, providing acceleration for the code used by neural networks and signal processing. Both Wi-Fi and Bluetooth are on-board, although the latter is upgraded to version 5.0. The interface peripherals remain more-or-less the same with the addition of USB on-the-go (OTG) and the TWAI™, or Two-Wire Automotive Interface, module. The latter is compatible with ISO 11898-1, otherwise known as CAN. Security is also boosted with the availability of an RSA-based secure boot, flash encryption, and a hash-based message authentication code (HMAC) accelerator.
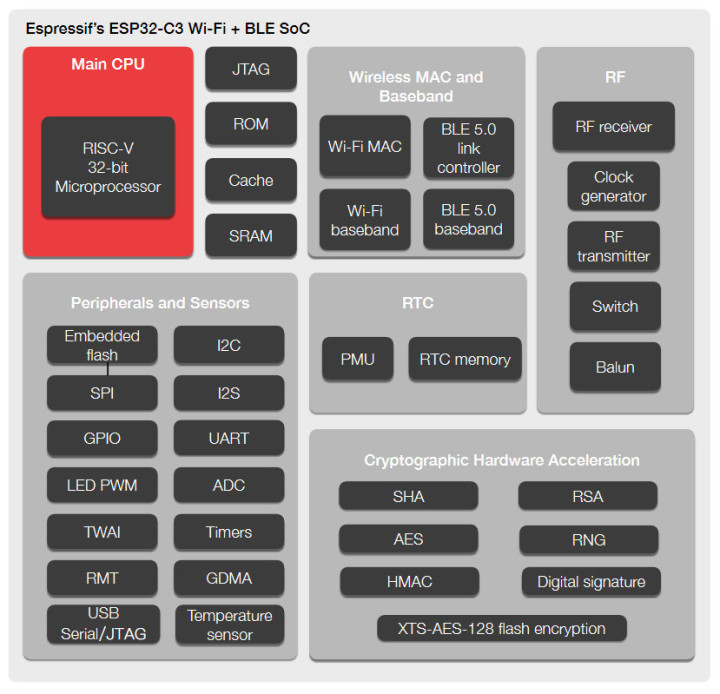
More recently, the line-up has seen the introduction of RISC-V processors. While the ESP32-C3 only provides a single-core option and operation at up to 160 MHz (Figure 2), its 2.55 CoreMark/MHz performance is essentially the same as the Xtensa LX7 of the ESP32-S series. Otherwise, in terms of peripherals and memory, the feature set roughly matches the ESP32-S but with the number of pins limited to 32.
Figure 2: The ESP32-C3 provides essentially the same peripheral options as the ESP32-S series but with a lower pin count and a RISC-V core replacing the Xtensa LX7.
Building ESP32 Applications
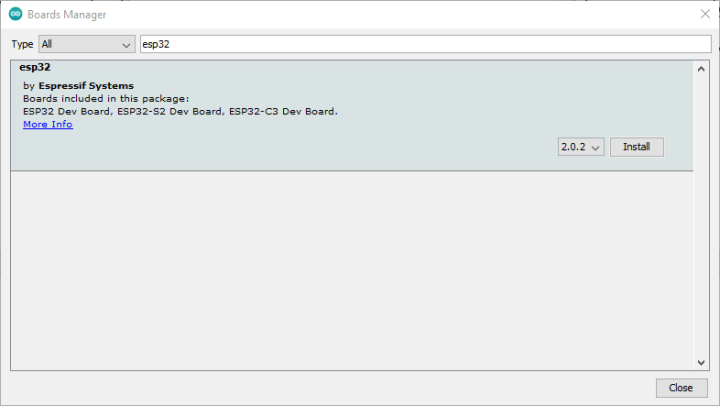
As a developer, a wide range of options are available when it comes to building application code. For makers with experience on Arduino, the easiest place to start is within your existing Arduino IDE installation. Simply add the location of the Arduino-ESP32 packages via File -> Preferences, then select ESP32 from Tools -> Board -> Board Manager (Figure 3). Once complete, a range of examples will show up under File -> Examples just like with any standard Arduino platform. Source code is saved with the standard ‘.ino’ file ending, and your application is written in the setup() and loop() functions you are used to.
Figure 3: Those familiar with the Arduino IDE can integrate support for the ESP32 through the board manager.
One of the frustrations with typical microcontroller development is the need to compile and then download the code before you can check that it works. This can grow to require a significant amount of time and isn’t quicker just because you changed one line of code. If you want a more responsive coding experience, you may like to look at the BASIC option offered by Annex WiFi RDS. The development environment is web browser-based. The environment is downloaded to your target ESP32 device that connects to your Wi-Fi once the code has been flashed with their tool. Once connected, you can write your code (Listing 1) using your chosen browser and, because it is interpreted rather than compiled, your code executes as soon as you are done.
led = 2 ’ GPIO02. Change with the pin where your led is connected
pin.mode led, output
for z = 0 to 1000
pin(led) = 1 - pin(led)
pause 500
next z
Listing 1: Example BASIC code to blink an LED using the Annex WiFi RDS development environment.
Of course, you can’t overlook the wealth of support from third parties for creating IoT solutions. Together with Amazon AWS, Espressif offers a complete artificial intelligence solution for image recognition and audio processing with their ESP-EYE development board. Or, if you’re looking for Amazon Alexa support, there are also the ESP32-Vaquita boards based around the ESP32-WROVER-E series of modules.
Subscribe
Tag alert: Subscribe to the tag microcontrollers and you will receive an e-mail as soon as a new item about it is published on our website!
What Will You Build?
Espressif’s success with its ESP32 chips and modules over such a short space of time has been more than impressive. Comparing them with some of the established European and American MCU vendors, they seem to have shown real attention to detail with good documentation, provided the necessary software to get the peripherals operational, and have delivered a substantial range of example applications too.
Figure 4: You're only limited by your imagination, as this ESP32-based miniature Mac proves!
And we’re not just talking about a blinky LED and reading an ADC – some of the applications would be meaty and challenging even for a professional engineering team. What’s exciting for makers is the range of development platforms available for developing code, coupled with the great community behind these powerful little chips. So, regardless of what you want to make, if it needs wireless connectivity, you’re not going to go far wrong with the ESP32.
Questions or Comments?
Do you have technical questions or comments about his article? Email the Elektor team at editor@elektor.com.
Subscribe
Tag alert: Subscribe to the tag Embedded & AI and you will receive an e-mail as soon as a new item about it is published on our website!
Elektor Magazine has been one of the leading sources of information on electronics for engineers, designers, start-ups and companies for 65 years. Our magazine is powered by an active community of electronics engineers – from students to professionals – who are passionate about designing and sharing innovative ideas.
For them, we publish hundreds of items a year, in formats such as articles, videos, webinars, and other learning formats. Our mission is to share knowledge in every possible way and inspire readers with the latest developments within the electrical engineering sector.
Thank you for your vote!
Leave further comments in the fields below.
Thank you for your vote!
If you wish to leave a comment with your rating, please first use the login below. If not, just close this window.


Discussion (0 comments)