
DIY PLC Trainers and More: Inside Chris Urban’s Electronics Workspace
on
In this interview, Christian Urbanescu shares his journey from being an electronics enthusiast to becoming a teacher. He gives us a glimpse into his passion for technology and hands-on learning. He talks about his work in automation, his DIY PLC trainers, and how his presence on social media inspires others in the maker community. Based just outside of Montreal, Quebec, he stays connected with others through his YouTube channel and social media, creating a welcoming space for learning and innovation.
Elektor: Can you share a bit about your background and journey in the field?
Christian Urbanescu: In retrospect, my entire professional career has been a long sequence of twists and rebuttals. I’ll skip a good portion of them because I don’t want the grin on your faces to get too wide. Let’s start with the military service, which, in my time, was mandatory. I landed in the Navy, and shortly after, my bold demand for a place in the Navy’s orchestra was denied — good ear but poor violin skills, buddy… somebody upstairs noticed my electronics background, so I was recruited for a year by the Navy research center. There, I saw Bang & Olufsen recording equipment for the first time. It looked like Martian technology to me.
After finishing my military service, I worked for three years in a TV set plant, doing all the factory floor jobs one can imagine — from carrying the pallets with the huge CRT tubes to assembling parts and eventually hitting the quality check booth. I left the factory with good soldering skills, knowledge of all the parts in a TV set, and new, valuable competencies, such as being able to distinguish between being shocked by a high-voltage transformer or a capacitor. Not the same. I would have stayed there longer if my recurring requests for the night shift hadn’t always been turned down. My dream of attending university morning classes was stalling.
Six years later, I became an engineer. Six years passed like the blink of an eye. I specialized in two fields: computers and industrial automation. Then I found a place in a computing/data center and, luckily, fell into the hands of two older engineers who taught me almost everything I know today about computing techniques. Because of them, I was dispatched to work on the new DEC PDP mini-computers and learned the rudiments of a UNIX-like OS. They also sent me for training to fix various computer boards and peripherals.
As funny as it may look today, I also understood the meaning of some BASIC instructions like “print.” In the famous computing center basement — governed by an Austrian climate control system — mainframe and mini-computer operators were using “terminals.” Unlike today’s micro-computers, back then an operator terminal was more like an automated typewriter. It had a keyboard plus a bi-directional printer, interfaced to communicate with the mainframe and fed with continuous paper. Three purposes were covered: the operator could send commands to the computer, receive feedback or answers to instructions, and execute network users’ requests too. Depending on how you chose your options, the command print could either show the info in front of your eyes or send it to the massive line printer, much like sending a big PDF file today. That computing center was the most beneficial and challenging place for my technical background.
As with all good things, it came to an end. By the eve of the '90s, most medium-sized computing centers like ours faded out and were dismantled. With four other colleagues, we opened our first company, and our first project was to dismantle one of our competitors! We found out that they had more and better computers than ours, and yet they ended up in pieces anyway. What I can tell you is, that it may take weeks to build a mainframe computer in a specialized plant. It took some planning, sure, but only three days for the five of us to disassemble and carry away the center’s contents. Recovering the parts and organizing the materials took the whole coming summer. We had so much fun!
The best project was organizing the servicing of mini-computers for the Ministry of Finance and the six financial districts in the capital. We did this for a good couple of years. For all the various projects, I always trained my clients very carefully so I wouldn’t have to travel back to them hundreds of kilometers. So, with my extensive training experience, when landing in Canada in 1998, I switched from engineering to teaching.
And here we are, 25 years later. I got my teaching license at McGill University in 2007, and in the meantime, I earned a certificate in programming at the University of Montréal. Despite doing PLC programming for years, I never considered myself a programmer but rather someone on the hardware side.
Elektor: How did you start your journey as a content creator on YouTube? What are your main areas of focus or topics that you cover in your videos?
Urbanescu: I was very reluctant for years to use videos during my classes. One of the very rare exceptions was the presentation and analysis of the Stuxnet virus, as it was designed to attack Siemens PLC software. I had to admit that the newer generations of students were addicted to videos, so I thought about adding some videos just as a catch and also offering visual help to the few students who wanted to mount their own PLC trainers at home and couldn’t have direct access to my advice during late nights or weekends.
In the fall of 2022, I decided to start the channel. And, almost out of nowhere, as still a fresh and inexperienced YouTuber, I now have around 130 videos online. The channel has four sections so far:
- “PLC trainers step-by-step.” It covers in detail the stages of making a personal trainer, from watching some of my projects, ordering the parts, and then putting them together into a finished product. I’ll never give up my opinion that if you really want to progress in understanding PLC programming, one essential step is to have a real PLC trainer at hand. Not a software simulator, not YouTube videos, but a real piece of hardware. You’ll be surprised to find out how many things you haven’t thought about in your program until you put it into a physical PLC and watch the result of your instructions.
- “Your time to shine.” A section of 11 videos, documenting the effort of two of my students working all the way to get their own trainers done and fully functional. Being as proud as my students for each of their finished projects, why not give Diyu and Rodney the credit they deserve?
- “PLC Networking: The French Connection.” As not all the students could have me teaching the PLC course, I wanted to make available a full view of how a local network works, like the workstations in a factory, where the individual stations can either execute similar tasks or completely different ones — digital outs, analog, or combined. The title is trying to reminisce the movie with the same title because the network is in Montréal, and we speak French too.
- “Electronics projects.” I started it particularly to encourage beginners to do projects and grasp the basics of electronics. I cover plenty of simple logic circuits and low-priced tools to build, like a logic probe, LED testers, and the like. Cheap tools are always beneficial for beginners in any field. I am also ordering and analyzing projects already published in electronics magazines. See my videos “TV-B-Gone,” “Miniature Larson Scanner,” “PC Keyboard Tester,” “Beep Logic Tester,” and others. I will inevitably include here some analog circuits, as well as electronic parts descriptions, a bit like in the Elektor magazine series “Peculiar Parts,” “Q&A,” “From the Labs,” “Tips and Tricks,” and so on.
Elektor: What initially sparked your interest in electronics?
Urbanescu: A big vacuum tube radio, given to us by my grandparents. Such an amazing member of our small family: it was talking on thousand voices, it was vibrating and singing too, and in the evenings it spread warm and well-shaped effluxes of light. I was staring at it for hours.
Through my 7-year-old eyes, I was so fascinated by IT that my mother was on the edge trying to convince me that it wasn’t really a being. So coming from my own mother with so many arguments, I had to give up and admit reluctantly that maybe, it was a thing. But as things may eventually stop working, one day I started to sing a different tune and suddenly decided in my mind that I absolutely needed to fix it.
Take your guess: nothing was really wrong with the big radio, it was doing its job beautifully. But this –as some of you may expect – was to be found much later, after the facts.cWith my new obsession in mind, I discovered then that nothing could be done, unless I could somehow remove the cardboard back cover.
So, day by day, in the short moments my mother was away I started loose the six screws one by one, until the cover barely stayed in place. I had no idea what a screwdriver was, and the cutlery wasn’t cooperating willingly either.
And finally, the D day arrived. My mother went out for longer than 15 minutes, instructing me to stay cool and quiet. Sure thing. Without wasting any more time, kicked the hated cover right on the floor. The warm heating waves coming out of the huge box were so welcoming me. Needless to say, I put a big smile on my face and went in, my hands first. That was the last thing I could remember. To make the whole story shorter, it took about two weeks for the doctors in the hospital to put me back on wheels.
And as with any good story, it comes with an ending. In his known wisdom, my grandfather — realising that the poor kid may still have other next encounters with the electric current on the schedule — registered me in the biggest radio club in town. This was the first step to becoming years later, a professional.
Urbanescu: The students reaching programs in vocational education are adults of all ages. My youngest was 17, and my oldest was 73 years old. Surely, Gabriele, at 73, wasn’t looking for a job; he was just of too curious a nature even after retiring, but he finished the electromechanics program like a pro anyway. As the courses are organized hands-on, you cannot count the number of projects and associated questions. So, I needed to replicate or improve some of these projects — mostly during the weekends, as there was no other time available to me — and then try to imagine the potential hiccups, troubleshooting procedures, preparing exams, and so on.
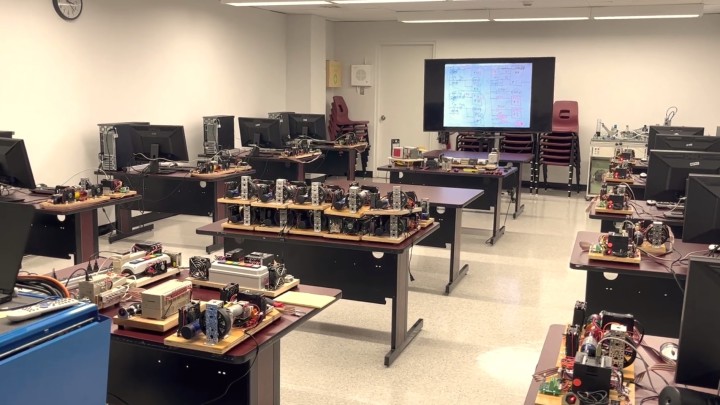
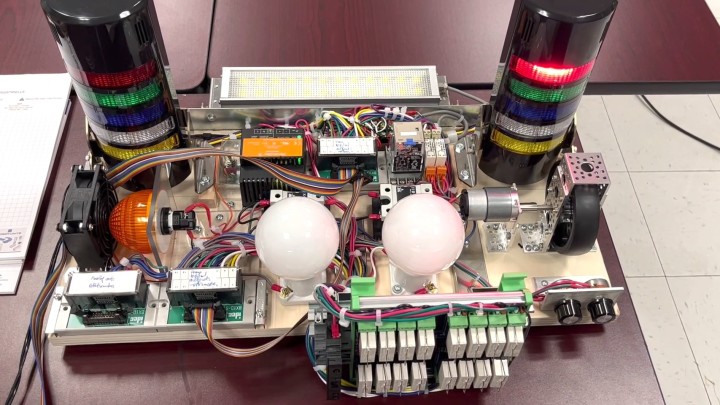
However, for the big PLC lab, for instance, I could not borrow the huge panels with three-phase motors and AC drives home. So, I used my personal workspace to design my own trainers, fitting the space I had. Guess what? The products of my design now equip a low-power full laboratory and several cabinets. They are currently used by all students, as well as the other teachers, and some can be seen in video #3 on my channel! Not to mention that, compared with similar goal projects you can find on specialized sites, mine can be made much cheaper. It was one of the arguments to convince anybody to become involved in building one: if in one year you become so good with PLC programming, you can sell your trainer — let’s say on eBay — and get your money back right away!
Urbanescu: I’ve used so many articles and diagrams from Elektor — and from other sources — during the last 20 years that I never thought to keep track of them, nor put them in a ranking order. Now, if I think about it, I’ve made a short list of some that I could easily recall and find among the Elektor-published articles:
- USB switch for printer: I built and used it for about 15 years already. It is described in a couple of my videos.
- Recycle your ATX power supply: This was surely the most successful one. I replicated it in more than 150 samples. The students were recovering or buying a second-hand PC power supply, then we were making and attaching the project on top. This way, anybody who wanted to practice a bit with low-power electronics could do it. We even improved the original design to compensate for some flaws.
- LED Tester: Also featured in one of my videos. It was a star in my introductory class about LEDs.
- Beep – a sounding logic probe/tester: Yet another star in my YouTube videos. Through one of our distributors, I ordered tens of them from Elektor. Unfortunately, at one point, it was discontinued.
- The LCR Meter: The most valuable Elektor project to me. I used it as a demo many times.
- Sand clock: This one, by the way, was the most challenging. I still have some problems using it.
- LED Top with special effects: It became a very catchy demo for the POV concept in my class.
- Ultrasonic tape measure: Together with the next one, they were very useful to introduce a standard ultrasonic sensor like HC-SR04.
- Level and distance gauge: A great companion to the previous project.
- AVR playground: Support for “Mastering Microcontrollers helped by Arduino.”
I cannot be accurate, but just to pick a round number, I’d say that more than 100 Elektor projects passed through my workbench. If I had to recommend a beginner in electronics where to start, I would first ask the question: are you a hobbyist, or do you intend to become a professional in the field?

The easy answer for the second option is: please register as soon as possible in an organized program fitting your desires — vocational or university level. As for hobbyists, keeping in mind that most of the objects around us are governed either by microcontrollers or microprocessors, I would suggest starting with the easier one to manage, in terms of resources and especially your time: microcontrollers.
There is one warmly recommended in the Elektor store — Microcontrollers Hands-On Course for Arduino starters (bundle). You get both an excellent small trainer — Arduino Nano included — and a hands-on manual with over 40 projects. Best investment for your time and money, no need to buy anything else to start.
As for the next step — microprocessors — we can talk about Raspberry Pi. I insist it is not the same as Arduino; it’s a full single-board computer (SBC).
Elektor: Tell us about your favorite project in the field of electronics. What did you build and why?
Urbanescu: In 25 years of teaching, my perspective about designing projects changed completely. During my college years where I had to often face basic math. difficulties from my students to the long time I spent in vocational education, people who were supposed to have at least a faint idea about Ohm’s or Kirchhoff’s laws, they actually didn’t. Combined with the missing math. skills, I came to the conclusion that the most difficult things to grasp and understand by beginners were the elementary notions of electronics, meaning resistors, capacitors, coils, semiconductors, and how they are connected all together to make a diagram. So then I started to re-orient my projects to help make things simpler.
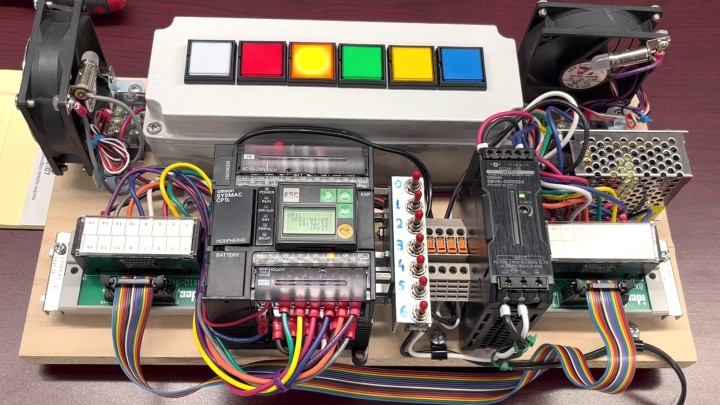
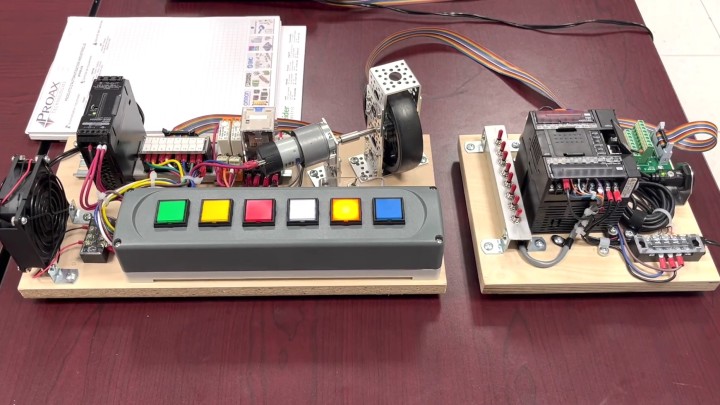
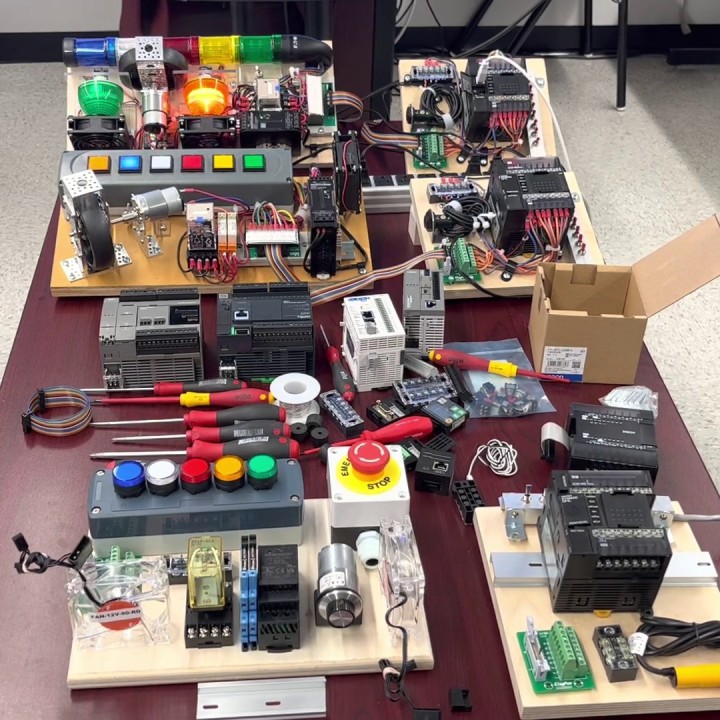
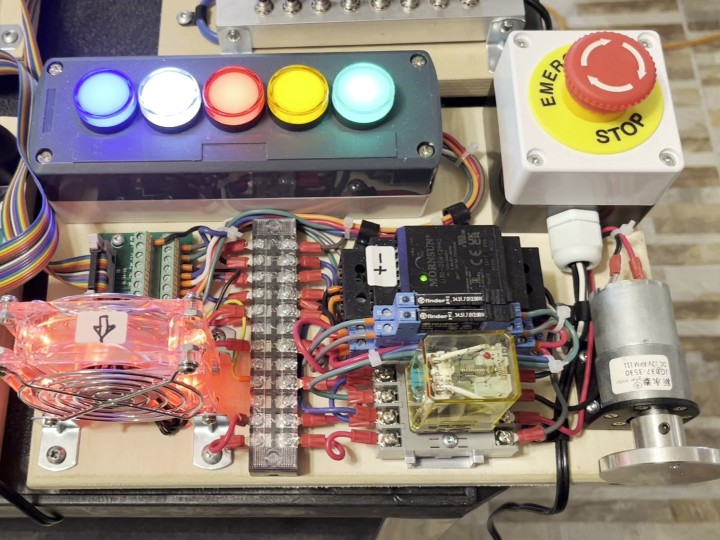
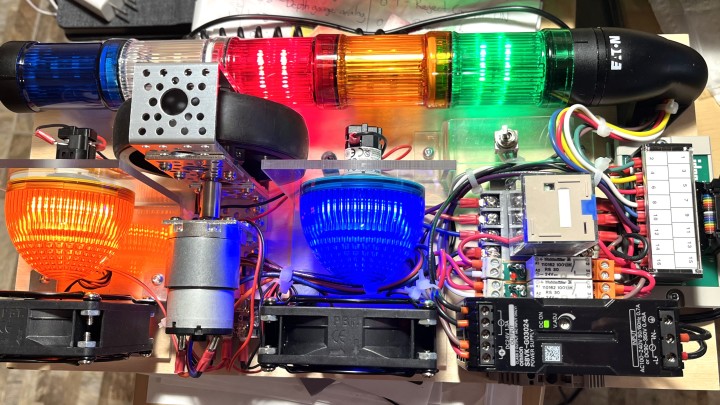
So, even if it looks like a no-brainer and doesn’t involve much calculation — just basic amperage and power consumption — I am particularly proud of the three main versions of my PLC (digital output) trainer.
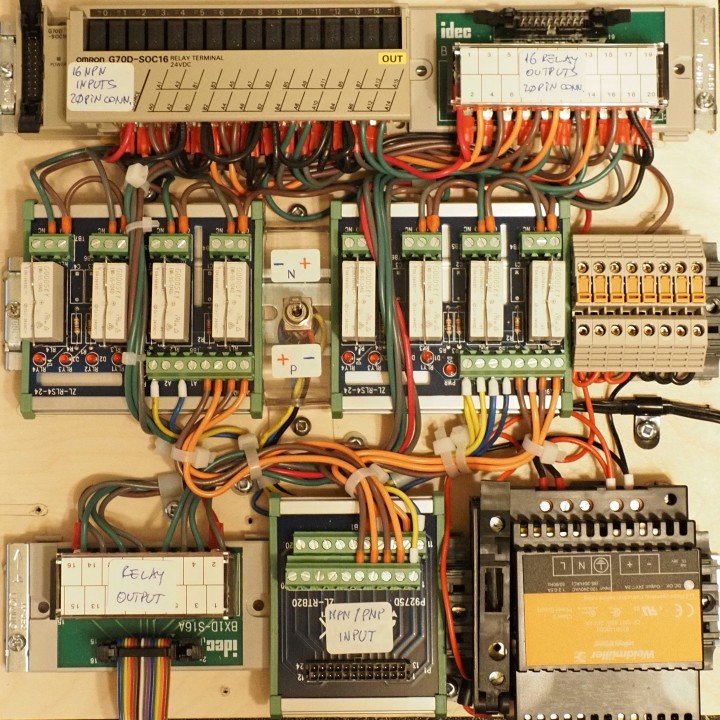
I’ve seen many trainers, and most of them were rigid assemblies where the PLC and the outputs were housed in the same box. You couldn’t use the outputs with another PLC unless you dismantled everything into pieces. Other trainers came with a breadboard attached, allowing users to tie their own external outputs to the PLC. However, in our training center, we had a variety of PLCs ready to program. To address this, I came up with a simple solution by separating the PLC from the external physical outputs.
The trainer serves as a simulator for real industrial loads, so I decided to assemble a board featuring common output devices while minimizing noise: lights, motors, and fans. I eliminated alarm buzzers and pneumatic valves/cylinders from the design for obvious reasons. Using industrial-grade lights, fans, and relays, we could get very close to the training goals.
The key feature of my design was a specific terminal block — let’s call it an interface — where all outputs converge. On all PLC boards, regardless of the brand, I attached a similar terminal block and wired all PLC outputs to it. By crimping an in-house-made flat cable — bingo! I could then connect any type of PLC to a standard output trainer, making the programming tasks much more user-friendly. After several iterations, I settled on three versions: an entry-level one I encourage my students to build themselves (detailed on my channel), a mid-level version featured in the video, and a high-end version ready for 30 digital sinking/sourcing outputs, also provided with analog inputs and outputs in the 4-20 mA system.
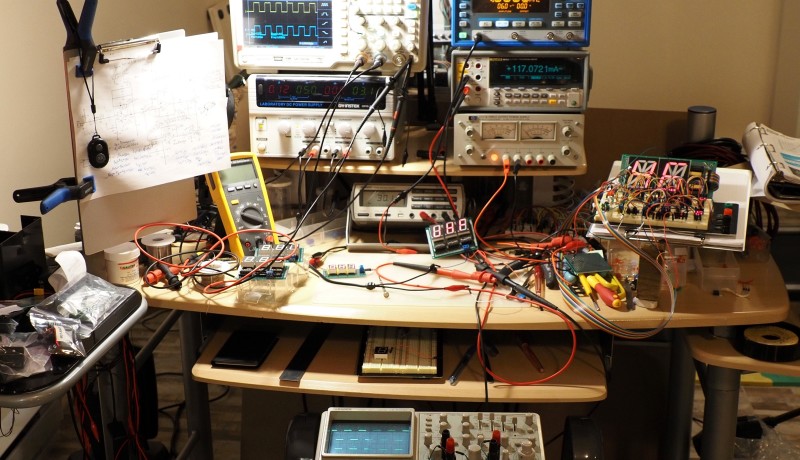
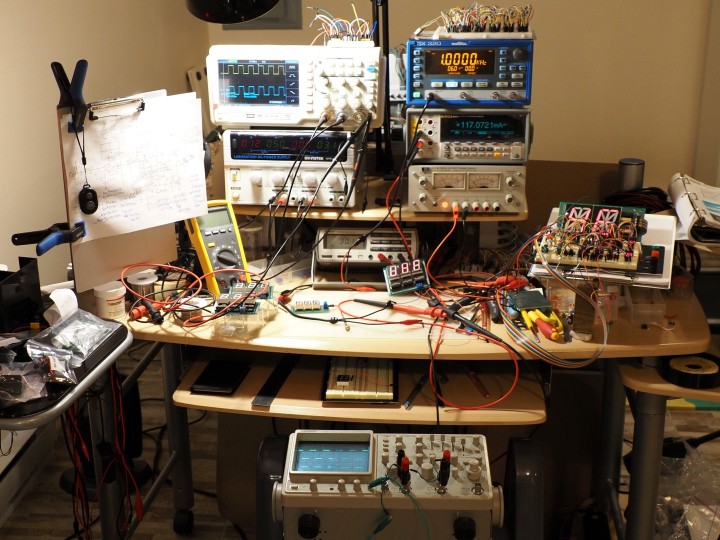
Urbanescu: My working space is split into two distinct areas, and they don’t interfere with each other. I use two identical benches: one of them is only for programming, consulting documentation, and looking at diagrams. It is equipped with a computer and a Raspberry Pi. Through a KVM switch, I can use my set: monitor/keyboard/trackball for both Windows and Linux environments. I would have used only Linux if I could. Unfortunately, most PLC brands only have their software designed for Windows. I’ve been trying for years to make them work on Linux, with very limited results so far. There are some promising software interfaces, like Waves, but the complex software packages only accept Windows.
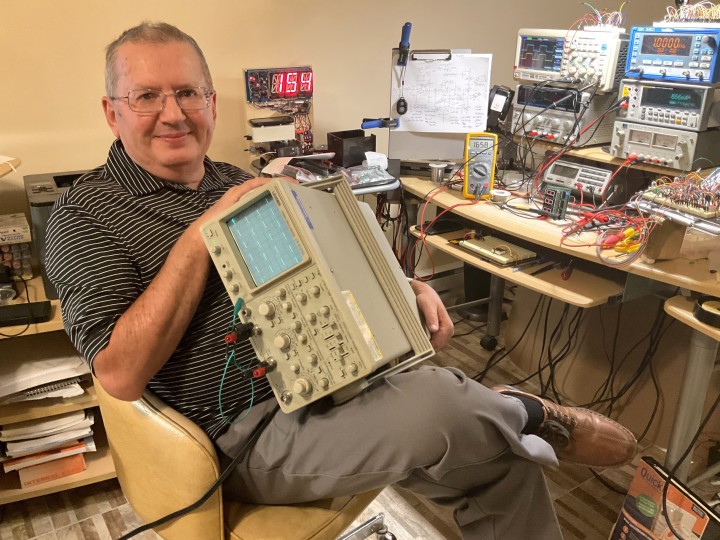
The other bench is for tinkering with projects. As Bob Pease used to say: “My favorite programming language is solder.” In the past, I was filling my basement with all kinds of broken instruments I could recover from various equipment suppliers and fix. At one point, though, I had to shelve my emotional attachment and decided to keep on the bench only the strictly required tools. It’s a pretty short list: a triple power supply, plus an old HP collectible one I couldn’t throw out; one cheap digital oscilloscope, plus an analog one I can’t give up either because it took too much effort to fix; a good bench function generator; a bench Fluke meter; and a soldering station, of course. That’s it.
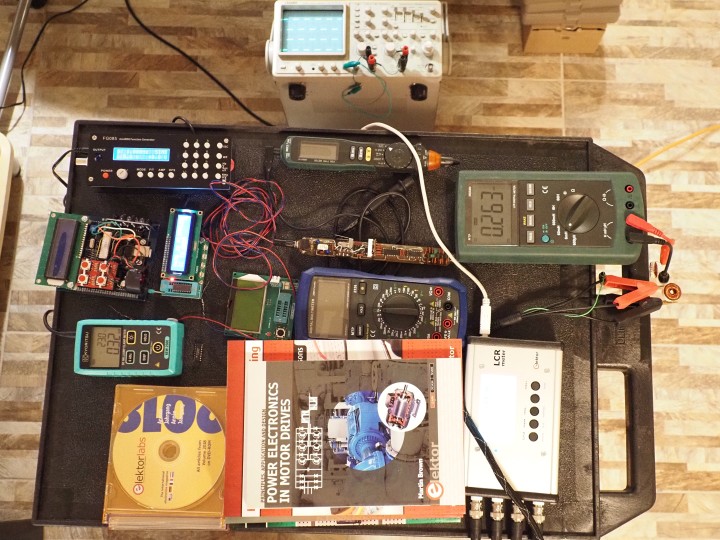
For flexibility, I keep in a big box several portable meters, logic probes, PIC programmers, clamp meters, the Elektor LCR meter, spare soldering station, portable oscilloscope tablet, and function generator, so when I carry my demos around, I can troubleshoot. But none of the small tools have a permanent place on the bench anymore, and they all have to fit in the big box
The instruments I’m most attached to? My Fluke bench meter. When I broke its 400 mA fuse, I had a pinch! And my +30-year-old logic probe. I couldn’t find a better one yet. The shelves on my wall are filled with folders and demo projects I can use for my presentations.
Elektor: Do you remember your first electronics project? Can you describe it and the technologies for it?
Urbanescu: I carried a ton of failed projects on my back throughout my career. The first significant successful one was a super-heterodyne transistor radio I assembled while in my eighth grade. It became a powerful motivator for my future projects, as I made it a gift for my grandfather. I could feel how proud he was, retiring discreetly in a recessed corner of his backyard to catch his favorite stations, like “The Voice of America.”
About 7 years elapsed between my enthusiastic “repairing” attempt on the big family radio and the moment I could assemble a fully functional pocket radio. Its small speaker and poor sound – coming out of germanium transistor amps – were surely below the ankle of the vacuum tube old friend. But hey, it was portable and required only a pack of four batteries. Most importantly, the “client” was so happy with it!
Elektor: Do you have any advice, tips, or encouragement for other engineers or makers who want to set up a workspace?
Urbanescu: If I could give advice to anybody – engineer, technician, or just hobbyist – about equipment and instruments, it would be this: please, do your best to keep it to a minimum. I know that over time, all of us fall into the squirrel attitude and grab more and more stuff. But the old saying is still very true: “You have an equipment or instrument? If you don’t use it for one year, get rid of it.” At least I found a compromise: all the instruments I don’t use currently have to fit in that box. No room for more.
I would have liked to share a common working space with other hobbyists, outside of the house. It’s just an unrealistic wish, as workspaces are expensive to rent. As for beginners, I have the same advice I gave to my students for years: don’t put your money on expensive stuff, for two reasons:
- One, as beginners, you should not be ashamed to make mistakes. Another saying reminds us that our competence goes in proportion to the amount of equipment we break. So, if you forget your meter on resistance and you accidentally measure the grid voltage, it will go kaput instantly. But if you were smart and bought a $10 meter, you only have to regret 10 bucks! Just as a side note: if you are really committed to taking a wrong measurement, it takes the same number of milliseconds to break a cheap or a Fluke meter.
- Second, use your money to cover more urgent needs. One day you’ll get your dream job, and then you can buy whatever meters you want.
Elektor: Are you currently working on an electronics or programming project?
Urbanescu: I am trying to put together a kind of PLC flexible interface that can be used either for 8-out or 16-out PLCs. The project has two sections. One is very straightforward: it allows a PLC with NPN transistors (16 outputs) to connect to AC loads. The other section is for 8-transistor-out PLCs, and they can connect to both kinds of loads: 24 V DC or 120 VAC, regardless of whether the output transistors are PNP or NPN.
Urbanescu: During the pandemic, I repurposed an old idea into a device to monitor bathroom occupancy for my students. The device used two sensors on the doorframe to count people entering and exiting, with a red light warning when three people were inside and a green light signaling fewer. It was a simple, non-intrusive way to promote safety.
To support my students in job hunting, I also created a LinkedIn profile where they can list me as a reference. Occasionally, I publish short technical articles there, although LinkedIn’s character limits can be restrictive.


Discussion (1 comment)