
Java on the Raspberry Pi (Part 1): GPIOs
on
Short Introduction to Java
Java is one of those programming languages which has been around for a long time. The first version was released in 1995, the same year JavaScript, PHP and Qt were born. Python is a little older, having had its first release in 1991. While the Java trademark has moved from Sun Microsystems to Oracle, the development is undertaken as an open-source project that moved to GitHub in 2020. Since 2018, two new releases of Java are provided per year resulting in fixes and newly developed features reaching our machines more regularly. This also includes improvements targeting embedded platforms such as the Raspberry Pi.
There seems to be feeling that ‘Java is dead’ but the numerous conferences — yes, even though they've all gone virtual during these times of Corona — and Java-related projects are proof that the language is still alive and kicking. The main contributors to the development of Java is a long list of well-known companies including Oracle, Microsoft, SAP, Google and others. It is also rumored that half of the Microsoft Azure cloud runs on Java! Today, Java distributions are available from different open-source (jdk.java.net, adoptopenjdk.net) and commercial providers (Azul, BellSoft, Oracle, and others).
Java on the Raspberry Pi?!
So, wasn’t the Raspberry Pi designed to be programmed using Python? Maybe yes, but that doesn’t mean you can’t use other languages. And, although this is a Java article, we don’t want to imply it is preferable over Python, C or any other language! Each project has its own requirements for which a specific language could be a perfect match, or where the development team have the best knowledge.
In my case, as a Java developer, I was really interested to understand if I could apply my knowledge to the Raspberry PI. This came about after my first experiment to build a Python-based pong game ended unsuccessfully and the user interface proved disappointing. Luckily, user interfaces can be generated with JavaFX, an independent project [4, 5] that extends Java with a framework to build GUIs (Graphical User Interface). It provides all the typical base components (buttons, labels, tables, charts) and there is a long list of free and open-source libraries that further extend this list. This is where I found the perfect match for Java with the Raspberry Pi as I wanted to build a touch-screen interface for the drum booth of my son (Figure 1 and 2).
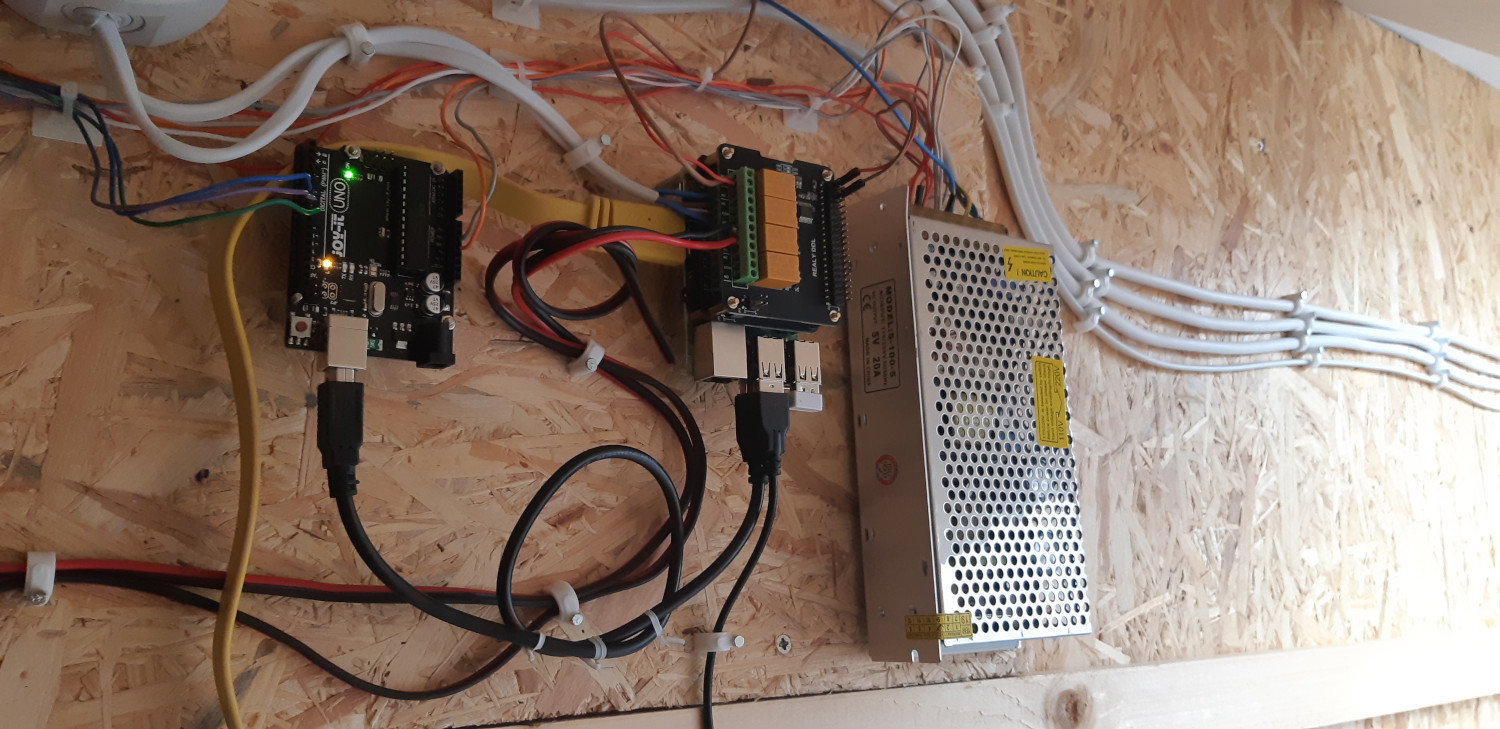
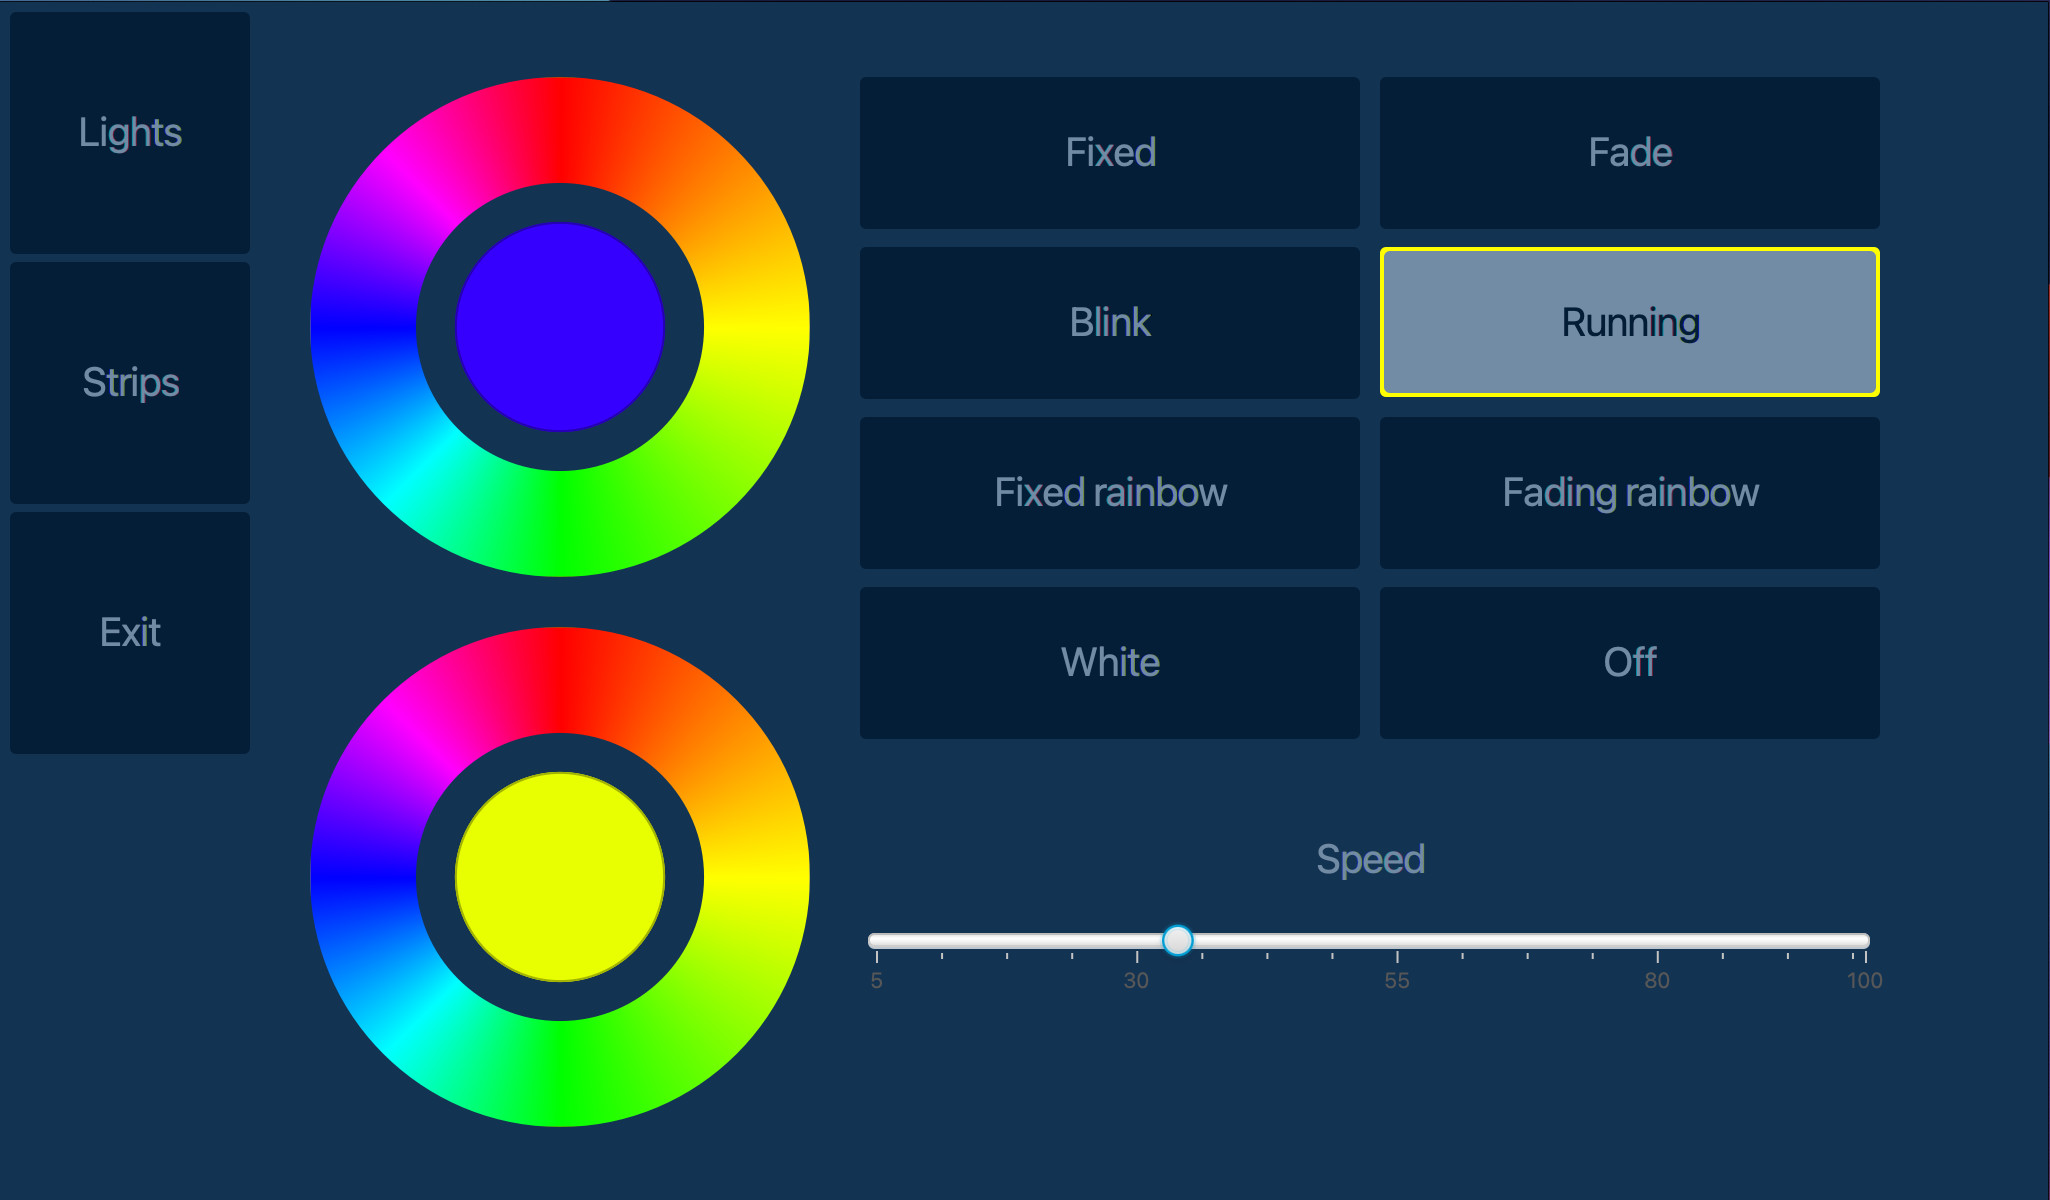
Combined with a relay board, an Arduino and some LED strips, this was to form the basis for my experimentation in a new world of embedded Java programming.
Getting Prepared
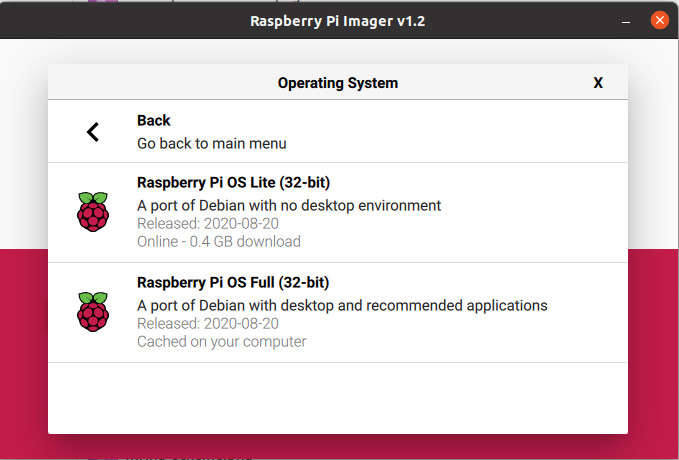
For the experiments shared in this article you’ll need a recent Raspberry Pi with an ARMv7 or ARMv8 processor. The older boards with an ARMv6 have a different internal layout for which the default Java will not work. If you want to use Java on such an ARMv6 board there is a solution that uses the Azul Zulu JDK. Also, if you're not too keen on typing, all the code examples accompanying this series are also available on a GitHub repository. Start by preparing an SD card with the ‘Imager’ tool and select “Raspberry Pi OS Full (32-bit)” (Figure 3).
Once you start your Raspberry Pi, open the terminal and type java -version to check that the version is ‘11’. As you will see, OpenJDK is pre-installed in this full version of the OS:
$ java -version
openjdk version "11.0.9" 2020-10-20
OpenJDK Runtime Environment (build 11.0.9+11-post-Raspbian-1deb10u1)
OpenJDK Server VM (build 11.0.9+11-post-Raspbian-1deb10u1, mixed mode)
Visual Studio Code
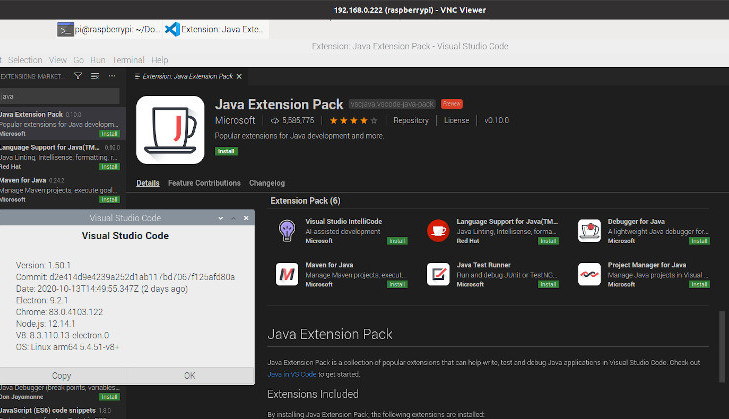
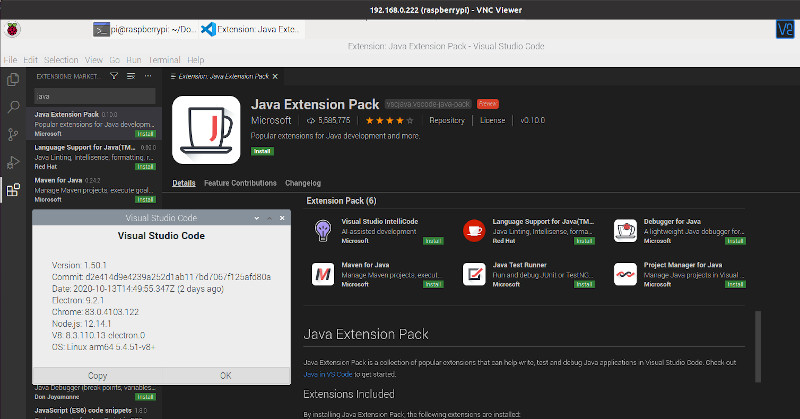
You can develop, test and execute your Java code on a PC before transferring it to the Raspberry Pi when complete. But there is another approach: Visual Studio Code. This free IDE (Integrated Development Environment) by Microsoft has a long list of extensions to make it the perfect companion for every programming project. There is a version available for 32-bit Arm systems (such as Raspberry Pi OS) and 64-bit Arm systems (new Raspberry Pi OS, which is still a work-in-progress) or even Ubuntu Desktop. There is also a “Java Extension Pack” that adds multiple Java extensions to the IDE to make it a full Java developer IDE (Figure 4)!
Experimenting with Hello World!
Let’s try our very first Java program on the Raspberry Pi. With Visual Studio Code, a text editor, or in the terminal, create a new text file named “HelloWorld.java” with this content:
public class HelloWorld {
public static void main(String args[]) {
System.out.println("Hello World!");
}
}
All our code is part of the class HelloWorld that is, by convention, the same as the filename. A Java program starts in the public static void main(String args[]) method. The only thing we do here is print “Hello World!” as the output of the program. Because we are using Java 11 we can run this kind of simple program without the need to compile the code. In the terminal, inside the directory with your Java file, run the command java HelloWorld.java to get the following result:
pi@raspberrypi:~/elektor $ java HelloWorld.java
Hello World!
For sure, print() in Python is shorter compared to System.out.println() in Java, but let’s forgive this as a “youthful sin”.
Reading the CPU Temperature
A lot of the system values, inputs and outputs, can be accessed through the /sys/ directory of the Linux file system. The values stored can simply be read as a text file. Let’s try to find the temperature of the Raspberry Pi processor from one of the files in this sys directory. The naming in the directory structure is not always very clear, nor is it always simple to determine how interpret the values, but it’s a good starting point to get to know a bit of the Linux system. Run the following command:
$ ls -l /sys/
total 0
drwxr-xr-x 2 root root 0 Dec 2 15:44 block
drwxr-xr-x 29 root root 0 Feb 14 2019 bus
drwxr-xr-x 64 root root 0 Feb 14 2019 class
drwxr-xr-x 4 root root 0 Feb 14 2019 dev
drwxr-xr-x 10 root root 0 Feb 14 2019 devices
drwxr-xr-x 3 root root 0 Feb 14 2019 firmware
drwxr-xr-x 8 root root 0 Jan 1 1970 fs
drwxr-xr-x 12 root root 0 Jan 1 1970 kernel
drwxr-xr-x 122 root root 0 Feb 14 2019 module
drwxr-xr-x 2 root root 0 Dec 15 11:39 power
It seems we can find a lot of info here! Let’s try looking a little more deeply at some of these:
$ cat /sys/firmware/devicetree/base/cpus/cpu@0/compatible
arm,cortex-a72
$ cat /sys/class/net/wlan0/address
dc:a6:32:c5:b7:9d
$ cat /sys/class/bluetooth/hci0/uevent
DEVTYPE=host
$ cat /sys/class/thermal/thermal_zone0/temp
30667
That last one would really look like a temperature in degrees if we were to divide it by 1000! Let’s write a simple program to read this value every second and calculate the average temperature.
The code in Listing 1 uses some more Java methods so we need to start with multiple imports. The io methods are used to read from a sys file as a text file. The List and ArrayList are used to keep a list of all measured values. From the main() method we call a separate method checkTemp() to acquire and store the temperature to the list. This allows us to keep the code clean as it is a good practice to isolate each functionality in its own method.
import java.io.BufferedReader;
import java.io.File;
import java.io.FileReader;
import java.util.List;
import java.util.ArrayList;
public class CPUTemp {
private static final String FILE = "/sys/class/thermal/thermal_zone0/temp";
private static final List<Integer> values = new ArrayList<>();
public static void main(String[] args) throws InterruptedException {
while(true) {
checkTemp();
Thread.sleep(1000);
}
}
private static void checkTemp() {
try (BufferedReader br = new BufferedReader(new FileReader(FILE))) {
int value = Integer.valueOf(br.readLine());
values.add(value);
int total = values.stream().mapToInt(Integer::valueOf).sum();
System.out.println("Now: " + value
+ " - Average: " + (total / values.size())
+ " - Number of measurements: " + values.size());
} catch (Exception ex) {
System.err.println("Error during temperature check: "
+ ex.getMessage());
}
}
}
As can been seen, Thread.sleep(1000) is used to wait a second between each temperature check. Within the method the average is calculated by calculating the sum total of the list of values using a stream. Streams were introduced in Java 8 and are a very powerful way to work with lists of items. As before, the file name is also the name of the class "CPUTemp.java".
Like before, this is a simple Java class without additional dependencies, so we can run it without compiling. The output can be halted using ‘Ctrl+c’:
pi@raspberrypi:~/elektor $ java CPUTemp.java
Now: 36998 - Average: 36998 - Number of measurements: 1
Now: 34563 - Average: 35780 - Number of measurements: 2
Now: 35537 - Average: 35699 - Number of measurements: 3
Now: 36024 - Average: 35780 - Number of measurements: 4
Now: 35537 - Average: 35731 - Number of measurements: 5
Controlling an LED and Reading a Push-Button
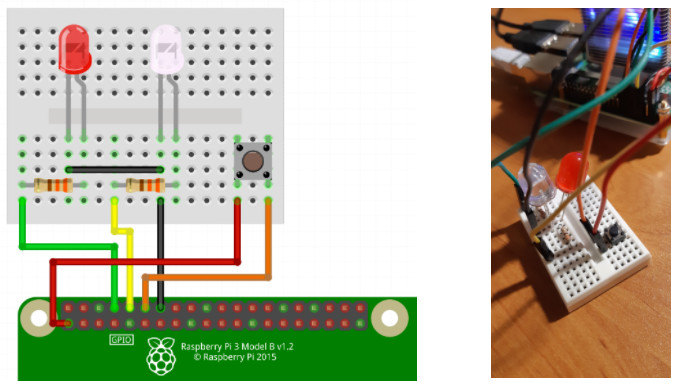
Let’s create another single-file Java application that can toggle two LEDs and read the state of a button. The wiring scheme is quite straightforward — just a very basic circuit to connect two LEDs and one button to separate GPIOs. The button needs 3.3 V, not 5.0 V, so make sure to use the correct power pin! In this setup the LEDs are connected to pins BCM 14 and 15, while the push-button is connected to BCM 18 (Figure 5).
Testing at the Terminal
With the built-in commands in the Raspberry Pi OS we can access the GPIOs from the terminal. We use this to test our wiring. Run the following commands to configure pin 14 as an output pin (op) and place it in its high (dh) or low state (dl). Try the same for the other LED (BCM 15):
$ raspi-gpio set 14 op
$ raspi-gpio set 14 dh
$ raspi-gpio set 14 dl
We can use a similar approach to test the button by configuring the pin as an input pin and requesting the state of the input:
$ raspi-gpio set 18 ip
$ raspi-gpio get 18
GPIO 18: level=0 fsel=0 func=INPUT pull=DOWN
$ raspi-gpio get 18
GPIO 18: level=1 fsel=0 func=INPUT pull=DOWN
When the button is pressed, the “level” value changes to 1.
Doing It in Java
Now, let’s take the same basic approach as we used in “CPUTemp.java” and use the terminal commands in a Java program by using Runtime.getRuntime().exec(cmd). If we add the Scanner user input class we can also acquire the result of the command and use it to check the state of the button. This is shown in Listing 2:
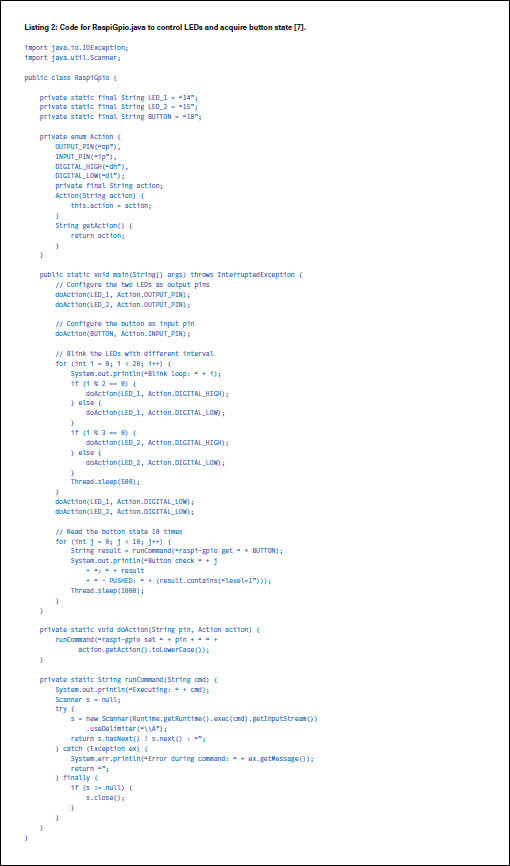
The code uses an Action enum to simplify the command processing. In its simplest form an enum is just a list of predefined names, but in this example we add a value to each name. This is a strong plus point for enums as they allow you to make your code much more readable while also simplifying it in a lot of cases. As can be seen in the doAction method, the Action enum is used as a parameter and its value is used to generate the command that needs to be executed.
The comments in the code should make everything clear as this is just simple Java to illustrate the use of input and output GPIOs. The most complex part is the runCommand method that uses some combined methods to execute the command, read the result and handle any possible errors. If this is not clear at this moment, no worries — it will be once the code is running!
As this example again doesn’t use any third-party dependencies we can run it without compiling. The output will show what’s going on so you should see your LEDs turning on and off at different intervals. When the LEDs stop blinking you can press the button as it will be checked 10 times at intervals of 1 second. The expected output is as follows:
$ java RaspiGpio.java
Executing: raspi-gpio set 14 op
Executing: raspi-gpio set 15 op
Executing: raspi-gpio set 18 ip
Blink loop: 0
Executing: raspi-gpio set 14 dh
Executing: raspi-gpio set 15 dh
Blink loop: 1
Executing: raspi-gpio set 14 dl
Executing: raspi-gpio set 15 dl
...
Executing: raspi-gpio get 18
Button check 0: GPIO 18: level=0 fsel=0 func=INPUT pull=DOWN
- PUSHED: false
...
Button check 3: GPIO 18: level=1 fsel=0 func=INPUT pull=DOWN
- PUSHED: true
...
Getting Ready for Next Time!
With some basics under our belts we've managed to cover a bit of an introduction to Java on the Raspberry Pi. Feel free to play around with the example code and read-up on the background in the links provided to develop your understanding further. Hopefully, this will make the next steps in the next article simpler as we develop a full Java application and link our GPIOs with a webpage.
(200617-01)
Questions or Comments?
Do you have questions or comments regarding this article? Then contact the author directly via javaonraspberrypi@webtechie.be or the editor via editor@elektor.com.
Discussion (0 comments)