
Java on the Raspberry Pi (Part 2): A Full Application
on
Is Java a programming language suitable for the Raspberry Pi? In the previous article, this was answered with a resounding “yes”! With some single-file Java demo applications under our belts, it is now time to go a little deeper. Expanding on the material covered, we now move a few steps further and construct a full application with multiple classes. These provide us with REST web services that control the GPIOs of a Raspberry Pi.
The “Raspberry Pi OS Full (32-bit)” version of the operating system already includes the Java Development Kit (JDK) version 11. However, to develop Java applications, an IDE will help us write applications that are easy to maintain. As described in the previous article, Visual Studio Code can be used on the Raspberry Pi. Alternatively, applications can be developed in Visual Studio Code on a PC and then compiled and run on the Raspberry Pi. For this article, we will write the code directly on the Raspberry Pi. For this we need some additional tools, so let’s start by installing them.
Maven
We are going to use Maven to build the application on our Raspberry Pi. Maven compiles code, together with the required dependencies, into a single JAR file. This is possible thanks to the pom.xml configuration file that is found in the root of the project.
Maven is installed with a single command, after which we can immediately check the installation by requesting the version as follows:
$ sudo apt install maven
$ mvn -v
Apache Maven 3.6.0
Maven home: /usr/share/maven
Pi4J
To control the GPIOs, we are going to use the Pi4J library that forms a bridge between our Java code and the general-purpose input/output (GPIO) pins on the Raspberry Pi. This allows us to control the GPIOs and connect to various electronic components.
For full support of the Pi4J library on the Raspberry Pi, we need to install some extra software. Again, we only need a single command to do this:
$ curl -sSL https://pi4j.com/install | sudo bash
Update of WiringPi
One last step is required to be fully prepared. If you are using a Raspberry Pi 4, you’ll need to update WiringPi. This is used by Pi4J as a native library to control the GPIOs. Because the architecture of the system-on-chip (SoC) has changed with version 4, a new version of WiringPi is required. Unfortunately, this project got deprecated last year, but thanks to the open-source community an ‘unofficial’ version is available that can be installed by a script provided by Pi4J. Run the command:
sudo pi4j -wiringpi
This acquires the project from GitHub, compiling and installing it on your Raspberry Pi all in one go. By requesting the version, you will see it’s upgraded from the default 2.50 to 2.60:
$ gpio -v
gpio version: 2.50
$ sudo pi4j –wiringpi
$ pi4j -v
--------------------------------------------
THE Pi4J PROJECT
--------------------------------------------
PI4J.VERSION : 1.3
PI4J.TIMESTAMP : 2021-01-28 04:14:07
----------------------------------------
WIRINGPI.PATH : /usr/lib/libwiringPi.so /usr/local/lib/libwiringPi.so
WIRINGPI.VERSION : 2.60
--------------------------------------------
The Application
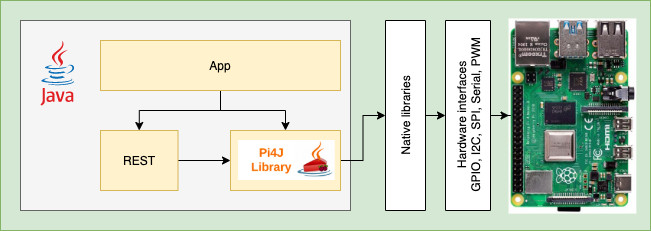
The full code of this application is available from the GitHub repository that accompanies this article in the folder elektor/2106. This project is a proof-of-concept application that controls the GPIOs using a REST web service. It uses the Spring framework, software that provides a lot of tools for building powerful applications with minimal code (Figure 1).
In what follows, the process for creating the various files that make up this project is described. If it doesn’t work as described, the repository code should work out-of-the-box.
The finished project is pulled from GitHub as follows:
pi@raspberrypi:~ $ git clone https://github.com/FDelporte/elektor
Cloning into 'elektor'...
remote: Enumerating objects: 34, done.
remote: Counting objects: 100% (34/34), done.
remote: Compressing objects: 100% (24/24), done.
remote: Total 34 (delta 2), reused 34 (delta 2), pack-reused 0
Unpacking objects: 100% (34/34), done.
pi@raspberrypi:~ $ cd elektor/2106
pi@raspberrypi:~/elektor/2106 $ ls -l
total 8
-rw-r--r-- 1 pi pi 1720 Feb 15 14:23 pom.xml
drwxr-xr-x 3 pi pi 4096 Feb 15 14:23 src
What Is Spring and Its Tools?
Spring is a framework that simplifies and speeds-up the development of (business) Java applications. Spring Boot is a layer that sits on top of Spring providing ‘off-the-shelf’ packages. These allow us to create stand-alone Spring-based applications that you can ‘just run’. This is achieved by a principle known as ‘convention above configuration’. What this means is, by default, everything operates according to predefined convention. If you need to do something different, you can then configurate your way.
The most important capabilities, as listed on the Spring Boot website, are:
- Easy creation of stand-alone Spring applications.
- Allows a web server to be embedded inside your application (Tomcat, Jetty or Undertow).
- Provides ‘starter’ dependencies to simplify your build configuration.
- Automatically configures Spring and 3rd party libraries whenever possible.
- Offers production-ready features such as metrics, health checks, and externalized configuration.
- Absolutely no need for code generation or XML configuration.
Finally, there is Spring Initializr, an online tool to quickly create an starter application that includes all the Spring Boot packages required.
Getting Started
To creating this project from scratch, we start by using Spring Initializr, a web-based configuration form, to create a getting-started package for us. Follow the link and then copy the options into the form using information in the screenshot shown in Figure 2.
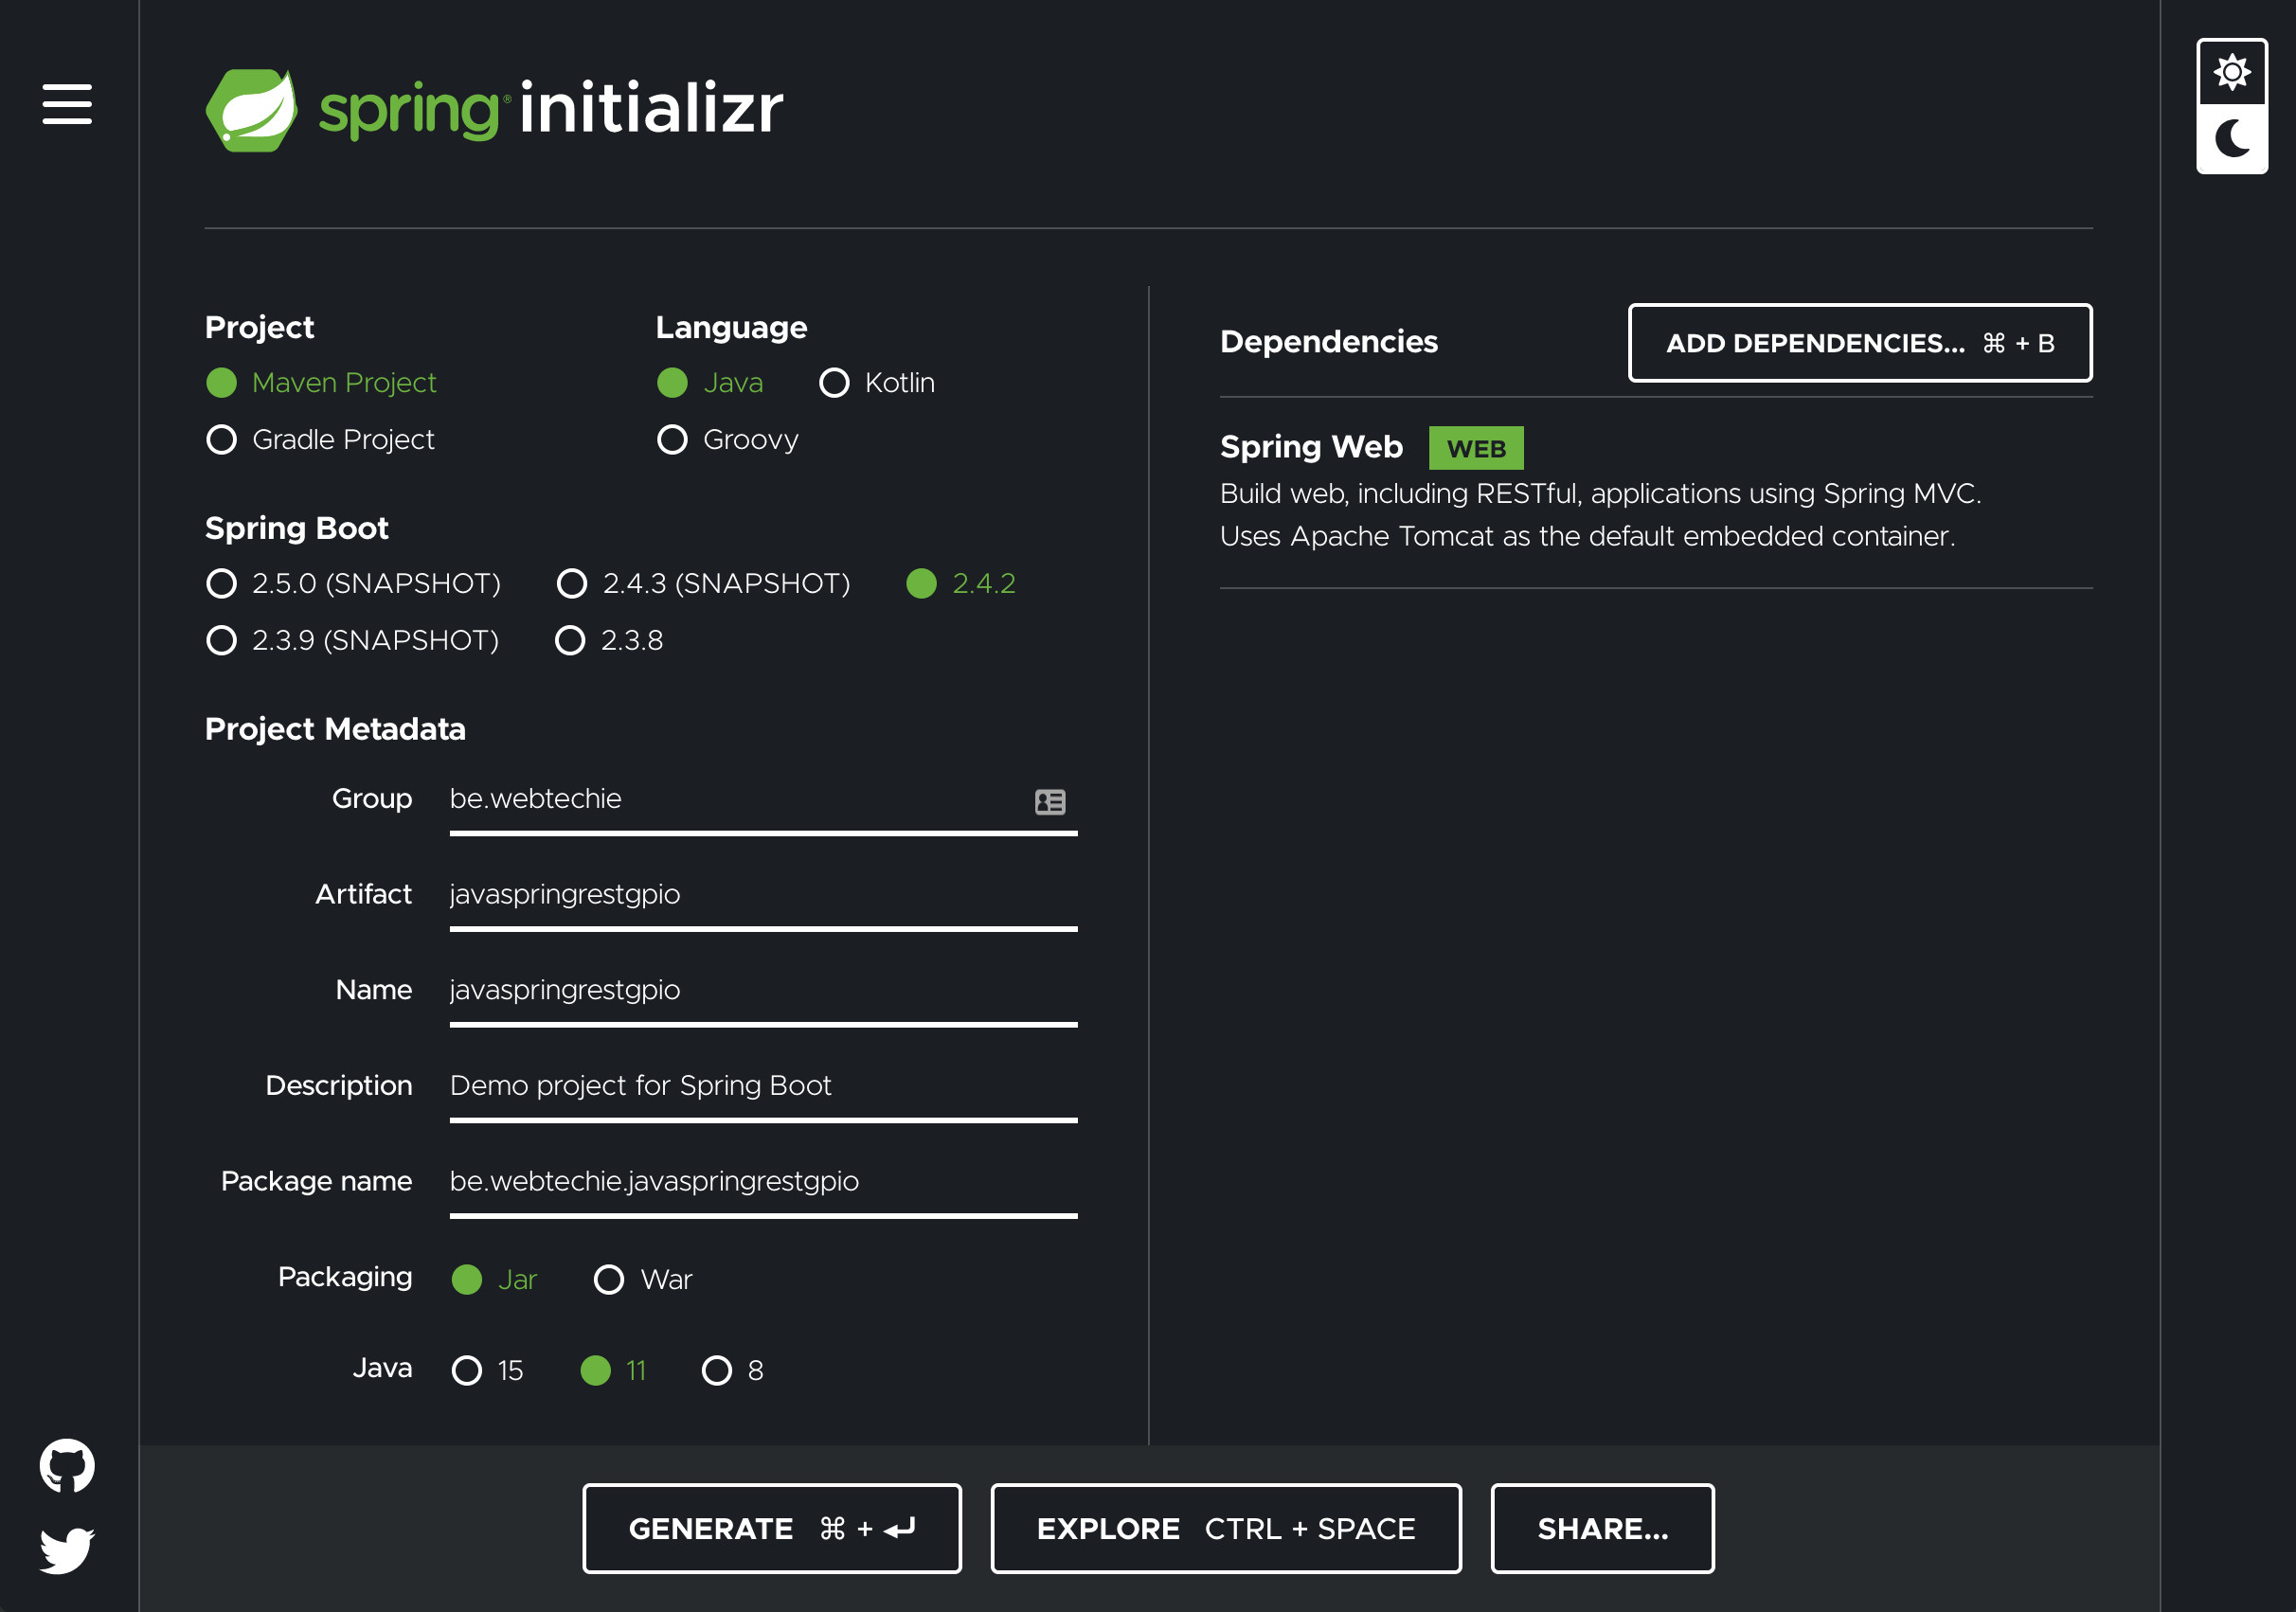
On the right-hand side, make sure also to click the “Dependencies” button. In the window that opens we need to add the “Spring Web” dependency. This can be found quickly using the search box. Clicking on this entry adds it to the project. Should an unwanted dependency be added by mistake, simply click on the red button (far right) to remove it.
The addition of the “Spring Web” dependency allows us to build a REST-application that enables us to connect to the application via webpages in our browser.
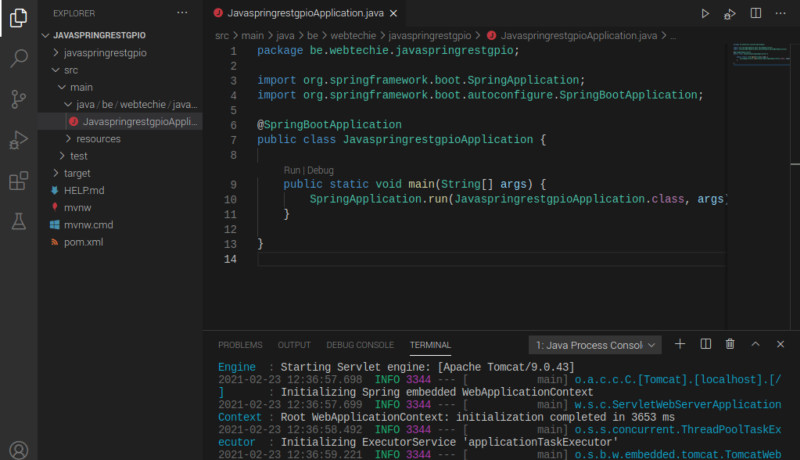
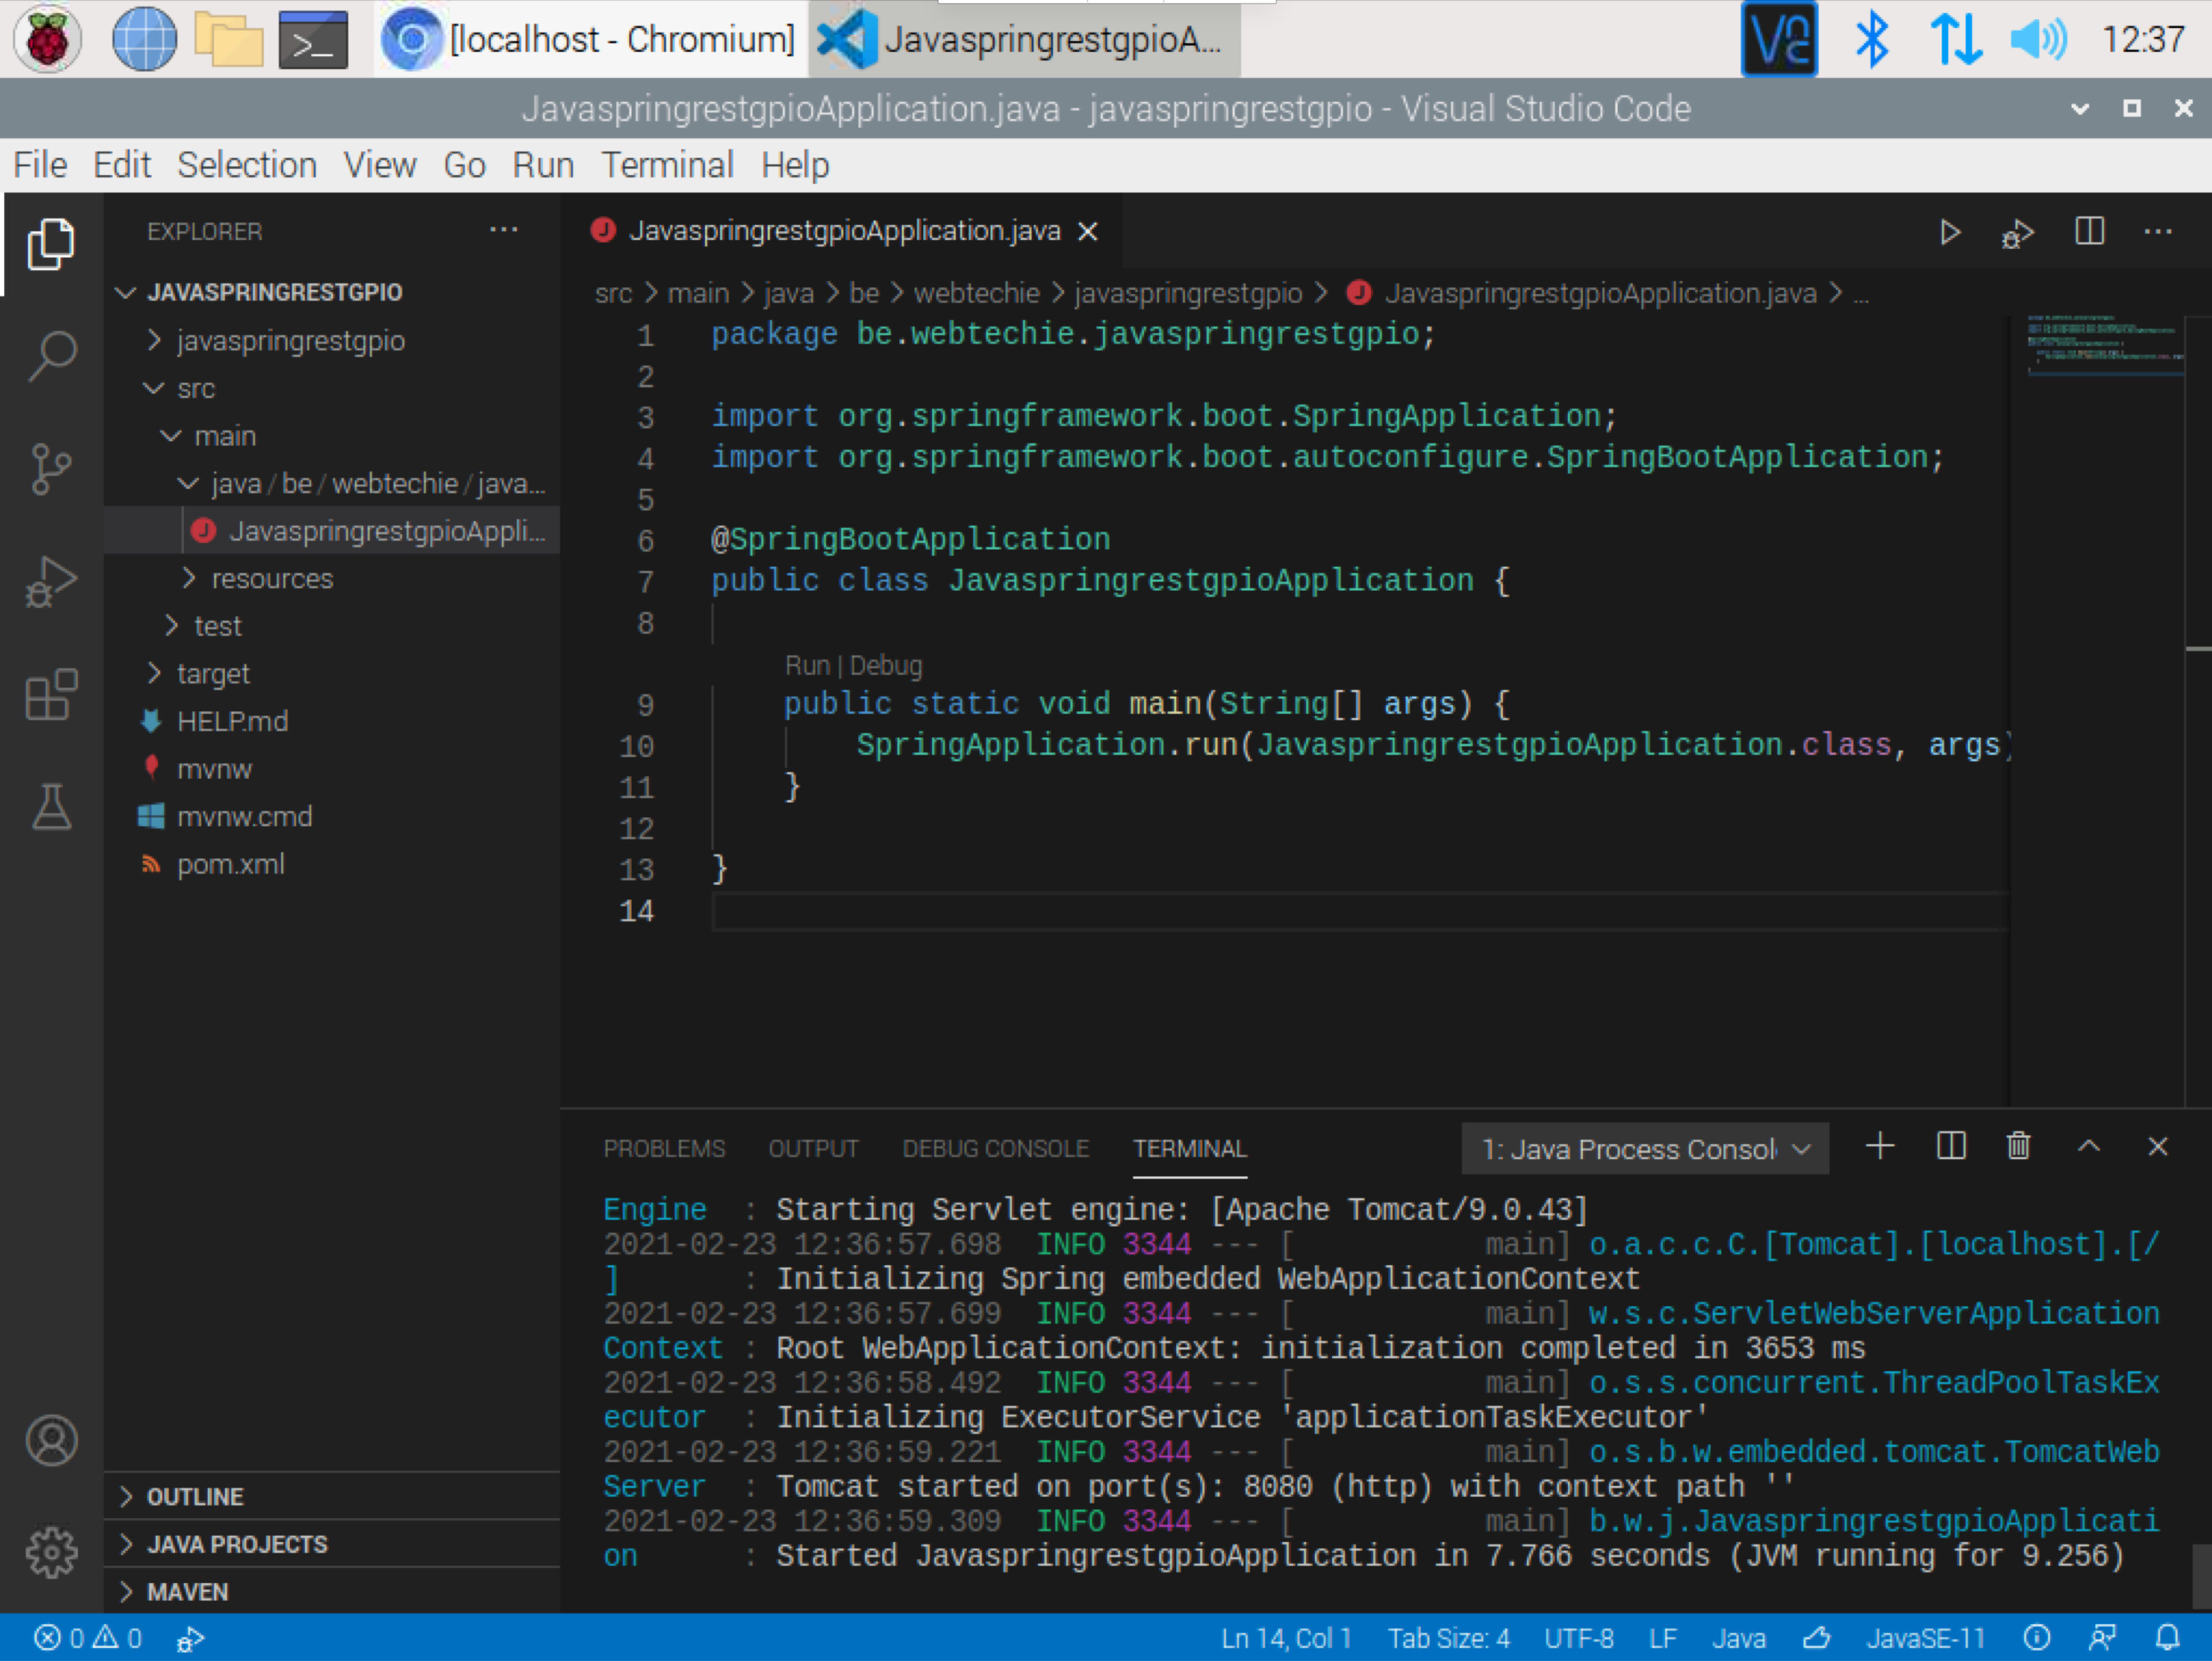
Clicking on the “Generate” button delivers a ZIP-file with a ready-to-use Maven project. Once it has been unzipped into a suitable directory, it can be opened in Visual Studio Code. This works, at this point, both on the Raspberry Pi or on a PC. Simply use File -> Open folder… and select the unzipped folder. Next, find the file JavaSpringRestApplication.java (under src/main/java). Via a right-click on this file name, the option Run is available. Select Run and the application should start (Figure 3).
If your Visual Studio Code install doesn’t already have the required Java support, a pop-up window will appear to request its installation.
In the Terminal panel we obtain the output in Listing 1 (here with timestamps removed). So, what does this output tell us?
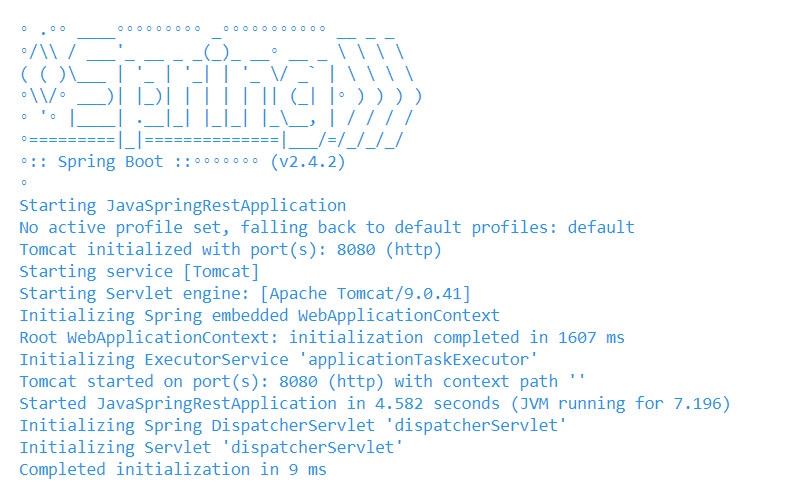
- The JVM (Java Virtual Machine) has run for 7 seconds, 4.5 seconds of which were needed to start the application.
- Tomcat (the webserver) is embedded in the application and running on port 8080.
Nice, so let’s open a browser and go to http://localhost:8080/ (Figure 4).
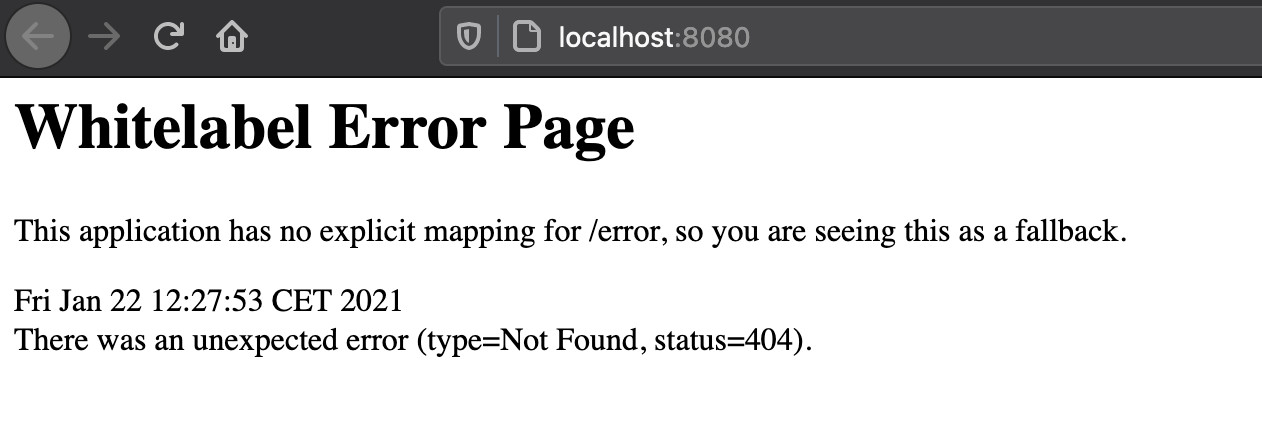
We get an error page — a little disappointing. This is because we haven’t created anything yet to be shown on this page! However, at the same time, this error page proves that our application is working and functions as a web server. It just doesn’t know yet what to share with us.
Building Our Own Application
We will now extend this Spring starter package to include the functionality we want in our application — namely, control of the GPIOs using Java code. To be able to do this, we must include the Pi4J library in our project. Thanks to this library we don’t need to control the hardware ourselves as we can use the full set of Java methods that are provided by Pi4J. However, we need to remember that, because of the dependency of this library on the Raspberry Pi, we can not run or test this application fully on the PC. The JAR file produced will need to be executed on the Raspberry Pi to test its control of the GPIOs.
Within the code examples that are provided here, each variable and method is documented in the JavaDoc style (starting with /**) to explain their purpose.
Adding the Dependencies
With the project created with Spring Initializr open, we add the pi4j-core dependency to the pom.xml file. This ensures we can access the pi4j methods:
com.pi4j
pi4j-core
<version>1.3
compile
While we are here, we can also add the OpenAPI dependency (springdoc-openapi-ui) that we use later to test the REST services:
org.springdoc
springdoc-openapi-ui
1.5.1
Adding an Information REST Controller
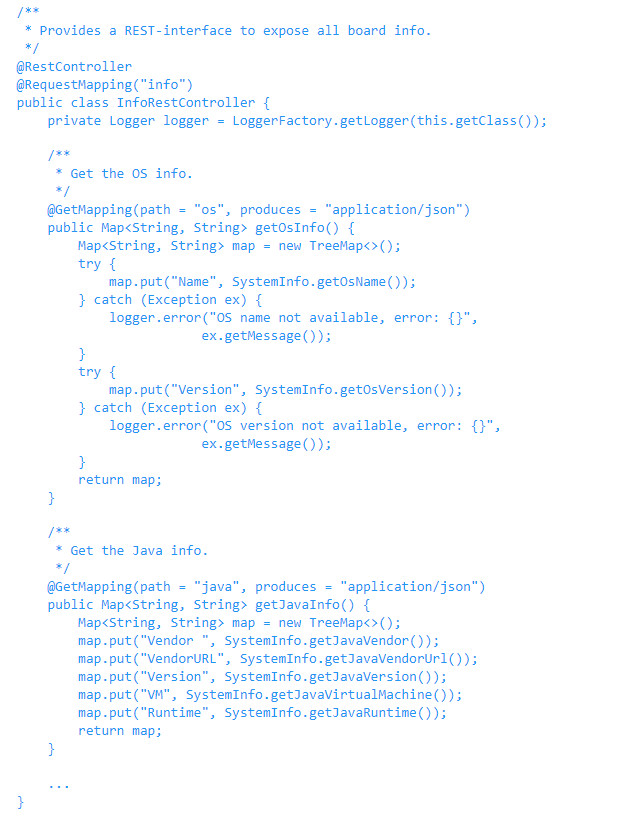
The first thing we are going to expose with this application is the information provided by the Pi4J library about our Raspberry Pi. We start by creating a package “controller” with a file InfoRestController.java. In Visual Studio Code, simply right-click the java\be\webtechie\javaspringrestgpio entry and select New Folder. Name the new folder “controller”. Then right-click the folder controller and select New File. Name the file InfoRestController.java.
In the sources you can find the full code, but Listing 2 provides a short snippet of its contents. Each method is a REST mapping that returns a specific set of key-value pairs with information about the Raspberry Pi.
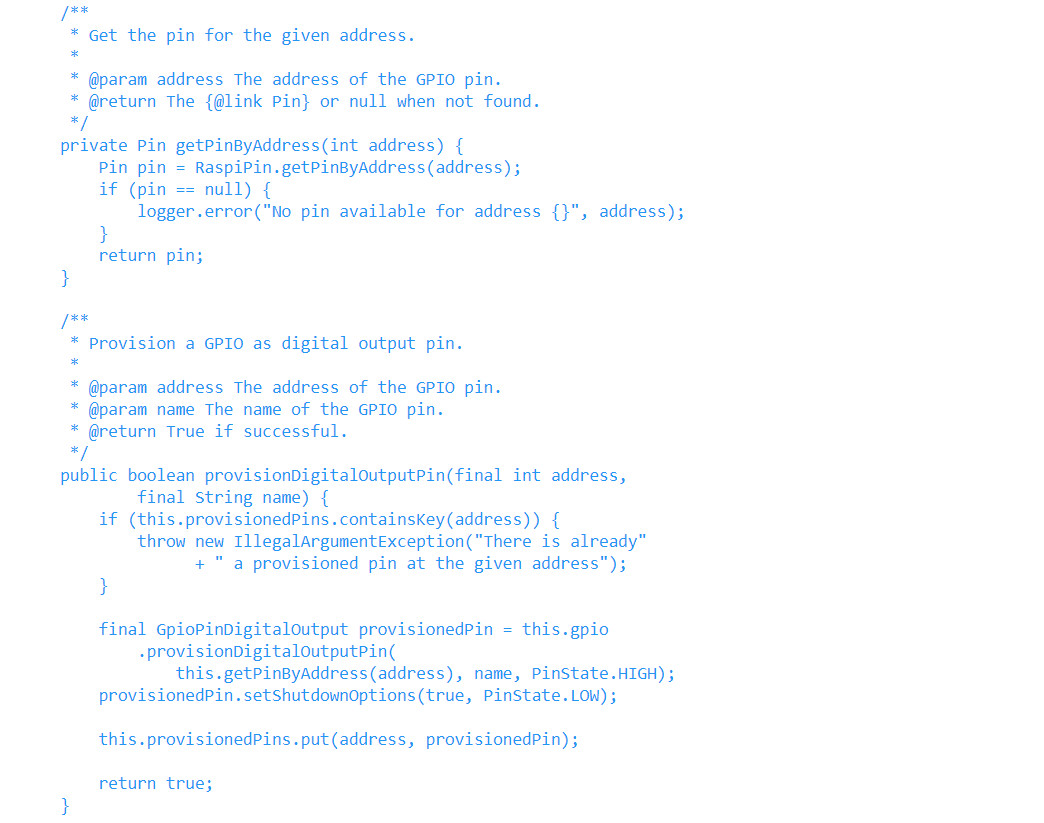
Adding the GPIO Manager
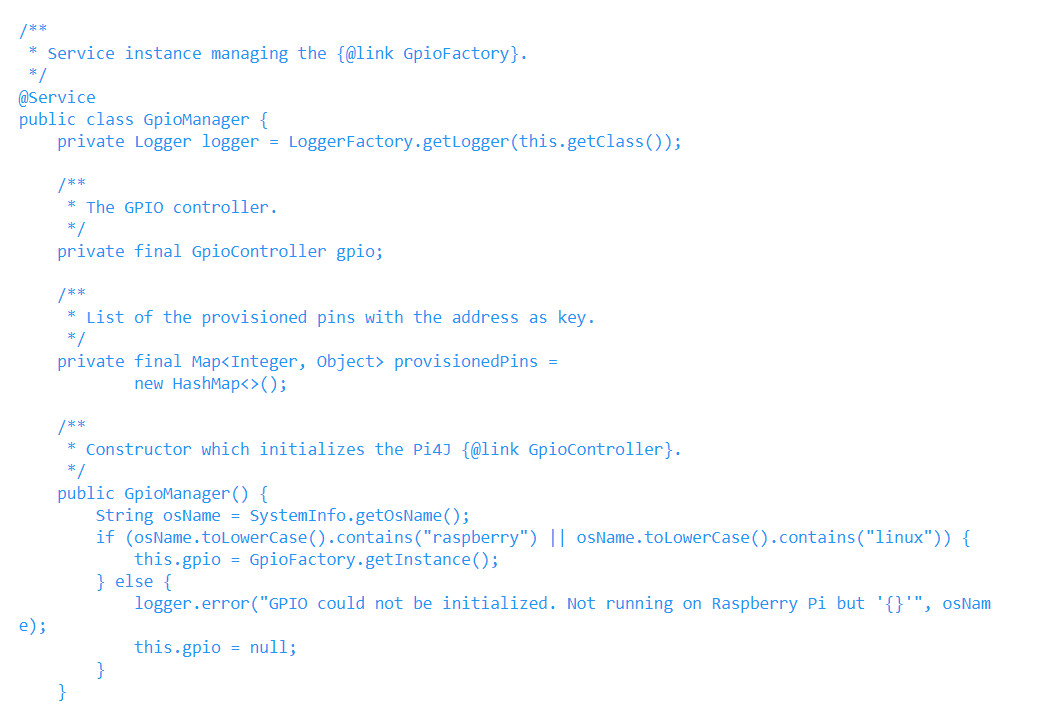
Before we can create the GPIO REST controller, we must add a GpioManager.java file to handle the Pi4J calls. This is placed in a “manager” package (created as a New Folder and New File as before). We will use this manager to store the initialized GPIO pins and call the Pi4J methods to interact with the GPIOs. Again, a short section of the code is provided in Listing 3, while the full code for this class is in the sources in the repository. Note that we use @Service in this class that instructs the Spring Framework to keep a single instance of this object in memory. This ensures we maintain a map of the provisioned GPIOs available at all times.

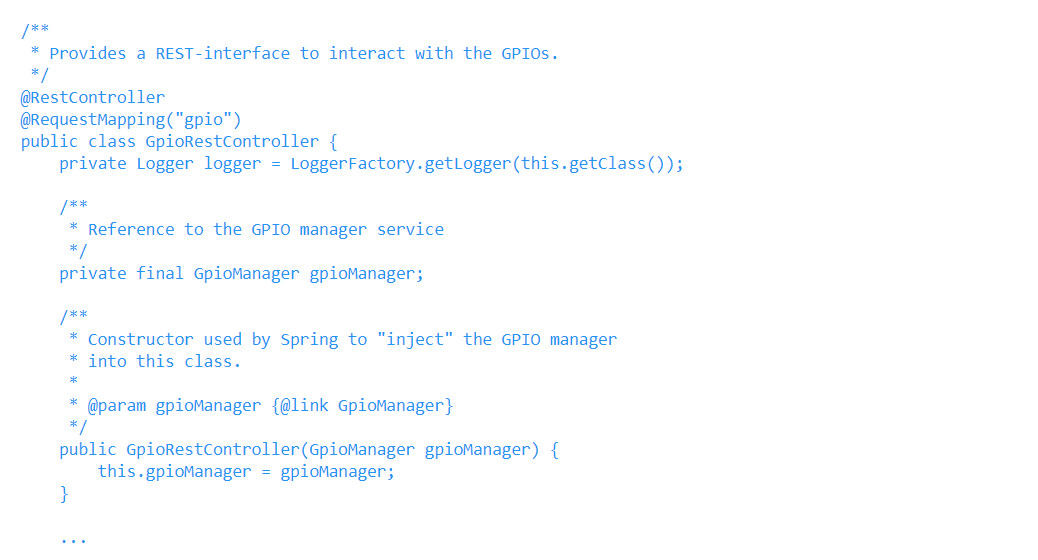
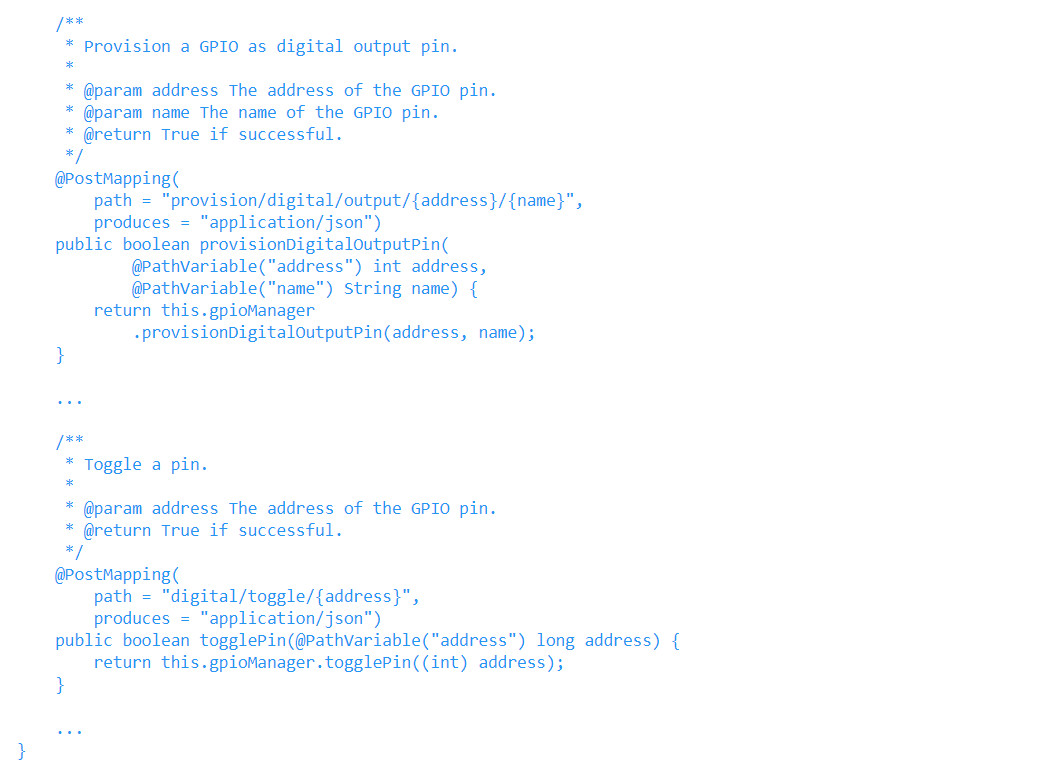
Adding the GPIO REST Controller
Finally, we add a GPIO controller with a REST interface to the controller package (folder). This file is named GpioRestController.java. This exposes the Pi4J GPIO methods we defined in the GpioManager.java class. Again, a section of the code is shown in Listing 4 and the full code is available from the repository.
Running the Application
This step can be undertaken on both the PC or the Raspberry Pi. If running on the PC, it is best to run the application from within Visual Studio Code. This avoids having to install Maven on the PC.
Because we added the springdoc-openapi-ui dependency in the pom.xml file, the application will provide us with a very useful Swagger webpage to test the REST services. Swagger is another open-source project that generates a simple webpage interface to test our Java code by automatically visualizing the controllers we created.
There are two ways to start the application. In Visual Studio Code it can be started using Run (Raspberry Pi or PC). The alternative is to build the application to a jar file with mvn package (Raspberry Pi only). Once built, it is run as follows from the command line:
java -jar target/javaspringrestgpio-0.0.1-SNAPSHOT.jar
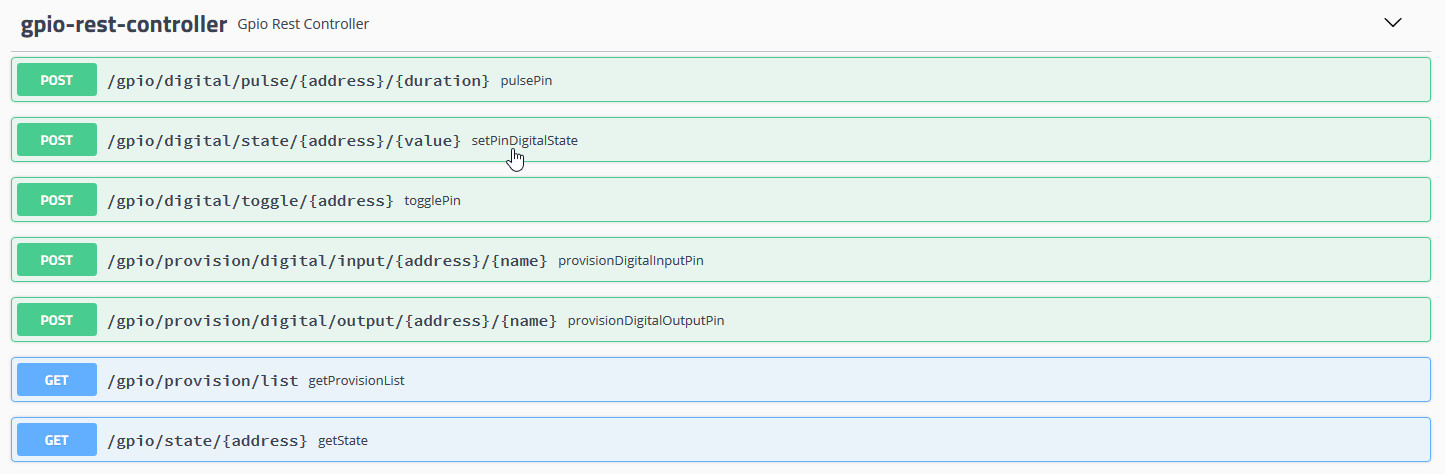
In a browser on the Raspberry Pi, open the Swagger page using http://localhost:8080/swagger-ui.html. Alternatively, using any PC on the same network, use http://:8080/swagger-ui.html. The two controllers with their methods will be displayed as in Figure 5.
Testing the Information REST Controller
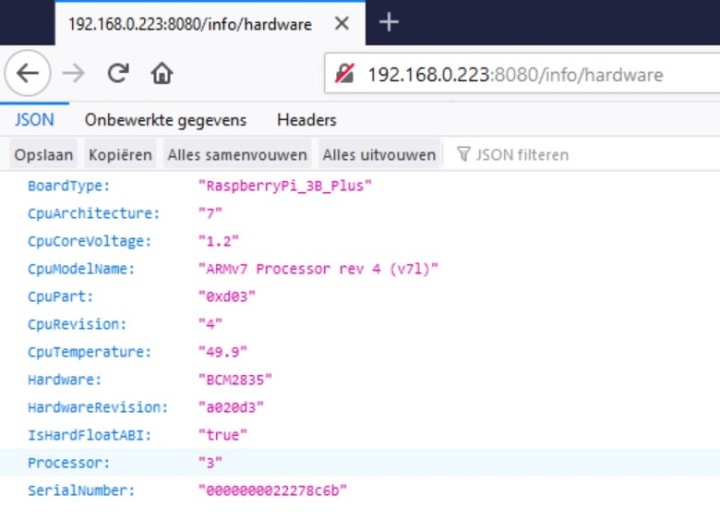
We can click on the Swagger page buttons and execute the available options. For example, in the section info-rest-controller we can click on GET next to the info/hardware method. This is followed by clicking Try it out and then Execute that displays the response in the Response body section.
All these methods can also be called directly from within the browser. Simply append the method name to the URL. For info/hardware we simply enter http://localhost:8080/info/hardware, and for info/java it is http://localhost:8080/info/java. The data from calling these methods is displayed in JSON format as shown in Figure 6.
Testing the GPIO REST Controller with an LED and Button
To demonstrate how to interact with GPIOs using this application, we will be using a very simple breadboard setup (Figure 7) as follows:
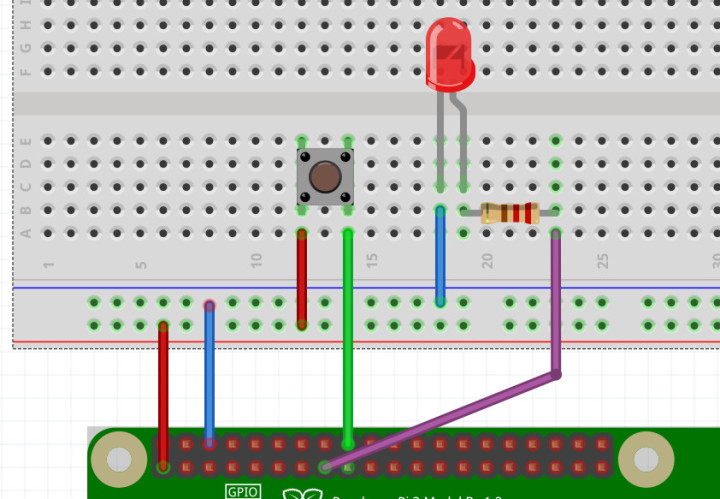
- LED on GPIO pin 15, BCM 22, WiringPi no. 3
- Button on GPIO pin 18, BCM 24, WiringPi no. 5
To be able to control the connected LED and read out the button state, we first need to initialize the GPIOs. To configure the output, the method /gpio/provision/digital/output is used. Returning to the http://localhost:8080/swagger-ui.html page, click GET by this method, Try it out and then enter 3 in address and LED in string. Commit the configuration by clicking Execute (Figure 8 left).
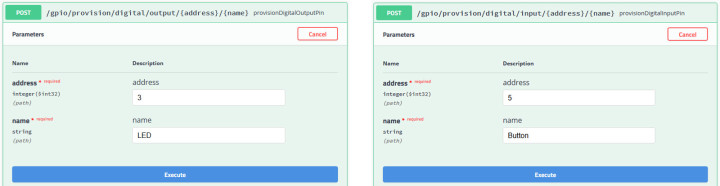
To configure the input, the method /gpio/provision/digital/input is used. Click GET by this method, Try it out and then enter 5 in address and Button in string. Commit the configuration by clicking Execute (Figure 8 right).
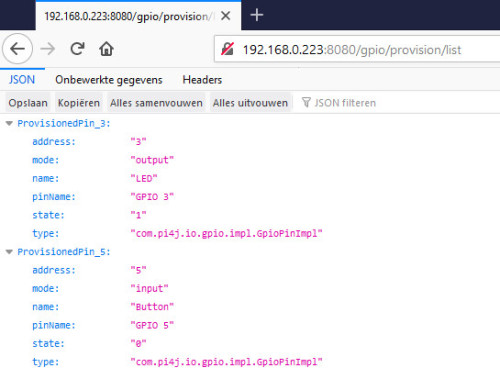
Once the GPIOs are initialized we can get a list of them using the /gpio/provision/list method. Simply use GET, Try it out, and Execute or type the URL http://localhost:8080/gpio/provision/list directly into the browser (Figure 9).
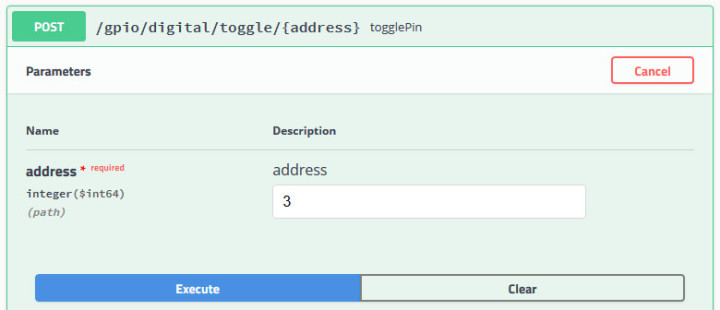
Now that we’ve checked the GPIOs are ready to use, we can toggle the LED on and off using the /gpio/digital/toggle method by repeatedly clicking on the Execute button (Figure 10).
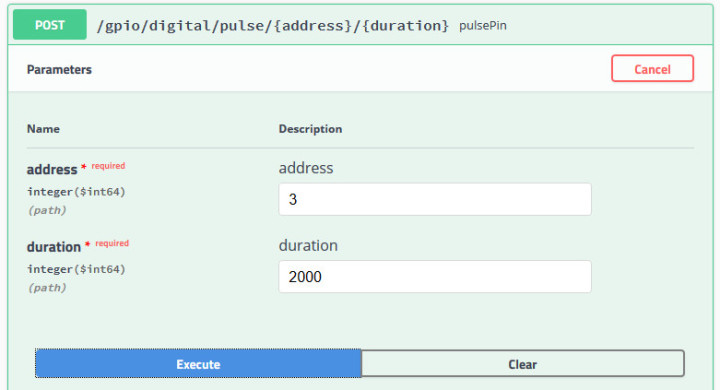
There is also an additional method that can turn the LED on for a given time, such as 2 seconds (Figure 11). Note that the duration must be provided in milliseconds.
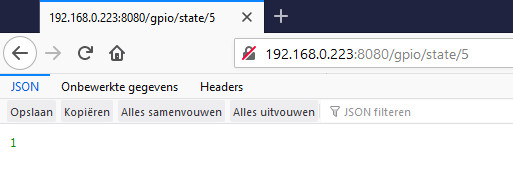
Requesting the state of the button can be done via the Swagger interface, but also available directly via the URL http://localhost:8080/gpio/state/5. In the case of Figure 12 the button is pressed, returning a 1.
Time to REST, Then Explore Further
This application only exposes a few of the Pi4J methods as REST services to show the possibilities and power of this approach. Depending on the project you want to build, you can extend or rework this example to fit your precise needs.
The Pi4J library is currently being rewritten to provide even better support for the Raspberry Pi 4 and future versions. This will also bring it fully up-to-date with the latest versions of Java. In the meantime, the current version allows you to get started and build applications where you want to integrate hardware control through a REST API.
Questions About this Article, Java, or Raspberry Pi?
Do you have technical questions or comments regarding this article? Then contact the author directly via javaonraspberrypi@webtechie.be or the editor via editor@elektor.com.
Discussion (0 comments)