
Hands On the Parallax Propeller 2 (Part 4): Sending Strings
on
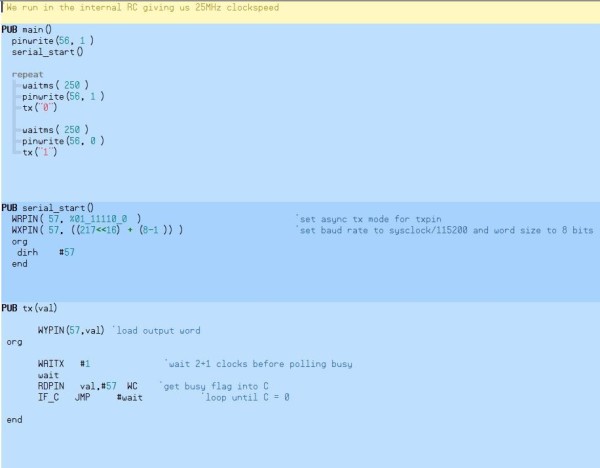
The purpose of this article series is to introduce you to the Parallax Propeller 2. In this article, we will expand our possibilities to send strings, like you do with print on your Arduino systems. With this first task, we will be able to send out some debug information the classical way. To recapitulate where we are: Our code is able to send a single character with 115200 baud, 8 data bits, no parity and one stop bit. The complete code appears in Figure 1 and can be downloaded at [1].
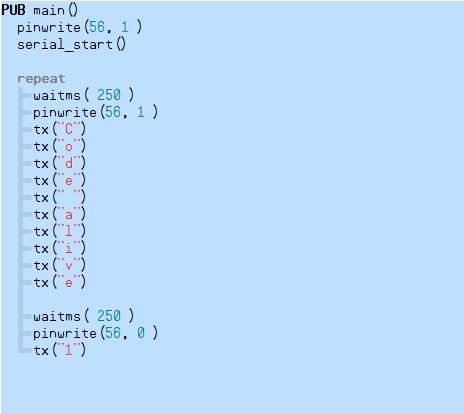
If we now want to send a “Code alive”, as shown in Figure 2, this will result in a lot of calls to our tx() function, one for every character. If we see code lines that repeat, one should start thinking about generalizing the task. Copied sections of code fragments all over the project are never a good idea, especially if you need to add something or fix the code later. We will build a function that takes a string as an argument, cut it into single characters and send these one after one to our tx() function. This sounds easy, and if you have done enough coding, in theory, it should be. Using SPIN2 or SPIN in general for the first time this means a bit more reading and tinkering about.
Passing Strings
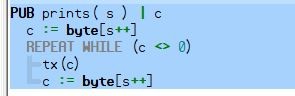
As strings are just a continuous amount of memory holding all characters after each other, terminated by a binary zero (“\0”), the attempt will be just to pass the start address of this memory to a function. If we are using C/C++, the & operatior in conjunction with the first element will do the trick. In SPIN2 this is handled a bit differently, syntax wise, but it works mostly the same. What is different is the way we declare the function and the argument itself. The type of variable that is passed to our function is not specified. If we don't specify any type SPIN2 will assume it is an long type (32 bits). This can be handy for some cases to use this automatic assumption in SPIN2 for variables passed on to a function but may also introduce some unwanted sideeffects. In our case it is the memory address for our string and will work fine for our purpose. What is different is the way we declare local variables. Someone can clearly see that all variables, here c, must be declared at the functions head. This is done with a | after the closing bracket at that line. If we need more than just one variable we will put them in that line and separate them with ,. Figure 3 shows what the function head will look like.

Inside the function (see Figure 4) we need to do a bit of careful data reading, byte by byte. We have the c := byte[s++] statement that needs some words for explanation. Our variable c has currently no type, or better, a default type. Without using the byte[] we would read 32 bits (uint32_t variable) at once; by using byte[s++] we will read one byte at the location of ‘s’, at the memory address where the string starts. The s++ here in conjunction with the byte[] will ensure that the address will only be incremented by one byte. If we don’t do this, all operations will be 32 bits wide. As now it is ensured that we read byte by byte, we’ll look at the repeat while statement. As long as c is unequal (<>) to binary zero everything inside the repeat while will be looped.
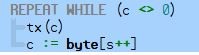
Inside the loop, shown in Figure 5, we have our tx() function that will send one byte and we have another line that will grab the next byte and put that into our variable c. Afterwards the loop continues and starts checking if c is still different to binary zero.
This means we have now our prints() in place and are able to send strings over UART to a connected PC or logic analyzer. The next is reading I/O pin states and output it using the UART. Read the status of an I/O pin. How hard can it be? Well, in theory, it is very easy. Sometimes the nice extras make the difference and show the mighty amount of features that are packed into the smart pins.
More on Propeller 2 and Related Topics
Want to learn more about topics like Parallax's Propeller 2 and SPIN2? Subscribe to Elektor today and never miss an article, project, or tutorial.
Discussion (0 comments)