
ESP8266 Programmer and Terminal
ESP8266 is a very nice highly integrated Wifi Microcontroller from Espressif from China. Complete assembled modules are available already for a few euros. One can use these module together with another microcontroller and control the module with AT commands over an UART and communicate via WiFi. Optionally you can start to develop your own firmware.
ESP8266 is a very nice highly integrated Wifi Microcontroller from Espressif from China. Complete assembled modules are available already for a few euros. One can use these module together with another microcontroller and control the module with AT commands over an UART and communicate via WiFi. Optionally you can start to develop your own firmware. A GCC based Compiler and an SDK are available from https://espressif.com/ in the 'BBS & Download' section.
I decided to start writing my own ESP8266 code based on the lubuntu vm image, which is available on the mentioned espressif Website. It works fine and allows to develop really nice projects without additional microcontroller. What became annoying, was the flash programming and debugging process. The Programming of the Flash is done via the same UART, as is used to communicate with the microcontroller. Therefore, when compiling a new firmware version, I needed to do the following steps:
- Edit the C Source in Notepad++ (or your editor of choice) under Windows
- Launch the compiler in the lubuntu vm (preconfigured vm downloaded from espressif)
- Close the Windows Terminal App to free the Com Port
- Entering the Bootloader Mode on the ESP8266 module. GPIO0 low while doing a reset.
- Open the Programming Software and flash the Firmware
- Close the Programming Software to free the ComPort
- Do a Hardware Reset on the ESP8266 module
- Start the Terminal Program and test/debug the Software
After several cycles of this, I started looking after a simpler solution for this process. Because i could't find something, I started my own little Programmer and Terminal Program, which I called ESPProg.
Hardware:
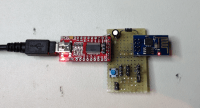
Already from the beginning, I used an USB2UART bridge based on the FT232RL chip together with the FTDI VCP drivers (Virtual Com Port) to communicate with the ESP8266 modul. With this UART chip, there are two output pins available (RTS and DTR), which can be (mis-)used to automatically enter bootmode and to reset the chip. Because the corresponding pins are normally pulled-up inside the chip, i connected the two pins needed for bootmode and reset via a diode to the UART bridge. As result these two ESP8266 pins stay freely available during normal operation. Schematic is attached.
Workflow:
The ESP8266 firmware is compiled under linux in the lubuntu vm. This vm runs in the freely downloadable Oracle-Virtualbox on a Windows machine. The Source Files are stored in a shared folder, which can be commonly accessed from Windows and from the lubuntu vm. Because i am personally still working mostly under Windows, my esp8266 process looks now as follows:
- - Edit the Source in Notepad++ (or your editor of choice) under Windows
- - Launch the compiler in the lubuntu vm (preconfigured vm downloaded from espressif)
- - Program the firmware to the ESP8266 using ESPProg.exe under Windows
- - Test/Debug the firmware using ESPProg.exe under Windows
No program needs to be closed/reopened, and the module's reset and bootloader-mode are invoked automatically.
PS: It seems that in the meantime the compiler can also be build directly for Windows, but because the readily available vm-image from espressif worked quite well, I opted for a mixed Linux/Windows Solution.
Software:
The ESPProg Windows Software has been written in the good old Delphi5 and runs here under win7-64, and results in a simple and relatively small (~600k) exe file, which can be easily copied directly into the project's bin folder, which contains the compiled firmware-files needed for the flash.
GUI:
At the moment there are mainly two Tabs: One for communicating with the module (some kind of Terminal), with some presets for the most common AT commands, and one for the programming of the flash. All the settings can be easily saved and reloaded to/from the harddisk. The whole program is not really finished yet, but here it works and speeds up the process already quite a bit.
Interestingly, the chip's bootloader has an auto baud-rate detection, which allows to download the firmware with speeds of up to 921'600, resulting in quick programming cycles. Normally I work here with 460'800 baud which results in programming times of less than 10 secondes for my firmware i am working on. Depending on the cabling, this 'high' speed might eventually result in problems. If this happens, the baudrate can be reduced to 230'400 or 115'200 in the GUI.
Software updated to V0.4:
- Possibility to swap the connection of RTS and DTR signals. Normaly RTS controls the RST pin and DTR controls GPIO0 pin. When setting the Swap Checkbox, DTR controls RST pin and RTS controls GPIO0 pin
- Button for saving a combined Bin File, that merges all the bin files in one single file. Such files are normally bigger, but they are easier to share with orthers. Always flash them to Address 0x00000.
Software updated to V0.51:
- Added the possibilty, to easily compile ESP8266 code directly from ESPProg. Therefore the Linux VM is no longer can be replaced with Chert's . You can find more details on where to download and how to install this in the ESPProg.txt file inside the zip file. Naturally I know, that in the meantime there are several very good environments available to program an ESP8266 (Eclipse, Arduino, VisualGDB etc.). But depending on what you are up to, they all have their own advantages and disadvantages...
Want to build a project?
Bring your design to life with the Elektor PCB Service, powered by Eurocircuits. Upload the project files and order professionally manufactured PCBs or assembled boards through a proven European production platform.
Supporting KiCad, Eagle, Gerber, and ODB++ formats, the service is suitable for everything from prototypes and validation builds to series production and volume manufacturing.
Made in Europe. Fast. Reliable. Professional.
Discussion (3 comments)