
Gain more program memory with the Arduino Nano
Arduino Nano with ATmega328P is available in two variants: "ATmega328P" and the older "ATmega328P (Old Bootloader)". The newer variant uses an optimized bootloader which has double upload transfer speed and only needs 512 bytes instead of 2048 bytes. Unfortunately the saved space cannot be used as additonal program memory for sketches. But this pity can easily be changed to gain more program memory with the Arduino Nano.
For the Arduino Nano with ATmega328P, two variants are available in the Arduino IDE under "Tools => Processor": "ATmega328P" and "ATmega328P (Old Bootloader)". The newer version "ATmega328P" uses an optimized boot loader, which on the one hand uses the double transmission speed when uploading the program (115200 Bd instead of 57600 Bd) and only requires a quarter of the program memory (512 instead of 2048 bytes). Unfortunately, the 1.5 kBytes saved cannot initially be used as additional program memory for sketches, since the fuse bits, which define the size of the boot area to be used in the AVR controller, have not been adjusted. Thus, the optimized boot loader continues to occupy 2 kBytes of the 32 kByte program memory. With an ISP programmer, which can be built with little effort, this can be changed easily, so that 1.5 kBytes more program memory is available for sketches, which means 5% more. In addition, many Arduino Nanos are still delivered with the "Old Bootloader" (also some boards from "joy-it"), so that with such a model there is also an additional speed advantage when uploading the sketch. First, look for the file boards.txt, in which the Arduino AVR boards are defined. This is usually located in the installation directory under C:\Program Files (x86)\Arduino\hardware\arduino\avr. In the same directory you create an additional text file called "boards.local.txt". There you enter a new type with the changed fuse bytes, so that the boot loader actually only occupies 512 bytes of the program memory. The required file is included as an attachment to this project and looks like this:
The fuse high byte has been changed to the value 0xDE (instead of 0xDA). In addition, the specification for the maximum program size of a sketch has been increased to 32256 (32768 bytes minus 512 bytes for the boot loader). The upload speed is 115200 Bd. After restarting the Arduino IDE, the now displayed variant "ATmega328P more Flash (32256 bytes)" with more program memory is selected under "Tools => Processor" on the Arduino Nano Board.
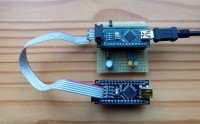
So that the additional program memory can be used, the boot loader and the fusebytes must now be programmed once in the Arduino Nano. This requires an AVR ISP programmer, which can also be built with a second Arduino Nano or Uno. Corresponding information can be found on the following page: https://www.arduino.cc/en/tutorial/arduinoISP. The ISP programmer is connected to the 6-pin ISP connector of the Arduino Nano to be reprogrammed (hereinafter referred to as "target"). A double-row pin header with a 2x3-pin version may have to be soldered in for this purpose. It is important to pay attention to the correct alignment of the ISP connector, since depending on the Arduino Nano model, these can be rotated by 180 degrees. The programmer is then connected to the PC via USB. If the target can be powered directly from the ISP programmer, the target must not be connected to the PC via USB. Depending on what Arduino model is used as an ISP programmer, it may also be necessary to switch a 10µF capacitor to GND at the reset pin.
In the Arduino IDE you select the setting "Arduino as ISP" under Tools => Programmer (pay attention to the exact name, as there are other similar variants). The appropriate COM port of the ISP programmer is selected under Tools => Port. Then the "Burn boot loader" option is selected under Tools. As a result, the fuse bytes are also programmed in accordance with the information in boards.local.txt. If the boot loader fails to burn with an error message, a capacitor on the reset pin of the Arduino Nano, which acts as an ISP programmer, may have to be switched to GND, as previously described. After successful programming, the ISP programmer is removed from the USB port of the PC and the connection cable to the ISP port of the target is removed. The reprogrammed Arduino Nano is connected to the PC via USB and the appropriate COM port is selected under Tools => Port. Now a sketch can be compiled and uploaded. There are now 1.5 kbytes more program memory available, for a total of 32256 bytes. If the "ATmega328P old Bootloader" setting was required for this Arduino Nano before reprogramming, sketches are now also flashed faster, since the upload takes place with 115200 Bd instead of 57600 Bd.
Comparison of the program memory space of the two Arduino Nano variants:
------------------------------------------------------
German version:
Mehr Programmspeicher beim Arduino Nano
Beim Arduino Nano mit ATmega328P sind in der Arduino IDE unter „Werkzeuge => Prozessor“ zwei Varianten verfügbar: „ATmega328P“ und "ATmega328P (Old Bootloader)". Die neuere Variante "ATmega328P" verwendet einen optimierten Bootloader, der zum einen die doppelte Übertragungsgeschwindigkeit beim Programmdownload benutzt (115200 Bd statt 57600 Bd) sowie nur ein Viertel des Programmspeichers benötigt (512 anstatt 2048 Bytes). Leider können die eingesparten 1,5 kBytes jedoch zunächst einmal nicht als zusätzlichen Programmspeicher für Sketches verwendet werden, da die Fusebits, die die Größe des zu verwendenden Bootbereichs im AVR Controller festlegen, nicht angepasst wurden. Somit belegt auch der optimierte Bootloader weiterhin 2 kBytes des 32 kBytes großen Programmspeichers. Mit einem ISP-Programmer, der auch mit wenig Aufwand selbst gebaut werden kann, lässt sich dies jedoch leicht ändern, sodass für Sketches 1,5 kBytes mehr Programmspeicher zur Verfügung stehen, was immerhin 5% mehr bedeutet. Zudem werden viele Arduino Nanos immer noch mit dem "Old Bootloader" ausgeliefert (auch manche Boards von "joy-it"), sodass sich bei solch einem Modell auch gleichzeitig noch ein zusätzlicher Geschwindigkeitsvorteil beim Upload des Sketches ergibt. Zunächst sucht man die Datei boards.txt, in der die Arduino AVR-Boards definiert sind. Gewöhnlich befindet sich diese im Installationsverzeichnis unterC:\Program Files (x86)\Arduino\hardware\arduino\avr. Im gleichen Verzeichnis erstellt man eine zusätzliche Textdatei mit dem Namen „boards.local.txt“. Dort trägt man einen neuen Typ ein mit den geänderten Fusebytes, sodass der Bootloader tatsächlich nur 512 Bytes des Programmspeichers belegt. Die benötigte Datei ist als Anlage zu diesem Projekt enthalten und sieht folgendermaßen aus:
Das Fuse-Highbyte wurde auf den Wert 0xDE geändert (anstatt bisher 0xDA). Außerdem wurde die Angabe für den maximale Programmgröße eines Sketchs auf 32256 erhöht (32768 Bytes abzgl. 512 Bytes für den Bootloader). Die Uploadgeschwindigkeit beträgt 115200 Bd. Nach einem Neustart der Arduino-IDE wird beim Arduino Nano Board unter „Werkzeuge => Prozessor“ die nun zusätzlich angezeigte Variante „ATmega328P more Flash (32256 bytes)“ mit mehr Programmspeicher ausgewählt.
Damit der zusätzliche Programmspeicher nutzbar ist, müssen nun noch der Bootloader sowie die Fusebytes einmalig in den Arduino Nano programmiert werden. Hierzu wird ein AVR ISP-Programmer benötigt, der mit einem zweiten Arduino Nano oder Uno auch selbstgebaut werden kann. Entsprechende Infos sind auf folgender Seite zu finden: https://www.arduino.cc/en/tutorial/arduinoISP. Der ISP-Programmer wird mit dem 6-poligen ISP-Anschluss des umzuprogrammierenden Arduino Nanos (im folgenden „Target“ genannt) verbunden, evtl. muss hierzu noch eine doppelreihige Stiftleiste mit 2x3-poliger Ausführung eingelötet werden. Hierbei muss unbedingt auf die korrekte Ausrichtung des ISP-Steckers geachtet werden, da je nach Arduino Nano Modell diese um 180 Grad gedreht sein können. Anschließend wird der Programmer per USB an den PC angeschlossen. Falls die Spannungsversorgung des Targets direkt vom ISP-Programmer aus erfolgen kann, darf das Target nicht noch zusätzlich per USB am PC angeschlossen werden. Je nachdem, was für ein Arduino-Modell als ISP-Programmer genutzt wird, kann es auch erforderlich sein, dort am Resetpin einen 10µF Kondensator gegen GND zu schalten.
In der Arduino IDE wählt man unter Werkzeuge => Programmer die Einstellung „Arduino as ISP“ aus (auf die genaue Bezeichnung achten, da es auch andere ähnlich lautende Varianten gibt). Unter Werkzeuge => Port wird der passende COM-Port des ISP-Programmers ausgewählt. Anschließend wird unter Werkzeuge die Option „Bootloader brennen“ angewählt. Dadurch werden gleichzeitig auch die Fuse-Bytes entsprechend den Angaben in boards.local.txt programmiert. Falls das Brennen des Bootloaders mit einer Fehlermeldung fehlschlagen sollte, muss evtl. ein Kondensator am Reset-Pin des Arduino Nanos, der als ISP-Programmer fungiert, gegen GND geschaltet werden, wie zuvor schon beschrieben. Nach erfolgreicher Programmierung wird der ISP-Programmer vom USB-Anschluss des PCs entfernt und das Verbindungskabel zum ISP-Anschluss des Targets abgezogen. Der umprogrammierte Arduino Nano wird per USB am PC angeschlossen und unter Werkzeuge => Port der passende COM-Port ausgewählt. Nun kann ein Sketch kompiliert und hochgeladen werden. Dafür stehen nun 1,5 kBytes mehr Programmspeicher zur Verfügung, insgesamt sind es 32256 Bytes. Falls bei diesem Arduino Nano vor der Umprogrammierung die Einstellung "ATmega328P old Bootloader" erforderlich war, werden nun Sketches auch schneller geflasht, da der Upload mit 115200 Bd erfolgt statt mit 57600 Bd.
Vergleich des Programmspeicherplatzes der beiden Arduino Nano Varianten:
Build This Project
Bring this design to life with the Elektor PCB Service, powered by Eurocircuits. Upload the project files and order professionally manufactured PCBs or assembled boards through a proven European production platform.
Supporting KiCad, Eagle, Gerber, and ODB++ formats, the service is suitable for everything from prototypes and validation builds to series production and volume manufacturing.
Made in Europe. Fast. Reliable. Professional.
Discussion (1 comment)