


Multiple Sensor Libraries with Arduino in Proteus
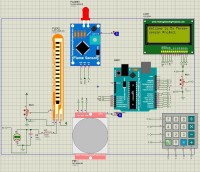
In this article, I have added three sensors with Arduino UNO and user can choose the required sensor with the help of keypad.
Hi there! I hope you are doing great. Today I am sharing the Proteus simulation of my project, in which I have shown the working of three sensors with a single Arduino. These include a PIR sensor (digital), flame-detecting sensor (digital), and flex measurement sensor (analogue). I have used the keypad and LCD with these sensors to make this project user-friendly. So let me show you the details of each component and their working.
Basics of Project
This project is based on the different types of sensors in the Proteus that get the power when the Proteus simulation is started. As we know, Embedded sensors are Semiconductor devices and a particular sensor is active only when the user wants it. At the start, the message is printed on the screen that guides the user to choose the sensor through a keypad. The user has to provide the input at the TestPin and the output is fed into the Arduino. Once the simulation starts, the LCD provides the details of the sensors and the user decides the particular options through the keypad. There are multiple sensors in Proteus but I have chosen the following three:
PIR Sensor
The real-time PIR sensor in Proteus senses the motion of a particular area. As Proteus is the EDA, to show the motion, a TestPin is present on the sensor. I used the toggle pin here to indicate the motion, so whenever the toggle is turned ON (value is 1) LCD shows the message that motion is detected. On the other hand, when the toggle switch is turned OFF, the respective message is shown.
Flame Detector
A flame detector is a sensor that checks for the environment and detects the presence of flame, just like a smoke detector detects smoke. Once it does its work, the flame can be notified with the help of any buzzer, LED, LCD or any other device. In my case, the status of the flame will be shown on the LCD when the user chooses a flame detector in the project. It is also the digital sensor and I have used a toggle switch to show the state.
Flex Sensor
A Flex sensor is present on the third number of the dial pad. The flex sensor is used to measure its bend by estimating the change in the resistance. It is an analogue sensor therefore, I have used the potentiometer to change the resistance value. As the Proteus deals with the peak-to-peak values; therefore, I had to use the LC circuit to overcome the errors in the calculations.
Components Used
- PIR Sensor
- Flame Sensor
- Flex Sensor
- Arduino UNO
- Dial Pad
- LCD 20x4
- Inductor
- Capacitor
- Logic Toggle
- Resistor
Arduino Code
The code I am sharing with you clearly describes every function of the component. The testPin of each sensor is responsible for the input of the sensor. To make it user-friendly, I have used the LCD that not only shows the output but also the printed message to help the user choose their option. The keypad has 10 keys but right now, I have interfaced only three sensors.
// PIR sensor status
bool pirActive = false;
// Flame sensor status
bool flameActive = false;
// flex sensor status
bool flexActive = false;
// Define PIR sensor pin
#define PIR_PIN A0
#define FLAME_PIN A1
#define FLEX_PIN A2
char key=' ';
// Define keypad pins and keys
const byte ROWS = 4;
const byte COLS = 4;
char keys[ROWS][COLS] = {
{'7', '8', '9', '/'},
{'4', '5', '6', '*'},
{'1', '2', '3', '-'},
{'C', '0', '=', '+'}
};
byte colPins[COLS] = {9, 8, 7, 6};
byte rowPins[ROWS] = {13,12,11, 10};
// Create keypad object
Keypad keypad = Keypad(makeKeymap(keys), rowPins, colPins, ROWS, COLS);
String input = "";
char operatr = ' ';
// Define LCD pins
LiquidCrystal lcd(0,1,2,3,4,5);
void setup() {
lcd.begin(20, 4);
lcd.setCursor(0,0);
lcd.print("Welcome to My Three-");
lcd.setCursor(0,1);
lcd.print("sensor Project");
delay(200);
lcd.clear();
// Set pins as input
pinMode(PIR_PIN, INPUT);
pinMode(FLAME_PIN, INPUT);
pinMode(FLEX_PIN, INPUT);
lcd.print("Press 1 for PIR");
lcd.setCursor(0,1);
lcd.print("sensor");
delay(200);
lcd.clear();
lcd.print("Press 2 for Flame");
lcd.setCursor(0,1);
lcd.print("sensor");
delay(200);
lcd.clear();
lcd.print("Press 3 for Flex");
lcd.setCursor(0,1);
lcd.print("sensor");
delay(200);
}
void loop() {
key = keypad.getKey();
if (key == '1')
{
lcd.clear();
lcd.setCursor(0, 1);
lcd.print("PIR sensor started.");
delay(200);
lcd.clear();
int pirActive = !pirActive;
while (pirActive) {
int pirValue = digitalRead(PIR_PIN);
if (pirValue == HIGH) {
lcd.setCursor(0, 1);
lcd.print("Motion detected!");
}
else
{
lcd.clear();
lcd.setCursor(0, 1);
lcd.print("No Motion");
}
}
}
if (key == '2')
{
lcd.setCursor(0, 1);
lcd.print("Flame sensor started.");
delay(200);
lcd.clear();
int flameActive = !flameActive;
while (flameActive) {
int flameValue = digitalRead(FLAME_PIN);
if (flameValue == HIGH) {
lcd.clear();
lcd.setCursor(0, 1);
lcd.print("Flame detected!");
}
else
{
lcd.clear();
lcd.setCursor(0, 1);
lcd.print("No flame");
}
}
}
if (key == '3')
{
lcd.setCursor(0, 1);
lcd.print("Flyex sensor started.");
lcd.clear();
int flexActive = !flexActive;
while (flexActive) {
int flexValue = analogRead(FLEX_PIN);
lcd.setCursor(0, 1);
// Determining appropriate threshold values for your flex sensor
if (flexValue > 500) {
lcd.print("Flexed!");
} else {
lcd.clear();
lcd.print("Not flexed.");
}
}
}}
bool pirActive = false;
// Flame sensor status
bool flameActive = false;
// flex sensor status
bool flexActive = false;
// Define PIR sensor pin
#define PIR_PIN A0
#define FLAME_PIN A1
#define FLEX_PIN A2
char key=' ';
// Define keypad pins and keys
const byte ROWS = 4;
const byte COLS = 4;
char keys[ROWS][COLS] = {
{'7', '8', '9', '/'},
{'4', '5', '6', '*'},
{'1', '2', '3', '-'},
{'C', '0', '=', '+'}
};
byte colPins[COLS] = {9, 8, 7, 6};
byte rowPins[ROWS] = {13,12,11, 10};
// Create keypad object
Keypad keypad = Keypad(makeKeymap(keys), rowPins, colPins, ROWS, COLS);
String input = "";
char operatr = ' ';
// Define LCD pins
LiquidCrystal lcd(0,1,2,3,4,5);
void setup() {
lcd.begin(20, 4);
lcd.setCursor(0,0);
lcd.print("Welcome to My Three-");
lcd.setCursor(0,1);
lcd.print("sensor Project");
delay(200);
lcd.clear();
// Set pins as input
pinMode(PIR_PIN, INPUT);
pinMode(FLAME_PIN, INPUT);
pinMode(FLEX_PIN, INPUT);
lcd.print("Press 1 for PIR");
lcd.setCursor(0,1);
lcd.print("sensor");
delay(200);
lcd.clear();
lcd.print("Press 2 for Flame");
lcd.setCursor(0,1);
lcd.print("sensor");
delay(200);
lcd.clear();
lcd.print("Press 3 for Flex");
lcd.setCursor(0,1);
lcd.print("sensor");
delay(200);
}
void loop() {
key = keypad.getKey();
if (key == '1')
{
lcd.clear();
lcd.setCursor(0, 1);
lcd.print("PIR sensor started.");
delay(200);
lcd.clear();
int pirActive = !pirActive;
while (pirActive) {
int pirValue = digitalRead(PIR_PIN);
if (pirValue == HIGH) {
lcd.setCursor(0, 1);
lcd.print("Motion detected!");
}
else
{
lcd.clear();
lcd.setCursor(0, 1);
lcd.print("No Motion");
}
}
}
if (key == '2')
{
lcd.setCursor(0, 1);
lcd.print("Flame sensor started.");
delay(200);
lcd.clear();
int flameActive = !flameActive;
while (flameActive) {
int flameValue = digitalRead(FLAME_PIN);
if (flameValue == HIGH) {
lcd.clear();
lcd.setCursor(0, 1);
lcd.print("Flame detected!");
}
else
{
lcd.clear();
lcd.setCursor(0, 1);
lcd.print("No flame");
}
}
}
if (key == '3')
{
lcd.setCursor(0, 1);
lcd.print("Flyex sensor started.");
lcd.clear();
int flexActive = !flexActive;
while (flexActive) {
int flexValue = analogRead(FLEX_PIN);
lcd.setCursor(0, 1);
// Determining appropriate threshold values for your flex sensor
if (flexValue > 500) {
lcd.print("Flexed!");
} else {
lcd.clear();
lcd.print("Not flexed.");
}
}
}}
So, I hope you like my project. It was the first time I had used more than one sensor in a single simulation. I have tried my best to make it user-friendly. Currently, the remaining keys of the keypad are not working, but I am working on more sensors. Hoping for positive reviews.
Want to build a project?
Bring your design to life with the Elektor PCB Service, powered by Eurocircuits. Upload the project files and order professionally manufactured PCBs or assembled boards through a proven European production platform.
Supporting KiCad, Eagle, Gerber, and ODB++ formats, the service is suitable for everything from prototypes and validation builds to series production and volume manufacturing.
Made in Europe. Fast. Reliable. Professional.
Discussion (2 comments)