
Raspberry Pi Debug Probe
Uploading the program on Raspberry Pi Pico Board using Raspberry Pi Debug Probe.
Introduction
Raspberry Pi Debug Probe is a completer debug kit. It can also be called as all-in one debug kit because it includes all necessary hardware and wires. All wires or cables are solderless so it can be easily connected with a target device.
It has both features processor debug interface (The ARM Serial wire debug interface) and an UART interface. Both interfaces use the 3-pin solderless connectors.
This debug kit is used for debugging the RP2040 microcontroller based development boards (Like Raspberry Pi Pico/Pico H or Pico W/Pico W H). This kit also works on 3.3V logic level like Raspberry Pi Pico board so it does not require level shifter.
Debug probe is enclosed inside a semitransparent case which is easily openable and closeable. It has a Micro-B USB connector so it can be easily connected to a computer or laptop with a micro-B USB cable which is also included in the kit.
It is designed to make it easy to debug and program Raspberry Pi Pico and RP2040 with a range of host platforms including Windows, Mac, and typical Linux computers, where you don’t have a GPIO header to connect directly to the Pico’s serial UART or SWD port.
Types of Debug Wires
Update the Firmware of Debug Probe
The firmware of the Raspberry Pi Debug Probe can be updated in the same way as Raspberry Pi Pico firmware. We can easily keep up to date firmware on Pico Probe. Fico probe firmware is free to download.
Raspberry Pi Pico as Debug Probe
We can also use a Raspberry Pi Pico board as Raspberry Pi Debug Probe. For that we need to flash the firmware of Debug Probe on the Pi Pico board. You can download the Debug Probe firmware via the following link;
https://github.com/raspberrypi/picoprobe
Purchasing the Raspberry Pi Debug Probe
You can purchase the original Raspberry Pi Debug Probe by Raspberry Pi Approved Sellers:
Specifications
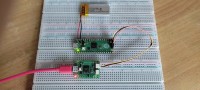
Upload the Sketch on Raspberry Pi Pico/Pico W board through Debug Probe
Here I am using the Arduino IDE to program the Raspberry Pi Pico through debug probe. If you do not have Arduino IDE on you computer then download and install it on your system.
Go through the following steps for uploading a sketch (program) on a Raspberry Pi Pico board through Debug Probe;
Raspberry Pi Debug Probe is a completer debug kit. It can also be called as all-in one debug kit because it includes all necessary hardware and wires. All wires or cables are solderless so it can be easily connected with a target device.
It has both features processor debug interface (The ARM Serial wire debug interface) and an UART interface. Both interfaces use the 3-pin solderless connectors.
This debug kit is used for debugging the RP2040 microcontroller based development boards (Like Raspberry Pi Pico/Pico H or Pico W/Pico W H). This kit also works on 3.3V logic level like Raspberry Pi Pico board so it does not require level shifter.
Debug probe is enclosed inside a semitransparent case which is easily openable and closeable. It has a Micro-B USB connector so it can be easily connected to a computer or laptop with a micro-B USB cable which is also included in the kit.
It is designed to make it easy to debug and program Raspberry Pi Pico and RP2040 with a range of host platforms including Windows, Mac, and typical Linux computers, where you don’t have a GPIO header to connect directly to the Pico’s serial UART or SWD port.
Types of Debug Wires
- Three-pin JST-SH connector to 3-pin JST-SH connector cable.
- Three-pin JST-SH connector to 0.1-inch header (female).
- Three-pin JST-SH connector to 0.1-inch header (male).
- Orange wire ----> TX/SWCLK (Output from Probe)
- Black wire -------> GND
- Yellow wire ------> RX/SWDIO (Input to probe or I/O)
Update the Firmware of Debug Probe
The firmware of the Raspberry Pi Debug Probe can be updated in the same way as Raspberry Pi Pico firmware. We can easily keep up to date firmware on Pico Probe. Fico probe firmware is free to download.
Raspberry Pi Pico as Debug Probe
We can also use a Raspberry Pi Pico board as Raspberry Pi Debug Probe. For that we need to flash the firmware of Debug Probe on the Pi Pico board. You can download the Debug Probe firmware via the following link;
https://github.com/raspberrypi/picoprobe
Purchasing the Raspberry Pi Debug Probe
You can purchase the original Raspberry Pi Debug Probe by Raspberry Pi Approved Sellers:
- Robu.in https://robu.in/product/official-raspberry-pi-debug-probe/
- Silverline Electronics https://www.silverlineelectronics.in/products/test-9
- Elektor Store https://www.elektor.com/search?q=Raspberry+pi+debug+probe
- Spark Fun https://www.sparkfun.com/products/21802
Specifications
- Form Factor: 22mmx32mm
- USB to two-wire serial debug bridge (ARM Serial wire debug supported by default).
- USB to UART Bridge.
- Compatible with the CMSIS-DAP standard.
- Works with OpenOCD and other tools that support CMSIS-DAP (like Arduino IDE).
- Includes high quality transparent plastic case.
- Includes a micro-B USB cable and 3 debug cables:
- 3Pin JST connector to 3Pin JST connector cable.
- 3Pin JST connector to 0.1-inch female header.
- 3Pin JST connector to 0.1-inch male connector.
- Nominal I/O voltage: 3.3V.
- Open source, easily upgradeable firmware.
- Operating Temperature: -20°C to +70°C.
Upload the Sketch on Raspberry Pi Pico/Pico W board through Debug Probe
Here I am using the Arduino IDE to program the Raspberry Pi Pico through debug probe. If you do not have Arduino IDE on you computer then download and install it on your system.
Go through the following steps for uploading a sketch (program) on a Raspberry Pi Pico board through Debug Probe;
- Open the Arduino IDE software.
- Open the blink sketch form examples.
- Select the board type.
- Select the port of Debug Probe.
- Click on Tools tab and select Upload Method: “Picoprobe (CMSIS-DAP)” as shown in image -11.
- Again click on Tools tab and select Optimize: “Debug (-Og)” as shown in image -12.
- Verify the sketch.
- Upload the Sketch.
Want to build a project?
Bring your design to life with the Elektor PCB Service, powered by Eurocircuits. Upload the project files and order professionally manufactured PCBs or assembled boards through a proven European production platform.
Supporting KiCad, Eagle, Gerber, and ODB++ formats, the service is suitable for everything from prototypes and validation builds to series production and volume manufacturing.
Made in Europe. Fast. Reliable. Professional.
Discussion (0 comments)