
Raspberry Pi Pico and L298N Motor Driver
Driving motors with Raspberry pi pico and MicroPython using L298N motor driver shield.
Introduction
If you want to make a robot (such as Line Follower, Obstacle avoider, Arm Robot or Racing Robot) or a car using a microcontroller(such as Arduino, ESP8266, ESP32, Raspberry pi pico etc.), you use motors to make your robot move. The motors consists of many winding of copper wire inside a magnetic field. These motors require more power than a microcontroller can supply so you cannot drive or control motors using a microcontroller directly. This is because the microcontroller boards work on low voltage and consumes less power and their Input/Output pins cannot supply enough current to drive your motors. If you try to connect a motor directly to a microcontroller board input/output pin, your microcontroller board may stop working. To get rid of this problem you must use a proper motor driver to control the direction as well as the speed of rotation. You can use a BJT or FET as a motor driver but a single BJT or FET can control speed only not direction of rotation. For controlling speed as well as direction you need to use 4 BJTs or FETs in H bridge configuration. Due to usage of 4 BJTs or FETs in H bridge your circuit will
become complex and bulky. To overcome this problem, we use motor driver IC. Inside a motor driver IC one and more H bridges are fabricated on a single chip so you can easily use it in your circuit. L298N and L293D are two motor driver ICs that are most popular for using in robots. You can use these ICs directly or can use an already assembled motor driver circuit which is also called as module.
Here I am going to show you how you can control motors using L298N motor driver module and Raspberry pi pico(as a microcontroller board) using MicroPython programming language.
After reading and understanding this article carefully one will be able to:
Hardware Requirements:
Software Requirements
Theory
L298N Motor Driver Module:
This dual bidirectional motor driver, is based on the very popular L298 Dual H-Bridge Motor Driver Integrated Circuit. The circuit will allow you to easily and independently control two motors of up to 2A each in both directions. It is ideal for robotic applications and well suited for connection to a microcontroller requiring just a couple of control lines per motor. It can also be interfaced with simple manual switches, TTL logic gates, relays, etc. This board equipped with power LED indicators, on-board +5V regulator and protection diodes. The image of this module has been given in image no. 8 , 9 and 14.
Specifications:
Step-1: Installing the MicroPython Firmware on Raspberry pi pico
When you purchase a new Raspberry pi pico board, you need to install the latest version of MicroPython firmware on your Raspberry pi pico board. For installing a new firmware on your Raspberry pi pico, keep pressed the bootsel button of your Raspberry pi pico and connect it to the computer with a micro USB cable. After connecting, release the bootsel button. As soon as you release the bootsel button a new drive will automatically opens on the screen of your computer. Select the downloaded firmware(.UF2 file) and drag it inside this drive. Now the drive will automatically disappeared from the screen.
Open thonny IDE and click on Tools and then select Options. Now again click on interpreter tab and select the interpreter MicroPython(Raspberry pi pico) also select the COM PORT on which your board is connected to and click on Ok.
Now your Raspberry pi pico board will be connected to Thonny IDE and you will see the following message in the shell.
Now type
in the shell and press enter. Your Raspberry pi pico will return the following reply.
Step-2: Solder wires to motors
To connect motors to L298N module you need to solder wires to your motors. You can easily solder wires to your motors using soldering tools(Soldering iron, Soldering flux and Soldering wire)
Step-3: Connect motors to L298N Driver module
After soldering the wires to both motors connect these wire to L298N module. There are two 2-pin screw terminal on L298N driver module. Connect the wires of the first motor to left side screw terminal and wires of the second motor to right side screw terminal and don't forget to tight your connections with a small screw driver.
Step-4: Making a test setup
Here you have to prepare a test setup on a breadboard for controlling the motors using Raspberry pi pico and MicroPython programming. I have provided here a pdf of the schematic diagram(Raspberry Pi Pico and L298.pdf). With the help of this schematic diagram you can create your own circuit on a bread board easily. If you have made any circuit on a bread board earlier , you can do this job very easily. I have prepared the schematic diagram on the basis of following wiring scheme:
L298N module Raspberry Pi Pico
ENA ---------------------------------> GPIO-0
IN1 ---------------------------------> GPIO-1
IN2 ---------------------------------> GPIO-2
IN3 ---------------------------------> GPIO-3
IN4 ---------------------------------> GPIO-4
ENB ---------------------------------> GPIO-5
GND ---------------------------------> GND
L298N module Battery
Vcc ----------------------------> +Ve(Red terminal)
GND ---------------------------> -Ve(Black Terminal)
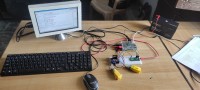
You can also take the help of given images to make proper wiring connections.
Step-5: Download the L298N_motor.py MicroPython module.
To keep the main programming part easier for beginners, I have developed a MicroPython module for L298N motor driver. Before wiring and running the example programs, you need to download the L298N_motor.py library from my GitHub repository. The link of the GitHub repository is given below:
https://github.com/ramjipatel041/Micropython-Driver-for-L298N-Motor-Driver.git
After downloading the above micropython module, open it in thonny IDE and save it on your Raspberry pi pico with the same name as L298N_motor.py. If you save it on your pico with a different name then you can't run the example programs given in the next step.
Step-6: Writing the example programs
After saving the L298N_motor.py file on your pico board, you are now ready for writing some example programs. Here in this step I have written six example codes. You can copy them and run on your Raspberry pi pico.
Example-1
Example-2
Example-3
Example-4
For example 5 and 6 you need to add two more devices to your previously created circuit. These two devices are HC-05 Bluetooth and 10K potentiometer. For connecting these devices you can take the help of schematic diagram(Raspberry pi pico_HC05 _L298N.pdf). Using HC-05 Bluetooth you can control your motors with your smart phone. The example code for this is given below:
Example-5
Potentiometer is used here to control the speed of motors. The example code for this is following:
Example-6
If you want to make a robot (such as Line Follower, Obstacle avoider, Arm Robot or Racing Robot) or a car using a microcontroller(such as Arduino, ESP8266, ESP32, Raspberry pi pico etc.), you use motors to make your robot move. The motors consists of many winding of copper wire inside a magnetic field. These motors require more power than a microcontroller can supply so you cannot drive or control motors using a microcontroller directly. This is because the microcontroller boards work on low voltage and consumes less power and their Input/Output pins cannot supply enough current to drive your motors. If you try to connect a motor directly to a microcontroller board input/output pin, your microcontroller board may stop working. To get rid of this problem you must use a proper motor driver to control the direction as well as the speed of rotation. You can use a BJT or FET as a motor driver but a single BJT or FET can control speed only not direction of rotation. For controlling speed as well as direction you need to use 4 BJTs or FETs in H bridge configuration. Due to usage of 4 BJTs or FETs in H bridge your circuit will
become complex and bulky. To overcome this problem, we use motor driver IC. Inside a motor driver IC one and more H bridges are fabricated on a single chip so you can easily use it in your circuit. L298N and L293D are two motor driver ICs that are most popular for using in robots. You can use these ICs directly or can use an already assembled motor driver circuit which is also called as module.
Here I am going to show you how you can control motors using L298N motor driver module and Raspberry pi pico(as a microcontroller board) using MicroPython programming language.
After reading and understanding this article carefully one will be able to:
- Control motors easily using L298N module and MicroPython programming language.
- Make a robot easily using L298N and MicroPython programming language.
- Control motors with Raspberry pi pico.
Hardware Requirements:
- Raspberry pi pico
- L298N motor driver module
- Bread board(Full size)
- Jumper wires(M-t-M and M-t-F)
- Wires with alligator clips
- 12V Battery
- Micro USB cable
- Gear motors(2)
- Screw driver
- Soldering Iron
- Soldering wire and paste
- Laptop or computer
- HC-05 Bluetooth module
- 10K potentiometer
Software Requirements
- Thonny(Python IDE for beginners).
- MicroPython Firmware for Raspberry pi pico.
- L298N_motor.py MicroPython Module.
Theory
L298N Motor Driver Module:
This dual bidirectional motor driver, is based on the very popular L298 Dual H-Bridge Motor Driver Integrated Circuit. The circuit will allow you to easily and independently control two motors of up to 2A each in both directions. It is ideal for robotic applications and well suited for connection to a microcontroller requiring just a couple of control lines per motor. It can also be interfaced with simple manual switches, TTL logic gates, relays, etc. This board equipped with power LED indicators, on-board +5V regulator and protection diodes. The image of this module has been given in image no. 8 , 9 and 14.
Specifications:
- Input Voltage: 3.2V~40Vdc. Brief Data:
- Driver: L298N Dual H Bridge DC Motor Driver
- Power Supply: DC 5 V - 35 V
- Peak current: 2 Amp
- Operating current range: 0 ~ 36mA
- Control signal input voltage range :
- Low: -0.3V ≤ Vin ≤ 1.5V.
- High: 2.3V ≤ Vin ≤ Vss.
- Enable signal input voltage range : o Low: -0.3 ≤ Vin ≤ 1.5V (control signal is invalid). o High: 2.3V ≤ Vin ≤ Vss (control signal active).
- Maximum power consumption: 20W (when the temperature T = 75 ℃).
- Storage temperature: -25 ℃ ~ +130 ℃.
- On-board +5V regulated Output supply (supply to controller board i.e. Arduino).
- Size: 3.4cm x 4.3cm x 2.7cm
Step-1: Installing the MicroPython Firmware on Raspberry pi pico
When you purchase a new Raspberry pi pico board, you need to install the latest version of MicroPython firmware on your Raspberry pi pico board. For installing a new firmware on your Raspberry pi pico, keep pressed the bootsel button of your Raspberry pi pico and connect it to the computer with a micro USB cable. After connecting, release the bootsel button. As soon as you release the bootsel button a new drive will automatically opens on the screen of your computer. Select the downloaded firmware(.UF2 file) and drag it inside this drive. Now the drive will automatically disappeared from the screen.
Open thonny IDE and click on Tools and then select Options. Now again click on interpreter tab and select the interpreter MicroPython(Raspberry pi pico) also select the COM PORT on which your board is connected to and click on Ok.
Now your Raspberry pi pico board will be connected to Thonny IDE and you will see the following message in the shell.
MicroPython v1.20.0 on 2023-04-26; Raspberry Pi Pico with RP2040
Type "help()" for more information.
>>>
Now type
>>> print('hello')
in the shell and press enter. Your Raspberry pi pico will return the following reply.
>>> print('hello')
hello
>>>
Step-2: Solder wires to motors
To connect motors to L298N module you need to solder wires to your motors. You can easily solder wires to your motors using soldering tools(Soldering iron, Soldering flux and Soldering wire)
Step-3: Connect motors to L298N Driver module
After soldering the wires to both motors connect these wire to L298N module. There are two 2-pin screw terminal on L298N driver module. Connect the wires of the first motor to left side screw terminal and wires of the second motor to right side screw terminal and don't forget to tight your connections with a small screw driver.
Step-4: Making a test setup
Here you have to prepare a test setup on a breadboard for controlling the motors using Raspberry pi pico and MicroPython programming. I have provided here a pdf of the schematic diagram(Raspberry Pi Pico and L298.pdf). With the help of this schematic diagram you can create your own circuit on a bread board easily. If you have made any circuit on a bread board earlier , you can do this job very easily. I have prepared the schematic diagram on the basis of following wiring scheme:
L298N module Raspberry Pi Pico
ENA ---------------------------------> GPIO-0
IN1 ---------------------------------> GPIO-1
IN2 ---------------------------------> GPIO-2
IN3 ---------------------------------> GPIO-3
IN4 ---------------------------------> GPIO-4
ENB ---------------------------------> GPIO-5
GND ---------------------------------> GND
L298N module Battery
Vcc ----------------------------> +Ve(Red terminal)
GND ---------------------------> -Ve(Black Terminal)
You can also take the help of given images to make proper wiring connections.
Step-5: Download the L298N_motor.py MicroPython module.
To keep the main programming part easier for beginners, I have developed a MicroPython module for L298N motor driver. Before wiring and running the example programs, you need to download the L298N_motor.py library from my GitHub repository. The link of the GitHub repository is given below:
https://github.com/ramjipatel041/Micropython-Driver-for-L298N-Motor-Driver.git
After downloading the above micropython module, open it in thonny IDE and save it on your Raspberry pi pico with the same name as L298N_motor.py. If you save it on your pico with a different name then you can't run the example programs given in the next step.
Step-6: Writing the example programs
After saving the L298N_motor.py file on your pico board, you are now ready for writing some example programs. Here in this step I have written six example codes. You can copy them and run on your Raspberry pi pico.
Example-1
"""This micropython program makes the motor1
move in forward and backward directions."""

from machine import Pin, PWM
from L298N_motor import L298N
import time

ENA = PWM(Pin(0))
IN1 = Pin(1, Pin.OUT)
IN2 = Pin(2, Pin.OUT)

motor1 = L298N(ENA, IN1, IN2)     #create a motor1 object
motor1.setSpeed(25000)            #set the speed of motor1. Speed value varies from 25000 to 65534

while True:
    motor1.forward()      #run motor1 forward
    time.sleep(5)         #wait for 5 seconds
    motor1.backward()     #run motor1 backward
    time.sleep(5)         #run motor2 backward
Example-2
 """This micropython program makes the motor1 and motor2
move in forward and backward directions."""

from machine import Pin, PWM
from L298N_motor import L298N
import time

ENA = PWM(Pin(0))
IN1 = Pin(1, Pin.OUT)
IN2 = Pin(2, Pin.OUT)
IN3 = Pin(3, Pin.OUT)
IN4 = Pin(4, Pin.OUT)
ENB = PWM(Pin(5))

motor1 = L298N(ENA, IN1, IN2)     #create a motor1 object
motor2 = L298N(ENB, IN3, IN4)     #create a motor2 object

motor1.setSpeed(30000)            #set the speed of motor1. Speed value varies from 25000 to 65534
motor2.setSpeed(25000)            #set the speed of motor2. Speed value varies from 25000 to 65534

while True:
    motor1.forward()      #run motor1 forward
    motor2.forward()      #run motor2 forward
    time.sleep(5)         #wait for 5 seconds
    motor1.backward()     #run motor1 backward
    motor2.backward()     #run motor1 backward
    time.sleep(5)         #run motor2 backward
Example-3
"""This micropython program makes the motor1
move in forward and backward directions with
increasing speed."""

from machine import Pin, PWM
from L298N_motor import L298N
import time

ENA = PWM(Pin(0))
IN1 = Pin(1, Pin.OUT)
IN2 = Pin(2, Pin.OUT)

motor1 = L298N(ENA, IN1, IN2)     #create a motor1 object
motor1.setSpeed(25000)            #set the speed of motor1. Speed value varies from 25000 to 65534

while True:
    for speed in range(25000, 65000, 100):
        motor1.setSpeed(speed)
        motor1.forward()
        time.sleep(0.1)
    motor1.stop()
    for speed in range(25000, 65000, 100):
        motor1.setSpeed(speed)
        motor1.backward()
        time.sleep(0.1)
    motor1.stop()
Example-4
"""This micropython program makes the motor1
move in forward and backward directions with
increasing and and decreasing speed in both
directions."""

from machine import Pin, PWM
from L298N_motor import L298N
import time

ENA = PWM(Pin(0))
IN1 = Pin(1, Pin.OUT)
IN2 = Pin(2, Pin.OUT)

motor1 = L298N(ENA, IN1, IN2)     #create a motor1 object
motor1.setSpeed(25000)            #set the speed of motor1. Speed value varies from 25000 to 65534

while True:
    for speed in range(25000, 65000, 100):
        motor1.setSpeed(speed)
        motor1.forward()
        time.sleep(0.1)
    for speed in range(65000, 25000, -100):
        motor1.setSpeed(speed)
        motor1.forward()
        time.sleep(0.1)
    motor1.stop()
    for speed in range(25000, 65000, 100):
        motor1.setSpeed(speed)
        motor1.backward()
        time.sleep(0.1)
    for speed in range(65000, 25000, -100):
        motor1.setSpeed(speed)
        motor1.backward()
        time.sleep(0.1)
    motor1.stop()
For example 5 and 6 you need to add two more devices to your previously created circuit. These two devices are HC-05 Bluetooth and 10K potentiometer. For connecting these devices you can take the help of schematic diagram(Raspberry pi pico_HC05 _L298N.pdf). Using HC-05 Bluetooth you can control your motors with your smart phone. The example code for this is given below:
Example-5
''' This is a micropython program to control the speed
and direction of the motor using seraial communication'''

from machine import Pin, PWM, UART
from L298N_motor import L298N
import time

uart = UART(1, 9600)
uart.init(9600, bits = 8, parity = None,stop = 1, rx = Pin(9), tx = Pin(8))

ENA = PWM(Pin(0))
IN1 = Pin(1, Pin.OUT)
IN2 = Pin(2, Pin.OUT)

motor1 = L298N(ENA, IN1, IN2)
motor1.setSpeed(30000)

while True:
    if uart.any() > 0:
        data = uart.read()
        print(data)
        if "FORWARD" in data:
            motor1.run("FORWARD")
        elif "BACKWARD" in data:
            motor1.run("BACKWARD")
        elif "STOP" in data:
            motor1.run("STOP")
        elif "SPEED" in data:
            uart.write(str(motor1.getSpeed()))
        elif "DIRECTION" in data:
            uart.write(str(motor1.getDirection()))
Potentiometer is used here to control the speed of motors. The example code for this is following:
Example-6
''' This is a micropython program to control the
speed of motor1 using a potentiometer'''

from machine import Pin, PWM, ADC
from L298N_motor import L298N
import time

potentiometer = ADC(26)
ENA = PWM(Pin(0))
IN1 = Pin(1, Pin.OUT)
IN2 = Pin(2, Pin.OUT)

motor1 = L298N(ENA, IN1, IN2)

while True:
    reading = potentiometer.read_u16()
    motor1.setSpeed(int(reading))
    motor1.forward()
    time.sleep(0.1)
Want to build a project?
Bring your design to life with the Elektor PCB Service, powered by Eurocircuits. Upload the project files and order professionally manufactured PCBs or assembled boards through a proven European production platform.
Supporting KiCad, Eagle, Gerber, and ODB++ formats, the service is suitable for everything from prototypes and validation builds to series production and volume manufacturing.
Made in Europe. Fast. Reliable. Professional.
Discussion (0 comments)