
DIY Smart Object Counter: Image Recognition Simplified with Edge Impulse
on
Do you want to transform a Raspberry Pi and a camera into a smart object-counting tool using Edge Impulse? This accessible object counter project demonstrates the ease of starting with Edge Impulse on a Raspberry Pi. Follow along.
Edge Impulse specializes in providing tools and platforms for developing machine learning models for edge computing, running particularly on embedded devices. Edge computing involves processing data near the source of data, instead of relying on a remote server. That’s perfect to implement on a Raspberry Pi! In this example, we’ll count small objects, in this case ordinary buttons found on fabric.
Machine learning platforms such as Edge Impulse use so-called models, which are specific types of algorithms used for data analysis and pattern recognition. These models are trained to recognize patterns, make predictions, or perform tasks based on input data.
Classifying of objects is easily possible by Edge Impulse models. You can identify between a man and animals, between bicycles and cars, and so on. In addition, you can easily count one type of object among other types of objects. All you need to have is a good quality camera, sufficient light, proper focus, and, lastly, a moderately built computer (a Raspberry Pi 3 or Raspberry Pi 4 is good enough), and you are ready to go for counting.
From the start, this project was aimed to be installed on the microcontroller (MCU) level — an Espressif ESP32, an Arduino Nicla vision, etc. And that’s why it was made for a very small area of counting (120 pixels × 120 pixels) with a relatively small button as an object of interest. Ultimately, it transpired that even for the smallest area, the MCUs were no match at all. The machine learning models are pre-trained on Edge Impulse servers and a so-called model file is generated to be stored on the embedded device. Here, the model file itself is about 8 MB! Therefore, the project was finally installed in a Raspberry Pi computer, where it works easily.
Knowledge and Wisdom
If you know Edge Impulse, then believe me, half of your job is already done. For the rest, you just need to tweak your model to fine-tune it for an acceptable level of performance. A computer AI model works like a child. Imagine how you learned things like, “A is for apple” and “B is for ball.” You were shown an apple from various angles, and then you were taught to name it “apple.” The same went for “ball.” Now, from all possible angles, a child will identify an apple and a ball fairly easily! And so it is with AI, which can identify them easily.
Now consider there is a basket where seemingly apple-sized balls and ball-sized apples are mixed and all look the same from the point of view. Being a child, what would you do? With your only knowledge of apple and ball, you would simply miss! AI would miss too. But consider the fruit basket is displayed by a fruit and vegetable vendor. Then, in all probability, neither of them is a ball! And some or all of them could be apples. This “trick” of connecting an apple with a fruit and vegetable seller is called wisdom, which you cannot expect either from a child or from AI unless it is specifically taught otherwise. However, human beings have learned, over the years, many more associated things that eventually have given us enough wisdom to connect apple with a fruit and vegetable seller.
However, AI is improving so fast that someday it will have wisdom to work on. For now, you must teach the ML model for apple and ball from all possible angles to perform them without any confusion (e.g., the texture profile of an apple, its stem, its creases on its body, look from top and bottom and much more). In any case, many different models with different capabilities are available in Edge Impulse for testing and experimenting.
Getting Started with Edge Impulse
First, open an account in Edge Impulse , which requires an email ID. Collect similar types of buttons, a handful number. If you open the site from a Raspberry Pi computer, using the camera of the Raspberry Pi computer (either USB connected or cam port connected), you can collect images of buttons from several angles (which is required while the model is deployed in a real working field). Edge Impulse has also provisions to connect your cell phone or laptop as an input device for collecting data, which is also more convenient for data acquisition in the Edge Impulse project.
The Object Counter Project
The Edge Impulse project is broadly divided into the following steps, all of which must be followed on the Edge Impulse website.
1. Data acquisition: This could be images, sound, temperatures, distances, etc. Part of the data is separated as test data, while all other data is used as training data.
2. Impulse design: The main part of it being labeled Create Impulse. In this context, an “impulse” refers to a pipeline or workflow for creating a machine learning model. This impulse encompasses several stages, including tweaking of input parameters associated with the data that were just collected, signal processing, feature extraction, and the machine learning model itself. “Features” are individual measurable properties or characteristics of a phenomenon being observed. Essentially, features are the data attributes used by models to detect patterns and make decisions. The Impulse pipeline is subdivided:
- Input parameters: image (width, height), sound (sound parameters)
- Processing block: how to process the input data
- Learning block: object data of this model
You have to select and configure these three steps.
3. Image processing: Generate Features of the collected images.
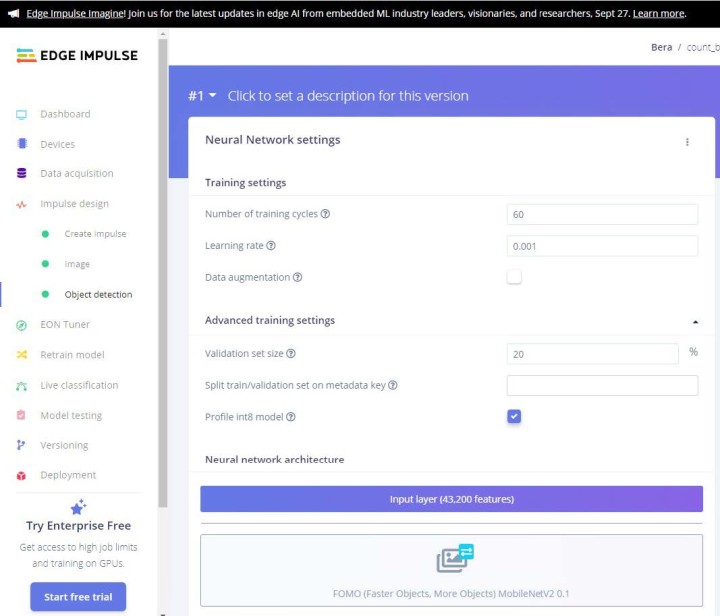
4. Object detection: Select your Neural Network model and train the model.
For the final part — the object detection part — your expertise is needed, or I would rather call it trial and error effort, so that the accuracy of the model becomes 85% or above. At times, you have to remove some bad images (aka outliers) from the model to improve its efficiency.
There are a handful of models in which you can try and see the accuracy level of the model. Anything above 90% is great; but certainly, it should not be 100% accurate! If it is so, then you have something wrong with your data. It could be very little data or insufficient features are there. Recheck and retry again for that case! For this project, the accuracy was 98.6%. Certainly, our number of data (about 40) was small. However, for a starter project, this is pretty good (see Figure 1). The files for this project are available on the Elektor Labs page of this project.

Model Testing
You can test your model on the test data first. Start there, and then point your device to the real-life data and see if it works!
In the dashboard of the Edge Impulse opening page, the test feature is available. You can straight away run the model in the browser, or you can use your smartphone to test it. To do so, Edge Impulse offers a QR code to scan with your smartphone (Figure 2). Point the camera to the buttons (Figure 3, Figure 4, and Figure 5) and see whether it can count them or not!
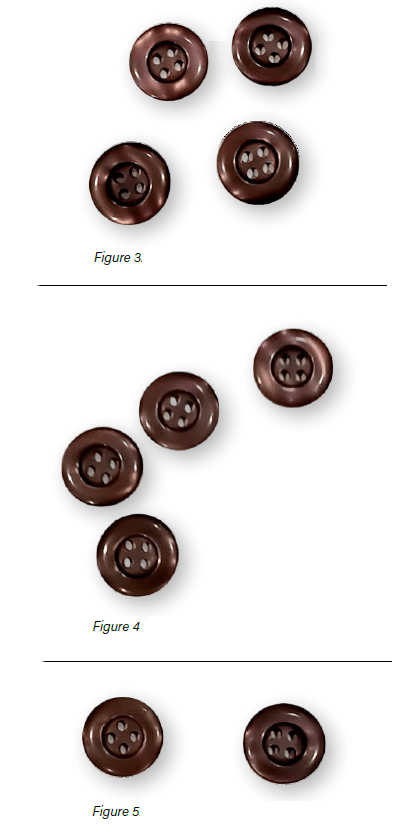
Figure 4: Data Acquisition: Sample-2.
Figure 5: Data Acquisition: Sample-3.
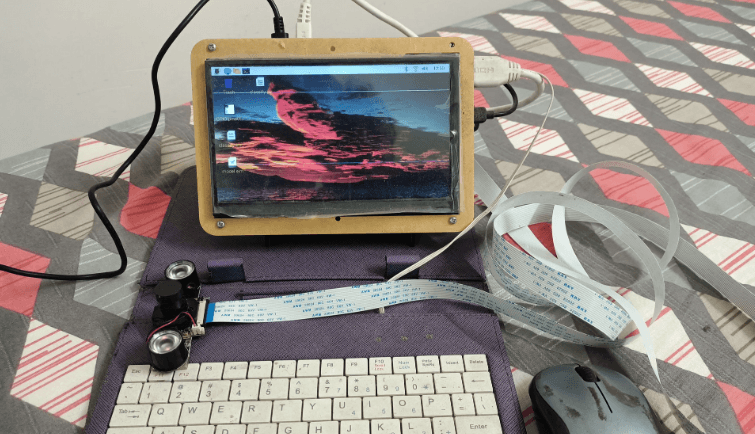
Raspberry Pi Deployment
To run the model on a Raspberry Pi computer, you have to download the *.eim file. But unlike for other hardware (Arduino, Nicla Vision, or ESP32 where you can download directly), in the case of Raspberry Pi, you have to install Edge Impulse on the Raspberry Pi computer first. From inside that edge-impulse-daemon software, you have to download this file. But don’t worry, Edge Impulse has devoted a full page to installing Edge Impulse on Raspberry Pi. There are a few dependencies to install first. Look at . It’s pretty easy. The process is well described.
OK, so after you install Edge Impulse on the Raspberry Pi computer, the fun begins. Remember to keep the Raspberry Pi connected to the Internet.
Run the command edge-impulse-linux-runner from the Raspberry Pi terminal. This will start a wizard which will ask you to log in, and choose an Edge Impulse project. If you want to switch between projects later, run that command again with the --clean option. This command will automatically compile and download the AI model of your project and then start running on your Raspberry Pi. Show the buttons to the camera connected to your Raspberry Pi and it should count them. That’s good! In the following, we will modify the system using Python and a voice synthesizer which, after counting, speaks up the number of buttons it got to count.
Deploy Model in Python
In the above deployment, it would work as it is intended in the Edge Impulse model. To make it work for your special purpose — for example, to sound an audio alarm or light an LED when the count reaches “2 or more” — you have to find some other means! Here comes Python 3 to help you out. Linux-sdk-python needs to be installed on your Raspberry Pi computer.
The Edge Impulse SDK Software Development Kit (SDK) is available for many models, including Python, Node.js, C++, etc. Check the SDK Python page.
Once the linux-sdk-python is installed, go to the linux-sdk-python/examples/image directory and run the Python file for image identification. Don’t get confused. In the example directory, there are three subdirectories — one each for audio data, image data and custom data. In the image directory, the video classification file is also available for video input data. The custom directory is for customizing other kinds of data (for experts only!).
Now run the command:
python3 classify-image.py /home/bera/downloads/model.eim
The model file *.eim is to be loaded from the respective directory of its location. If you prefer, you can copy it into the SDK directory as well!
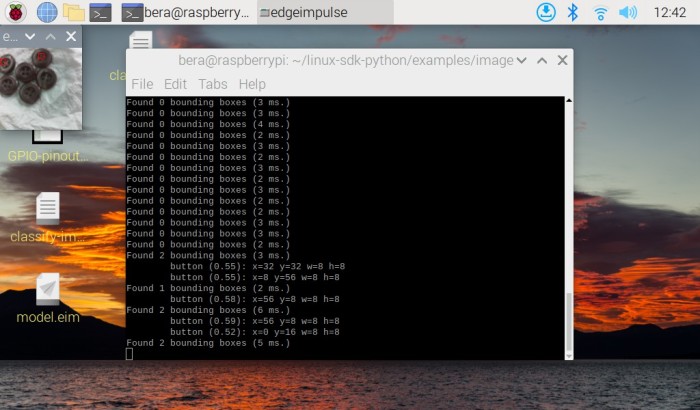
That’s how you have to load the Python file with the downloaded model.eim file. The program will automatically find the camera module (USB-connected or Cam-Port connected) and will start running! In the top-left corner, a small 120 × 120 camera window will open, and the identified buttons will be marked with a small red marker. The numbers identified will be shown on the terminal. Please ensure sufficient light is available, and the camera is properly focused for the buttons. This is particularly important for cheap cameras. That’s why if you run the model on your smartphone it produces far superior images and counts far more quickly. Nonetheless, ensure proper light and focus, and it will produce better results.
In the following screenshot pictures of the Raspberry Pi computer, on the top left, the small 120 × 120 exposure window is visible wherein all three buttons are identified and counted by the model. See the distinct visible red marker on all three buttons!
In Figure 6, four buttons are missed because of inadequate focus and light issue. The camera also does not have a stand to be fixed for this work! That’s why I recommend getting the camera fixed on a stand, like in a “microscope setup.” Be sure not to look at an angle from the top.
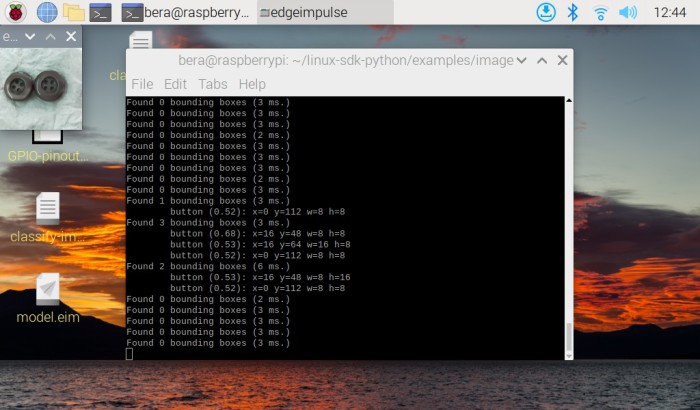
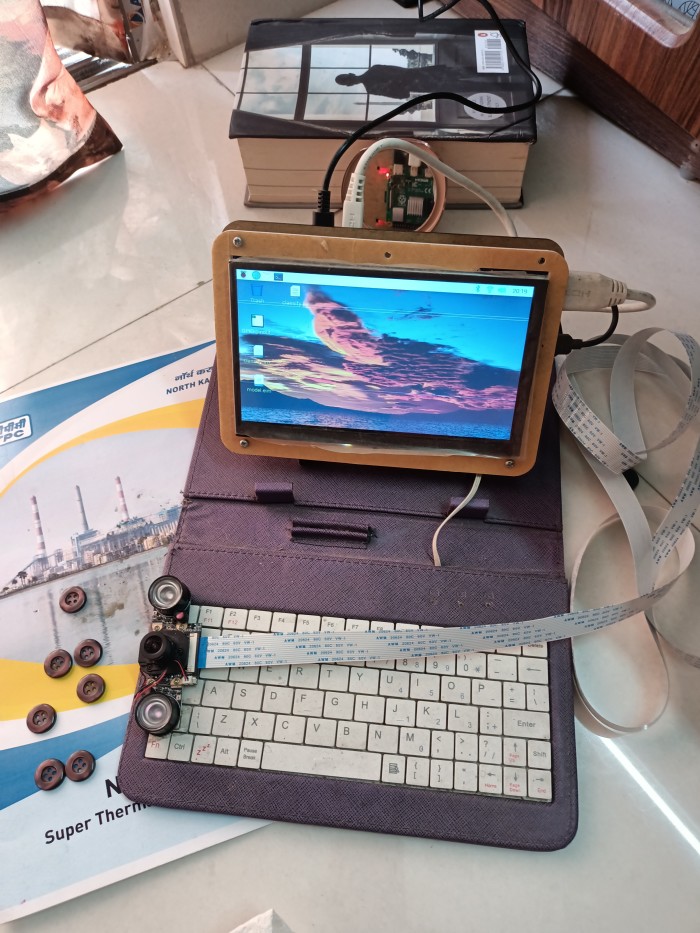
In Figure 7, I removed one button and the model counted it right first. It read two buttons, but at the moment I pressed the pr-screen button, it got misaligned and missed. Also, ensure the camera has a long cable (ribbon cable — see my object counter prototype in Figure 8) to move around. This cable is available on Amazon. However, once the camera is fixed on a stand with a good amount of light/daylight, it will work infallibly.
Customize Your Model
Please have a look at the classify-image.py file. It’s a simple Python file that can be tailor-made with little difficulty. In this Python file, I’ve added an espeak module such that the moment it finds a button(s), it speaks out the number of button(s) it finds. To install espeak on your Raspberry Pi, run the command:
sudo apt-get install espeak
Refer to Listing 1 with the Python file including my modifications.
Espeak is a stand-alone text-to-speech module for Python. It does not require an Internet connection to work.

Modified Run
Now you have modified the Python program. If you run the Python file now, it will locate the button (on the top left, a small 120 × 120 camera port will open), and the numbers will be shown on the terminal window and the associated speaker will speak out the number: “Found five buttons / Found two buttons,” etc. If you want to run some relay, light an LED, etc., import the GPIO library of the Python and then fire the associated GPIO to run the relay, etc. However, for running a relay, you have to use a switching transistor to increase the amount of current required for running the relay.
Aftermath
Edge Impulse started in 2019 with an objective to enable developers to create the next generation of intelligent devices. Since then, AI-powered programs and devices have appeared on ESP32, Jetson Nano, Raspberry Pi, Orange Pi, Maixduino, OpenMV, Nicla Vision, and many more. This trend will further improve in the coming days! Gone are the days of supercomputers or big-brand computers. Small, low-power modular devices are covering that space fast. And who knows? Maybe soon we will have the built-in wisdom installed and ready right out of the package!
Editor's note: This article (230575-01) appears in Elektor March/April 2024.
Questions About the Article or Object Counter?
If you have technical questions or comments about this article or the object counter, feel free to contact the author by email at berasomnath@gmail.com or the Elektor editorial team at editor@elektor.com.


Discussion (0 comments)