
AI Specialist: Machine Learning with the Jetson Nano
on
Artificial intelligence on GPUs does not necessarily mean expensive graphics cards and massive power consumption. NVIDIA has been moving towards smaller systems for some time now, certainly also due to the competition from microcontroller manufacturers. In this article, we look at the Jetson Nano and a small demo application.
The market for artificial intelligence (AI) acceleration in embedded systems is in flux. Companies such as Canaan and Maxim Integrated are fighting tooth and nail for supremacy. ARM has also driven a gladiator into this arena with the announcement of the Cortex M52. The aim is to offer small AI systems that perform basic AI tasks on the much talked-about edge without a connection to the Internet. This leads to a much more stable system architecture because the ML or AI tasks can then continue to be processed even if the connection to the parent server is lost. NVIDIA has been trying to play in this area for some time with the Jetson series.
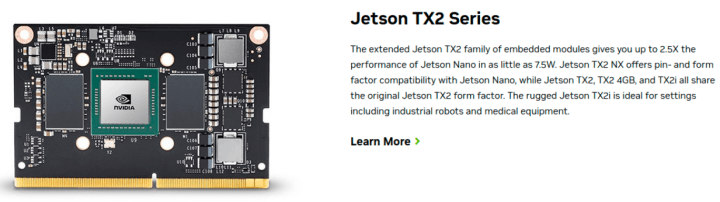
In the interest of didactic honesty, it should be noted that custom board designs with these systems are not really manageable for smaller companies, if only because of the extreme bandwidth required to access the DDR RAM. NVIDIA is aware of this problem. The portfolio overview available here, which provides electronics engineers with an overview of the entire Jetson ecosystem, therefore also includes various “compute cards,” such as the Jetson TX2 shown in Figure 1.
It should also be noted that due to NVIDIA’s dominance in the GPU sector, its well-developed third-party ecosystem has now also discovered the Jetson product range. A list of various third-party products can be found here, the integration of which into an in-house solution can save a great deal of development time (think, for example, of housing design and the selection of cameras and the like).
Getting the Jetson System Up and Running
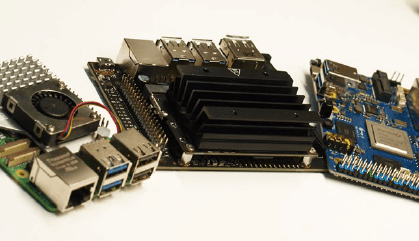
For “lateral entry,” NVIDIA offers the NVIDIA Jetson Nano Developer Kit shown in Figure 2 (next to a Raspberry Pi and an Orange Pi 5+). At the time this article went to press, the best OEMSecrets price (see here) was €155. While this is slightly more expensive than a Raspberry Pi, the NVIDIA technology is better integrated into the general AI ecosystem. When purchasing the NVIDIA Jetson Nano, it is recommended that you also order a power supply unit with a barrel connector with the common dimensions of 5.5/2.1 mm. In the following steps, the author uses a MeanWell GST25E05-P1J.
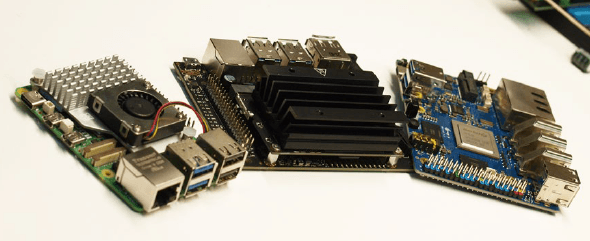
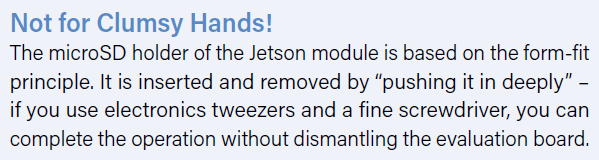
A careful look at the system (see also Figure 3) reveals that it is a two-part product. In addition to the carrier board, which exposes the various interfaces, there is the actual computing module with the heat sink. It is relevant that a microSD card with the operating system must be inserted into the computing module.

The built-in SoC is a multicore system that also has four fully-fledged Arm Cortex A57 cores in addition to the actual AI accelerator. This results in a setup reminiscent of classic process computers that usually run Embedded Linux. NVIDIA recommends using a MicroSD card with at least 32 GB of capacity and a minimum speed of UHS1. The image file can be found here, which you can extract to your memory card using a card reader as usual.
A USB mouse and a USB keyboard are also required for the initial start-up; Jetson supports both HDMI and DisplayPort for screen output. We will assume that an Ethernet cable is also connected in the following steps, as this is reasonable.
The lack of a camera proves problematic during setup. Instead of a CCD sensor, NVIDIA uses two of the connectors familiar from Raspberry Pi 4 and the like. Some Raspberry Pi cameras can be connected directly to the Jetson. In the following steps, the author uses a Raspberry Pi 2 camera that connects to the CAM0 port via an FPC cable designed for the Raspberry Pi. It should only be noted that the version of the cable intended for the Raspberry Pi 5 is not compatible with the Jetson. Various 3D models for positioning the camera are available in ThingiVerse, and printing them will make life easier for the developer.
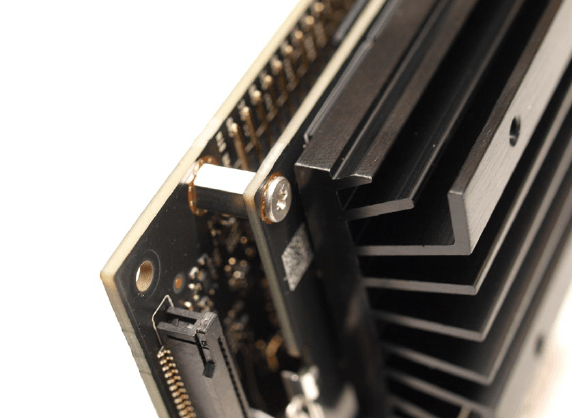
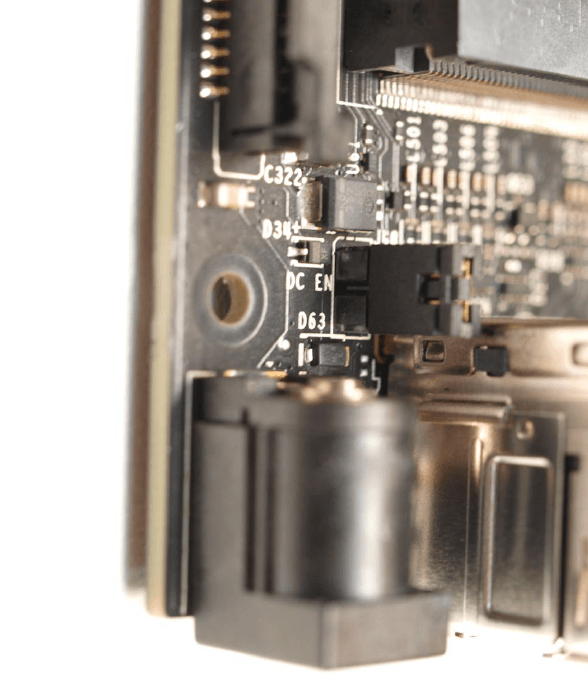
If you want to put the NVIDIA Jetson into operation using the MeanWell power supply unit mentioned above, you must be aware of a little beginner’s pitfall. The jumper shown plugged in Figure 4 is not plugged in when delivered: In this case, the DC connector is not connected to the power supply. When the power supply unit is plugged in, the status LED does not light up, which can be confusing.
During the first boot, the process computer immediately switches on the HDMI screen — the reconfiguration of the microSD card and some other “initiation rituals” take some time. Once the work is done, the system presents an Ubuntu desktop and then prompts you to complete the welcome wizard.
In general, this is the usual Ubuntu setup wizard, but NVIDIA has added a step to approve the in-house software licenses, among other things. The wizard for selecting the power model is important: It is recommended to keep the selected option. It ensures that the Jetson receives the maximum amount of power.
Once the wizard has been successfully completed, there is still some time to go before the Jetson board is ready for action — some prompts to reboot the system may also appear on the desktop.
First Experiments
NVIDIA relies on a more or less completely standard-compliant Ubuntu 18.04 in the Jetson. The author likes to configure such process computers for remote access to save himself the trouble of switching between the PC and process computer keyboards.
However, the settings application included in Ubuntu is unsuitable for this task, which is why we run sudo apt-get update and sudo apt-get upgrade to update the package inventory in the first step instead. Any queries must be acknowledged by pressing Enter; the restart of the Docker system must be allowed. The Jetson must then be restarted. Entering sudo apt install vino ensures that the VNC server is ready for use.
Finally, the following commands are required to bring the configuration into a usable state. The string thepassword must, of course, be replaced by a password suitable for your installation.
tamhan@tamhan-desktop:~$ mkdir -p ~/.config/autostart
tamhan@tamhan-desktop:~$ cp /usr/share/applications/vino-server.desktop ~/.config/autostart
tamhan@tamhan-desktop:~$ gsettings set org.gnome.Vino prompt-enabled false
tamhan@tamhan-desktop:~$ gsettings set org.gnome.Vino require-encryption false
tamhan@tamhan-desktop:~$ gsettings set org.gnome.Vino authentication-methods "['vnc']"
tamhan@tamhan-desktop:~$ gsettings set org.gnome.Vino vnc-password $(echo -n 'thepassword'|base64)
After the next reboot, the Jetson can be accessed with the VNC client Reminna if a user is logged in. Please note, however, that the applet for remote access in the Settings application still does not work.
As a next step, you can perform an initial test of the camera connection by entering the following command:
tamhan@tamhan-desktop:~$ gst-launch-1.0 nvarguscamerasrc ! nvoverlaysink
The camera preview that can be activated with this basic command only appears on a monitor physically connected to the Jetson — the system communicating with the computer via VNC sees the terminal output instead. To end the whole process, it is sufficient to send an interrupt event using Control + C.
The actual camera access is then — in general — carried out using methods known from the PC or workstation. Of particular interest is the file, which demonstrates the setup of an Open CV-based pipeline.
The following commands are required to make it executable:
tamhan@tamhan-desktop:~$ git clone https://github.com/JetsonHacksNano/CSI-Camera
tamhan@tamhan-desktop:~$ cd CSI-Camera/
tamhan@tamhan-desktop:~/CSI-Camera$ python3 simple_camera.py
The launched camera window is then also visible via VNC because it does not send the information directly to the frame buffer of the Tegra GPU.
If the camera image is upside-down, adjusting the parameter flip_method in the file will help:
def show_camera():
window_title = "CSI Camera"
print(gstreamer_pipeline(flip_method=2))
video_capture = cv2.VideoCapture(gstreamer_
pipeline(flip_method=2), cv2.CAP_GSTREAMER)
if video_capture.isOpened():
. . .
Interacting with GPIO Pins (via Python)
Artificial intelligence systems require a completely different skillset from the developer, which generally has little overlap with classic embedded development. Practical experience shows that people from outside the field with a background in traditional mainframe computer technology often get to grips with AI better than embedded developers. The author’s partner, who programs very efficiently in Java, solves AI tasks faster — but she has little knowledge of assembly language.
The purpose of this little detour into software architecture is to point out that we are intentionally illustrating GPIO access on the Jetson in Python in the following steps. The reason for this is that the majority of user-oriented creation of AI systems takes place in Python: If you rely on C here, you will end up with an unnecessary native interface.
The standard distribution of Python does not include package management on the Jetson, which is why the commands sudo apt install python-pip and sudo apt install python3-pip must be entered. The next step is to check that the GPIO modules have been installed correctly. Two commands are also required here because the Python environments are (naturally) not really capable of sharing their library repository:
tamhan@tamhan-desktop:~$ sudo pip install Jetson.GPIO
tamhan@tamhan-desktop:~$ sudo pip3 install Jetson.GPIO
We cannot present the Jetson GPIO API in full here due to lack of space. Under this you will find a group of ready-made examples that explain the API in full.
The following program is sufficient for our little test:
import RPi.GPIO as GPIO
import time
output_pin = 18 # BCM pin 18, BOARD pin 12
def main():
GPIO.setmode(GPIO.BCM)
# BCM pin-numbering scheme from Raspberry Pi
GPIO.setup(output_pin, GPIO.OUT, initial=GPIO.HIGH)
print("Starting demo now! Press CTRL+C to exit")
try:
while True:
GPIO.output(output_pin, GPIO.HIGH)
GPIO.output(output_pin, GPIO.LOW)
GPIO.output(output_pin, GPIO.HIGH)
GPIO.output(output_pin, GPIO.LOW)
finally:
GPIO.cleanup()
if __name__ == '__main__':
main()
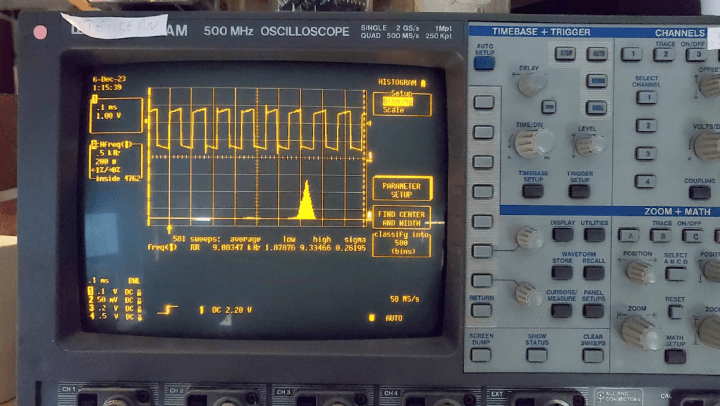
What is particularly interesting here is that NVIDIA offers the budding Jetson developer several ways to address the pins — we use the GPIO.BCM option here, which is based on the Raspberry Pi pinout. The reward for our efforts is the screen image shown in Figure 5 — the frequency stability may not be particularly high, but it is more than sufficient for triggering IoT events.
It should also be noted that the execution of GPIO program examples without superuser rights can sometimes cause problems. See here for a detailed discussion of this topic.
Jetson and Experiments with the ML Function
In theory, the availability of a fully-fledged Linux operating system and a (very fast) USB3 interface encourages the execution of experiments. One possible example would be Stable Diffusion: In practice, it is possible to use the Jetson as an image generator using an (adapted) runner.
In practice, however, this approach is not recommended: Both the comparatively small graphics memory of only 4 GB VRAM and the small number of “only” 128 cores ensure that image generation requires patience. On Reddit, there are reports from ML experimenters who estimate up to 5 hours of computing time per image with a cluster size of 512 × 512 pixels.
The same applies to the “end-to-end” solutions that are often demonstrated — training a model requires so much computing power and resources that NVIDIA recommends outsourcing to a desktop or mainframe in most tutorials — the Jetson is then parameterized with the ready-to-use model weights. Here you will find more or less ready-to-use examples that illustrate the performance of the Jetson in a straightforward manner.
To use this model powershow, it is necessary to download and deploy an NVIDIA software package. In theory, the use of a Docker container is also possible here — for people unfamiliar with container technology, local compilation is an alternative, which can be achieved by entering the following commands:
sudo apt-get update
sudo apt-get install git cmake libpython3-dev python3-numpy
git clone --recursive --depth=1 https://github.com/dusty-nv/jetson-inference
cd jetson-inference
mkdir build
cd build
cmake ../
make -j$(nproc)
sudo make install
sudo ldconfig
Feel free to answer the question about installing the training components as you wish — the author has answered No in the following steps in order to save some memory on his microSD card, which is only 32 GB in size.
After successfully completing the compilation process, a relatively complex project structure can be found in the directory ~/jetson-inference/build/aarch64$/bin, which provides Python files in addition to various binary files. It is interesting to note that NVIDIA even places some ready-made test examples here.
The first thing we want to do is use the classifier — it analyzes image files and determines what can be seen in the supplied image:
tamhan@tamhan-desktop:~/jetson-inference/build/aarch64/bin$ ./imagenet.py images/orange_0.jpg images/test/output_0.jpg
The first execution of this command takes a little more time because the modules provided are optimized for the requirements of the Jetson system. The timing information shown in Figure 6 is then displayed.
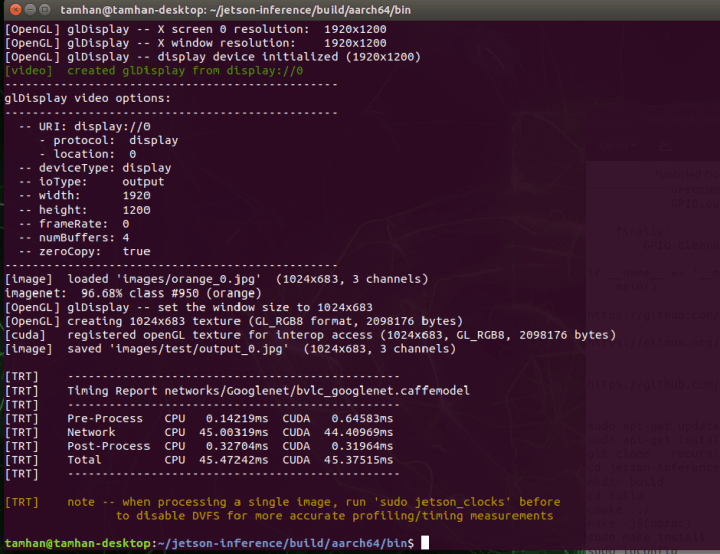
To actually visualize the results delivered by the ML process, you need to view the generated image file instead — entering the following command opens the output folder directly in the Nautilus file manager:
tamhan@tamhan-desktop:~/jetson-inference/build/aarch64/bin$ nautilus images/test/output_0.jpg
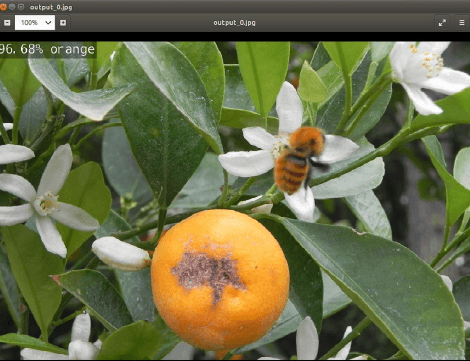
The reward for your efforts is the appearance of the screen image shown in Figure 7.
Analysis of the Python File
Next, we will take a quick look at the example program we have just used. Its source code can be opened by entering the following command line:
tamhan@tamhan-desktop:~/jetson-inference/build/aarch64/bin$ gedit imagenet.py
Even at first glance, it is obvious that the library used here is related to the classic ImageNet — NVIDIA packages various widely used artificial intelligence systems in the Jetson starter kit.
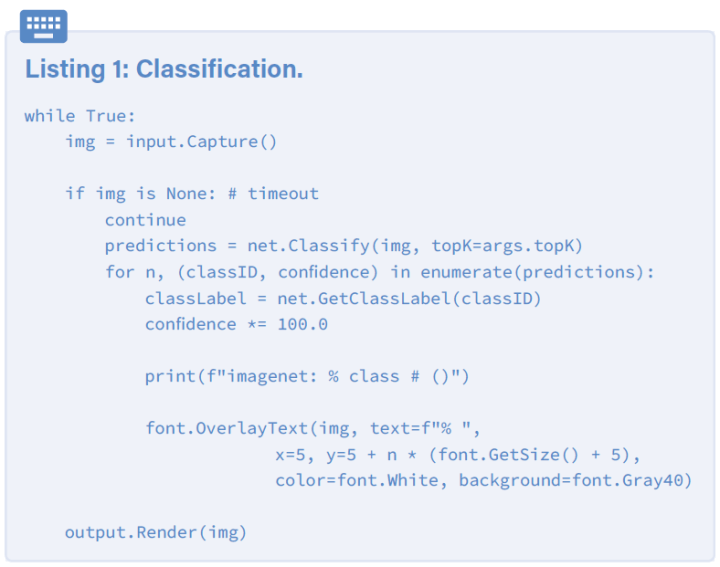
The core of the program example is an endless loop that takes an image from the input stream, feeds it to the ML model and finally outputs the “calculated” information (Listing 1). The initialization of the data streams and the model to be used is carried out further above according to the following scheme:
net = imageNet(args.network, sys.argv)
input = videoSource(args.input, argv=sys.argv)
output = videoOutput(args.output, argv=sys.argv)
font = cudaFont()
Another interesting aspect is the procurement or population of the network parameter, which supplies the name of the model to be processed. Here, NVIDIA relies on the ArgParser class, which is — normally — specialized in the processing of parameters supplied via the command line.
In the case of this declaration, a default value is entered that normally activates and loads the GoogLeNet:
parser.add_argument("--network", type=str, default="googlenet", help="pre-trained model to load (see below for options)")
Side Note: “Guided” Online Training Including Certification
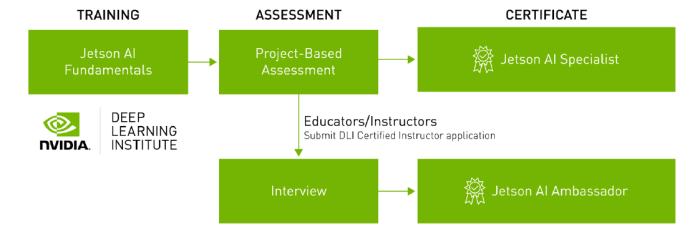
The Soviet Union’s successes in various Arab and African countries can be attributed in part to the close training partnership — what the cadet learns is what he later uses in his job. NVIDIA is obviously aware of this situation, which is why Jetson AI Certification — as shown in Figure 8 — is a completely free two-part ML course. It should also be emphasized that successful completion of the course is rewarded by NVIDIA with a certificate.
If you are interested, we recommend that you visit here. There you will find further information on how to organize your participation in the NVIDIA training course most efficiently.
Advantages due to Linux
With the Jetson, NVIDIA is sending a hybrid into the race that falls between all the stools in the field of artificial intelligence. On the one hand, dedicated low-power microcontrollers such as the Maxim MAX78000 offer significantly lower energy consumption. On the other hand, such controllers suffer from the fact that they do not offer support for CUDA: A model that can run on a PC or mainframe computer therefore requires adaptation before it can be used in the IoT using these chips.
On the other hand, the NVIDIA Jetson is not a fully-fledged GPU: Both in terms of energy consumption and the supported CUDA variant (CUDA 11 does not work), the module is not a fully-fledged replacement for an RTX 4000.
The bottom line is that a deployment pays off if a model that works smoothly on a computer or mainframe has to be mobilized with little effort and gets by with the resources offered by Jetson. The availability of a Linux operating system means that comparatively little conversion work is required for a data scientist — familiarization with the embedded APIs used by Maxim & Co. requires considerably more man-hours. The higher costs of the hardware can thus be amortized quickly and efficiently, especially in smaller series.
This article (230740-01) appears in Elektor March/April 2024. Translated by Jörg Starkmuth.
Questions About Jetson Nano or This Article?
Do you have questions or comments about this article? Email the author at tamhan@tamoggemon.com, or contact Elektor at editor@elektor.com.
Discussion (0 comments)