
Arduino FAQ, How-to & Getting Started
Answers to (too) often-asked questions about Arduino.
Answers to (too) often-asked questions about Arduino.
Here are the answers to frequently asked questions (FAQ) about Arduino. Don't know where to start? Having problems you can't figure out? Check this FAQ first. And if you can't find what you need, just ask by posting a comment and we will try to help you out.What is Arduino?
Strictly speaking, Arduino is the combination of:- an Arduino Board: a microcontroller board. The most popular board is the Arduino Uno based on the ATmega328 microcontroller from Microchip's (formerly Atmel) AVR family but today it can be almost any microcontroller from any manufacturer;
- the Arduino IDE: a simplified and easy-to-use Integrated Development Environment (IDE) used to create small programs -- commonly referred to as Sketches. There exists an online IDE, Arduino Create, and a downloadable offline IDE;
- the Arduino API: a large library of functions (the Application Programming Interface or API) that can be used in user programs -- commonly referred to as the Arduino Language;
- the Arduino Bootloader: a special program pre-loaded into the Arduino Board and compatible with the Arduino IDE that allows uploading of programs to the board without requiring special tools; usually over USB.
Everything is supposed to be open source and open hardware; all software tends to be free.
Installation of the Arduino IDE
- Offline - The offline Arduino IDE must be installed on a computer. There are versions for Windows, Linux and Mac OS. For Windows it can be downloaded as a ZIP archive, an installer and even as a Windows App. For the other platforms only archives exist. Note that the Arduino IDE uses Java, so make sure you have that installed as well.
- Online - uses an Internet browser and requires the installation of a browser plug-in to allow the online IDE to load programs into the Arduino board.
How to setup the Arduino IDE for my Arduino Board?
- Connect the Arduino Board to the computer. Make sure it is recognized by the computer and that a port is created for it. If it isn't, you may have to install a driver for your board first.
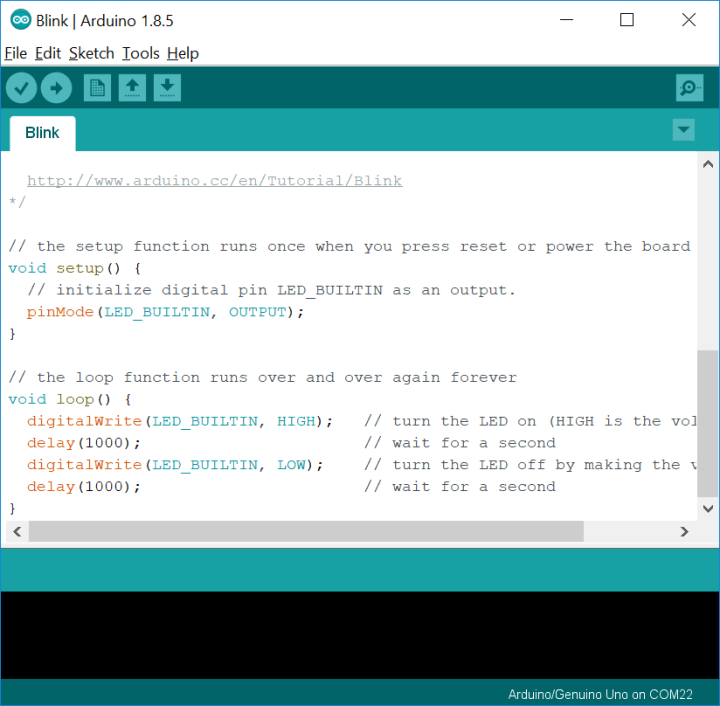
- Start the Arduino IDE. From the menu choose 'Tools' -> 'Board:' and scroll through the list until you find your board. Select it.
- From the menu choose 'Tools' -> 'Port' and select the port that was created during step 1. If the port is not listed go back to step 1 and fix the problem.
My Arduino Board is not listed?
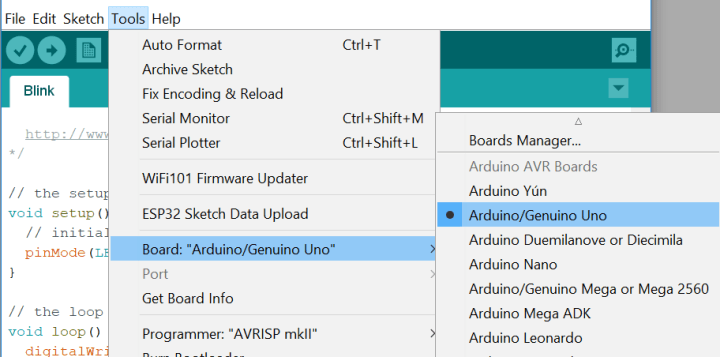
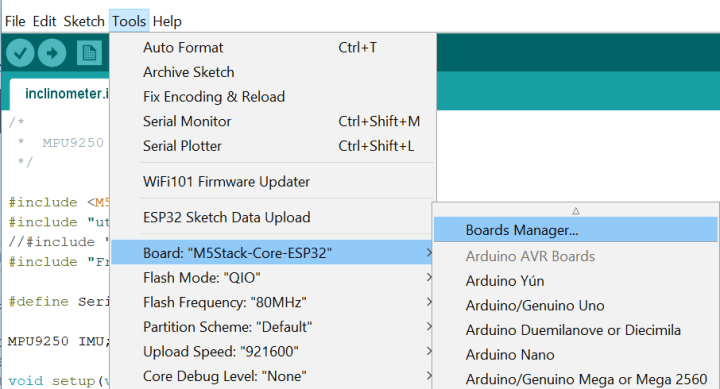
Go to 'Tools' -> 'Board:' -> 'Boards Manager...'. Wait until the dialogue box has finished downloading some files. Now look for your board in the list. You can filter the list by typing keywords next to 'Type All' (leave it at 'All'). Once you have found your board, install it by clicking the 'Install' button. If you need a particular version, select it first. Installing a board can take a while, so be patient. Wait until the manager is ready, then close it. Go to 'Tools' -> 'Board:' and look for your board somewhere in the list. Select it if you need it now.My Arduino Board is still not listed?
Go to the section 'How to install a Boards package?'How to open a Built-in example?
On the Main menu click 'File' -> 'Examples'How to open a sketch saved earlier?
- First try 'File' -> 'Open Recent'
- If your sketch is not listed, try 'File' -> 'Sketchbook'
- If your sketch still is not listed, try 'File' -> 'Open...'
How to open a sketch downloaded from the Internet?
First of all, a sketch must be in a folder with the same name as the sketch. Example: the sketch 'ai_experiment.ino' must be inside a folder with the name 'ai_experiment' (without the extension). If this folder does not exist, you must create it first before copying the sketch (INO) file into it. Once this is true, you can open the sketch with 'File' -> 'Open...'How to open a ZIP-ed sketch (downloaded from the Internet)?
Modern operating systems let you look inside a ZIP archive file, giving you a false impression of "unzipping" the archive. It is not unzipped at all, you are just seeing through the packaging. The Arduino IDE cannot work with sketches stored this way. You must extract the sketch from the ZIP archive by copying it to a folder. For the Arduino IDE, the sketch must be in a folder with the same name as the sketch. Example: the sketch 'ai_experiment.ino' must be inside a folder with the name 'ai_experiment' (without the extension). If this folder does not exist, you must create it first before copying the sketch (INO) file into it. Once this is true, you can open the sketch with 'File' -> 'Open...'How to add a sketch downloaded from the Internet to the Sketchbook?
First of all, a sketch must be in a folder with the same name as the sketch. Example: the sketch 'ai_experiment.ino' must be inside a folder with the name 'ai_experiment' (without the extension). If this folder does not exist, you must create it first before copying the sketch (INO) file into it. Once this is true, you can open the sketch with 'File' -> 'Open...'Adding the sketch to your Sketchbook now is easy, either use 'File' -> 'Save' or 'File' -> 'Save As...' The latter allows you to rename the sketch.
It is also possible to use a file manager to store the downloaded sketch directly into your Sketchbook (see 'Where is the Sketchbook?' to find out its location). You must restart the Arduino IDE to make it appear in the menu 'File' -> 'Sketchbook'.
Where is the Sketchbook?
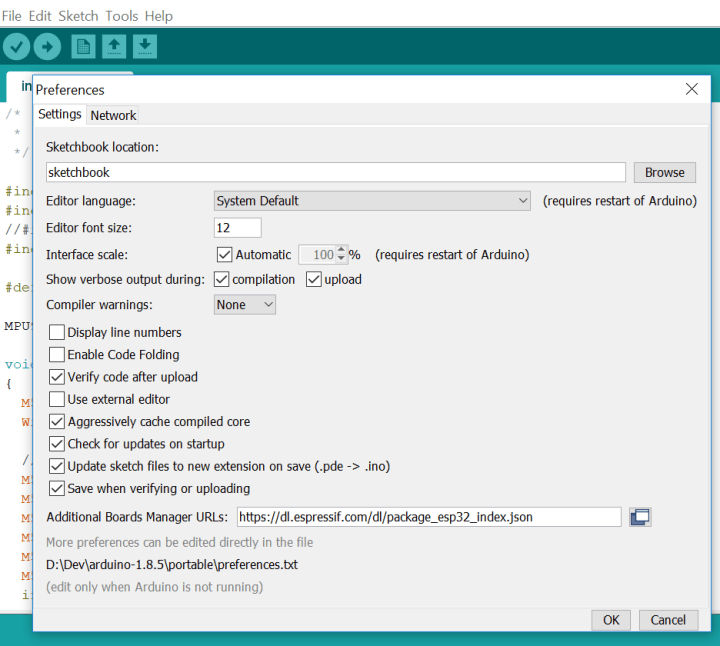
Click 'File' -> 'Preferences' to open the IDE's settings. At the top of the 'Settings' tab there is a box labeled 'Sketchbook location'. Just below it you will find the path to your Sketchbook.Another way is to first open a sketch from the Sketchbook and then click 'Sketch' -> 'Show Sketch Folder'.
How to load the sketch into the Arduino board?
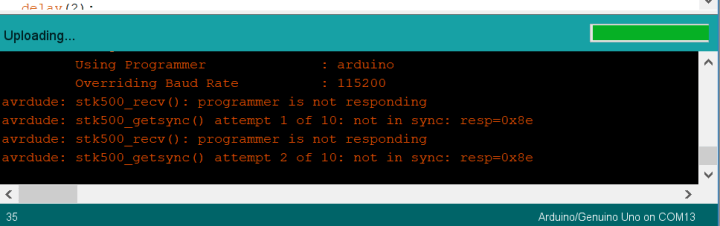
Click the 'Upload' button (arrow pointing to the right) or select from the menu 'Sketch' -> 'Upload'.Why won't the Arduino IDE upload my sketch?
Several causes are possible:- wrong or no port selected for the board. Make sure the board is recognized by the computer. You may need to restart the Arduino IDE to help it find the right port;
- wrong board selected. Not all boards use the same upload speed. Choose the right board and try again;
- the board is not responding for some reason (no power, automatic reset not working);
- some boards have selectable upload speeds and you chose the wrong one. Go to the 'Tools' menu and look for a communication speed option. Set it right and try again;
- bad connection. Use proper wires or a good cable and connect them (or it) properly, then try again;
- too fast. Some boards allow for very high upload speeds that are too high for your cable/connection. Try a lower upload speed;
- the program has errors and didn't compile completely. Fix the errors and try again;
- the serial port of the board is connected to some peripheral like a GPS that may be interfering with the upload. Disconnect everything from the board's serial port except for the computer.
Serial Monitor
Many sketches communicate with the computer over a serial connection. The Arduino IDE has a built-in Serial Monitor or Terminal to help you visualize this data. You can also send data to the board from the Monitor. To open the Serial Monitor go to 'Tools' -> 'Serial Monitor'. Usually this will restart the Arduino board. Make sure to set the speed aka baud rate to the right value. If you don't do this, you will see garbage or nothing at all. Common baud rate values are 9,600 and 115,200.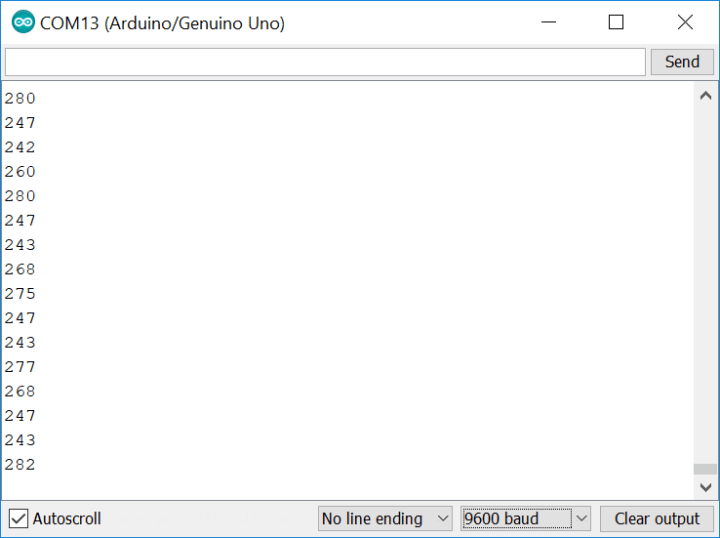
Serial Plotter
The Serial Plotter is a kind of graphical Serial Monitor that displays numeric data as graphs. The function Serial.print() is used to send data, Serial.println() validates the data for display. Multiple graphs will be drawn when different values are separated by whitespace. To open the Serial Plotter go to 'Tools' -> 'Serial Plotter'. Usually this will restart the Arduino board. Make sure to set the speed aka baud rate to the right value.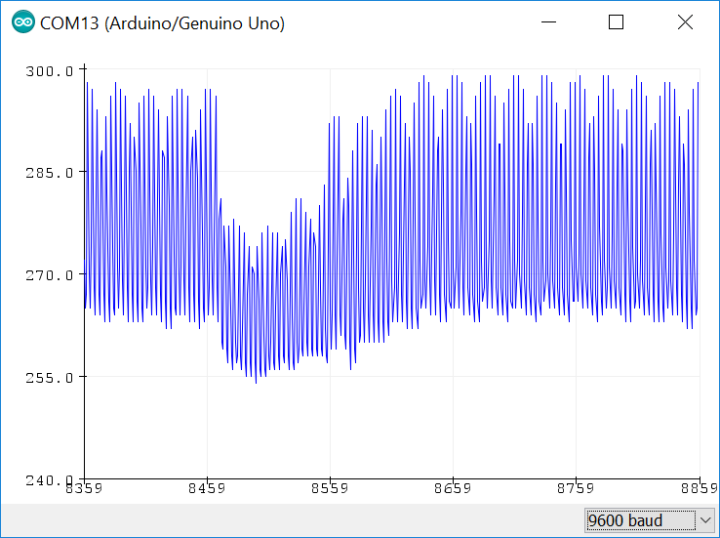
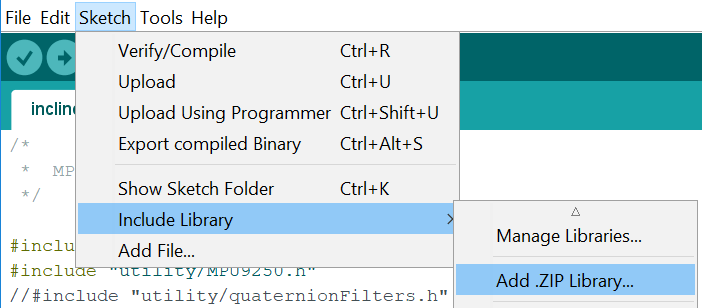
How to use a library in a sketch?
Open the sketch, then click 'Sketch' -> 'Include Library' and choose the library you want to use. If you can't find the library, you must install it first. See 'How to install a library?' to find out how to do this.How to install a library?
Click 'Sketch' -> 'Include Library' and then click 'Manage Libraries...'. Be patient, it may take a while before the 'Library Manager' opens. Scroll through the list that opens and click on the library you want to use. Click the 'Install' button to (download and) install the library. If you need a particular version of the library, select it first. After installation, the library is available from the 'Sketch' -> 'Include Library' menu. You may have to scroll a bit to find it.If the desired library is not available in the 'Library Manager', then goto 'How to install a library downloaded from the Internet?'
How to install a library downloaded from the Internet?
- The library is packaged as a ZIP file? Use the menu option 'Sketch' -> 'Include Library' -> 'Add .ZIP library...' and navigate to the ZIP file.
- It is a file or a bunch of files? Create a folder for it in the 'libraries' folder of your sketchbook. If the 'libraries' folder does not exist, create it now. The library folder must have the same name as the main file of the library. Copy all the files into this folder and restart the Arduino IDE.
How to install a Boards package?
You need a link to a JSON file that describes the Boards package. The manufacturer of the board will have published this link somewhere. Copy it and paste the complete link into the 'Additional Boards Manager URLs:' field of the 'File' -> 'Preferences' dialogue. It is OK to have multiple URLs in this box as long as they are separated by commas.Close the preferences by clicking 'OK' and then go to 'Tools' -> 'Board:' -> 'Boards Manager...'. Wait until the dialogue box has finished downloading some files. Now look for your new board in the list. You can filter the list by typing keywords next to 'Type All' (leave it at 'All'). Once you have found your board, install its Boards package by clicking the 'Install' button. If you need a particular version of the package, select it first.
Some Boards packages can be really big and downloading can take a while. Wait until the manager is ready, then close it. Go to 'Tools' -> 'Board:' and look for your new board somewhere in the list. Select it if you need it now.
Arduino Uno Fuse settings
The Arduino Uno is based on an ATmega328. This microcontroller has three configuration bytes that must be programmed with the correct values to make it work. These values are (in hexadecimal):- Low fuse byte: 0xff
- High fuse byte: 0xde
- Extended fuse byte: 0xfd
The lock bits are not used and should all be 0xff (which means that they are off).
The fuse bits make sure that the Arduino Bootloader will have enough memory and that it will be started after a reset. Also, they activate the ISP interface and the external crystal oscillator.
avrdude needs these parameters to program the fuse bits:
-U lfuse:w:0xff:m -U hfuse:w:0xde:m -U efuse:w:0xfd:m
Several fuse calculators can be found on the Internet for AVR devices.Other non-AVR but Arduino-compatible boards may have similar configuration mechanisms. Refer to the microcontroller's datasheet to find out.
Build This Project
Bring this design to life with the Elektor PCB Service, powered by Eurocircuits. Upload the project files and order professionally manufactured PCBs or assembled boards through a proven European production platform.
Supporting KiCad, Eagle, Gerber, and ODB++ formats, the service is suitable for everything from prototypes and validation builds to series production and volume manufacturing.
Made in Europe. Fast. Reliable. Professional.
Discussion (1 comment)