
Review: Elektor SDR Hands-on Kit
The first steps

USB cable, audio jack cable and a piece of wire.
The first step was soldering the supplied pinheaders into the circuit board. The headers are supplied separately because of practical considerations. I also fitted a 2-way pin header into the connection for the antenna input. This is very convenient when connecting an antenna. There should have been a few more of those pinheaders in the box, because I can imagine that not everyone will have these in their parts collection.
The circuit board was now plugged into an Arduino and the Uno could be connected to a PC or laptop. This requires a USB cable (USB-A to USB-B) for the data connection and a 3.5-mm stereo jack cable for the audio connection. Then it was time to grab the book. In the first few pages the author briefly describes the hardware on the SDR shield and it then immediately turns practical with the introduction of the G8JCFSDR software. Downloading and installing the software was done quickly. A big advantage of this software is that the Elektor SDR shield is fully supported by G8JCFSDR. After selecting the shield in the configuration menu, the software offers the option of loading the appropriate frequency-control software into the Arduino, without the need to install the Arduino IDE. This also went quite quickly. Note that in G8JCFSDR, at the heading Display, you have to select the option “full”, otherwise the Config button is not visible. After I hooked a piece of wire to the antenna input, I could go on the quest of finding a transmitting station. Before you realise it, the afternoon is gone and you have tried all kinds of options and settings in the software. I have in the past played a little with a simple short-wave receiver, but this is much more fun and offers an infinite number of possibilities!
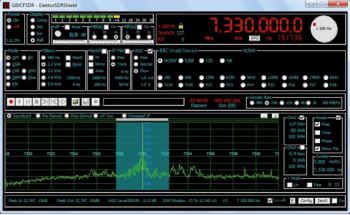
with, the SDR shield is fully supported.
After gaining this first experience I could continue with installing the separate PC tuning software for the oscillator on the SDR shield (all software written by the author of this book is available from the Elektor website). This is necessary when using other SDR software, such as SDRsharp, the next software program that is described in the book. This offers an entirely different feature set compared to the first program.
Conclusion
To be honest, I didn't progress any further than what I described above, and that covers only the first 40 pages of the book. The next chapter is about antennas, and in my experiments I already quickly discovered how important the antenna is. I will certainly continue with the book and try different antenna types and connection options. The two supplied toroidal cores will be very useful for these experiments. I will also work through the remaining chapters, but I think that I will be quite busy for a while with the antenna experiments. This is a very nice kit that doesn't cost much and will gain you a great deal of experience in the field of Software Defined Radio.
Discussion (2 comments)