
Andonstar HDMI Microscope ADSM201 | User Manual
August 24, 2017
on
on
v1.3 last update 2017-08-30
1. Press On/Off button to turn on the camera
2. For camera settings press the “menu” button. Scroll through options with up & down buttons and press “OK” to change a setting. Use the up & down buttons to select a new value, press “OK” to confirm and return to the settings menu.
3. Press “menu” again to enter the device menu (Date/Time, Beep, Language, Frequency, Screen Saver, Format, Default Setting, Version). Press the “menu” button for the third time to close the menus.
The “M” (mode) button is used to cycle between picture (Still) or video capturing and playback mode.
In the playback mode, use the up & down buttons to choose the picture or to view. Press “menu” button to delete, protect or slideview pictures. Press “M” button to quit.
2. Handle as described in general mode
2. Two options are displayed on the microscope: PC camera or Mass storage. Choose “PC camera”
3. Open the AMCap software. The title will show the storage path.
4. Record a video: Capture → start capture → OK → stop capture

5. The video will be saved automatically with the displayed title. To change the title, click File → save capture video and change the name of the fille.
6. Capture a picture: Capture → still → enable
Capture → still → folder (choose a storage path)
Capture → snap (capture a picture or simply press “Enter” on your keyboard)
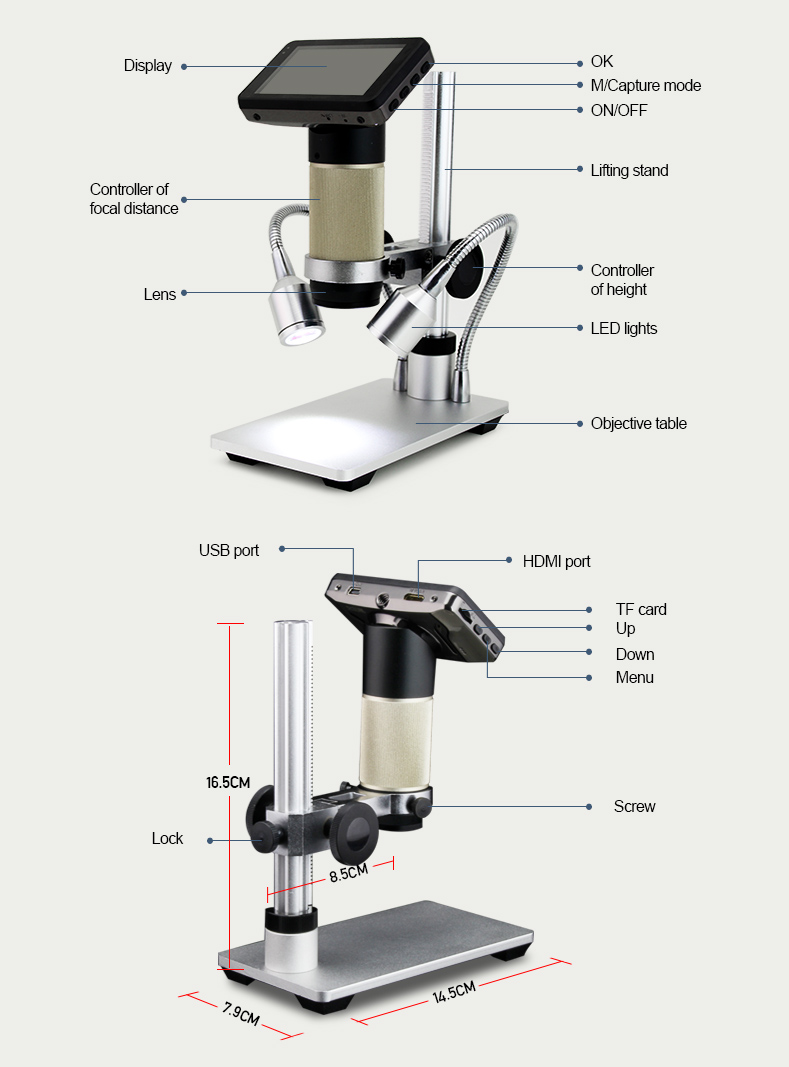
Push-buttons and connectivity(click to enlarge picture)
Operating modesThere are three ways to use the microscope:
Besides that you can record pictures and/or video on an optional SD card.
Changing the settingsImportant note: after changing settings, be sure to store these settings for later use by switching the microscope off using the ON/OFF button. New settings will not be retained if the power supply is switched off. |
 |
1. Press On/Off button to turn on the camera
2. For camera settings press the “menu” button. Scroll through options with up & down buttons and press “OK” to change a setting. Use the up & down buttons to select a new value, press “OK” to confirm and return to the settings menu.
3. Press “menu” again to enter the device menu (Date/Time, Beep, Language, Frequency, Screen Saver, Format, Default Setting, Version). Press the “menu” button for the third time to close the menus.
The “M” (mode) button is used to cycle between picture (Still) or video capturing and playback mode.
In the playback mode, use the up & down buttons to choose the picture or to view. Press “menu” button to delete, protect or slideview pictures. Press “M” button to quit.
HDMI display output mode (<1920*1080)
1. Connect the microscope to an HDMI display2. Handle as described in general mode
USB 2.0 output mode (<1080*720)
1. Connect the microscope to the PC2. Two options are displayed on the microscope: PC camera or Mass storage. Choose “PC camera”
3. Open the AMCap software. The title will show the storage path.
4. Record a video: Capture → start capture → OK → stop capture

5. The video will be saved automatically with the displayed title. To change the title, click File → save capture video and change the name of the fille.
6. Capture a picture: Capture → still → enable
Capture → still → folder (choose a storage path)
Capture → snap (capture a picture or simply press “Enter” on your keyboard)
Read full article
Hide full article
Discussion (0 comments)