PiKVM software turns a Raspberry Pi into a remote control for PCs and more. Until recently, you had to build the hardware yourself, but now everything is offered in a single useful package, including a HAT.
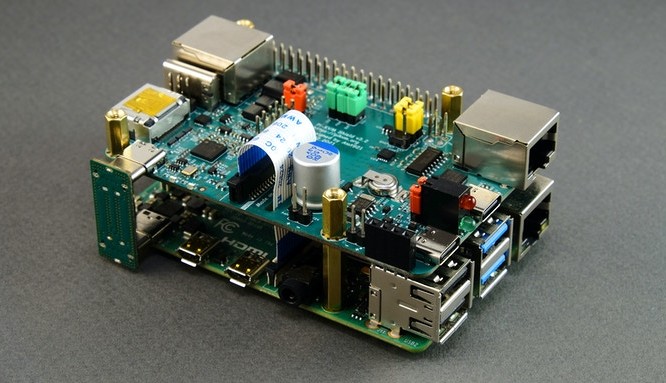
In early 2022, I presented the PiKVM software and published an interview with the software developer, Maxim Devaev. The PiKVM software transforms a Raspberry Pi (currently Raspberry Pi 2 or newer) into a remote maintenance solution. The Raspberry Pi is connected to the computer to be controlled and forwards key, mouse, and video signals via the Internet. In the past, you had to assemble the necessary additional hardware from different parts. You also had to 3D print the housing, and a USB Y-cable had to be made in order to split data and power. With the PiKVM v3 HAT for the Raspberry Pi 4, you now have an all-in-one solution from the author of the PiKVM software.
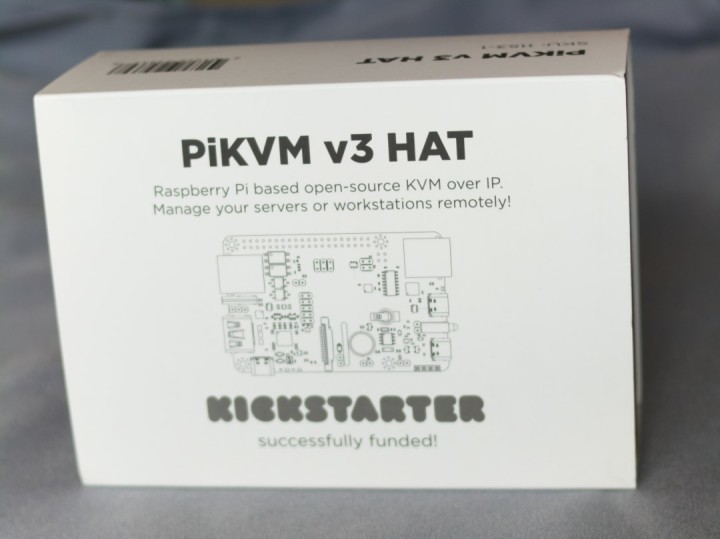
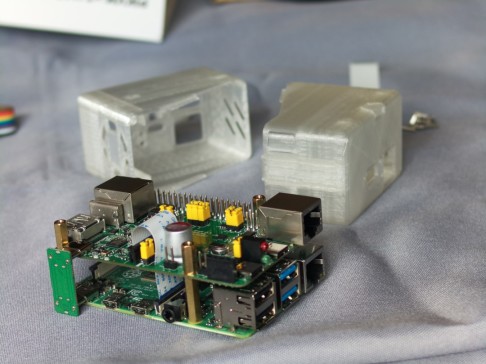
PiKVM v3 HAT Box
Now there is a board available with the PiKVM v3 HAT that can be optimally used with a Raspberry Pi 4. You can also buy a matching metal case. In addition to the HDMI input, there is a USB-C port that enables the Raspberry Pi 4 to emulate a mouse, keyboard, and mass storage. Many other useful functions have been added to the HAT.
The PiKVM v3 HAT was funded on Kickstarter in no time and has already found its way into the hands of early adopters. The first batch of units available in the Elektor Store also sold out within a short time, but fortunately we now have more PiKVM v3 HATs in stock, as well as the optional metal case. Therefore, now is a good time to check out the PiKVM v3 HAT! Curious about what is inside the box?
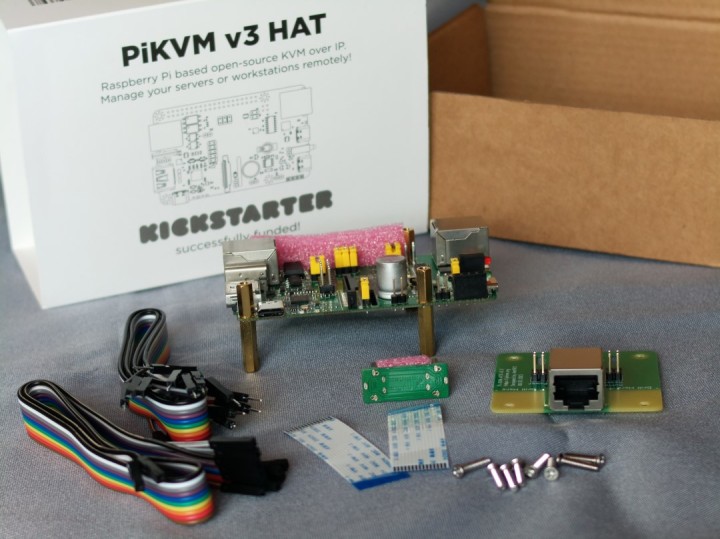
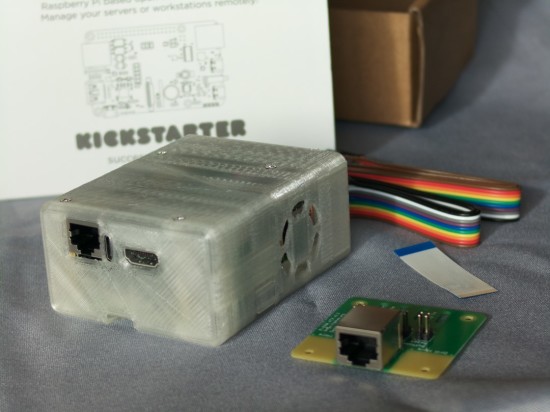
Inside the PiKVM v3 HAT's box
The box contains the PiKVM v3 HAT, spacers, a USB-C bridge, flex cable, screws, jumper wire and the ATX adapter for remotely pressing the reset and power button on a computer. So, apart from a Raspberry Pi 4 and an SD card, everything you need is delivered. The metal housing is an additional and recommended accessory. If you don't want to buy this, you still have the option of a 3D-printed version.
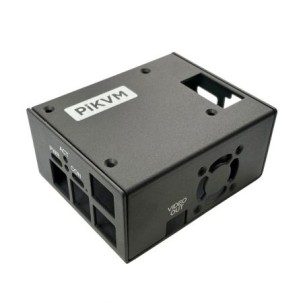
Metal case for the PiKVM v3 HAT
Pi-KVM HAT: Yes or No?
Why should you buy the HAT? The price of around €150 is certainly something that some might consider high-end (compared to the price of a pure HDMI-to-CSI2 bridge, which can also be used to feed HDMI signals into the Raspberry Pi). But the PiKVM v3 HAT is much more than just a simple HDMI-to-CSI2 bridge. A look at the connections and ports reveals that significantly more options and functions are offered here. Therefore, here is a quick overview of the most important connections and functions.
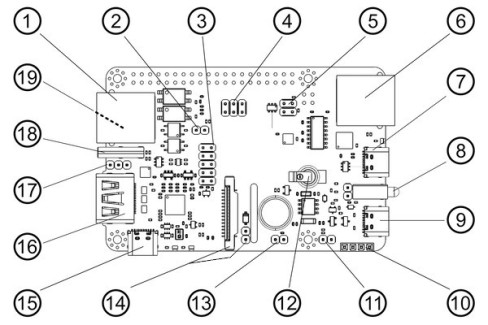
Serial console port (for the Raspberry Pi or server console access).
7
USB-C console port.
8
Power and activity LEDs.
9
USB-C power input.
10
I2C display connector.
11
Alternate +5V power input/output header pins.
12
RTC clock supercapacitor (rechargeable).
13
FAN connector - PWM controlled.
14
CSI-2 interface and HDMI backpowering jumper.
15
Built-in power splitter port.
16
HDMI capture port (max 1080p @ 50Hz) with sound capture support.
17
USB emulation pins for alternative access.
18
USB-C emulation port - this port is doing the emulation of a USB keyboard, mouse, Virtual CD-ROM or USB Flash Drive, USB-Ethernet, USB-Serial port and a lot of other Linux-supported features.
19
1-Wire & Neo-pixel interface (bottom side, advanced user feature).
HDMI-to-CSI2 Bridge
As with many inexpensive HDMI to CSI-2 converters, a Toshiba TC358743XBG is also used here. This is one of the chips supported by the closed-source firmware of the Raspberry Pi camera interface. With the PiKVM v3 HAT, an HDMI signal with up to 1080p50 can be processed. Unfortunately, in many inexpensive HDMI to CSI-2 bridges, the part that extracts audio data from the HDMI signal is not always properly wired. With the PiKVM v3 HAT, care was taken to also be able to extract the audio data from the HDMI data stream. (Currently, the PiKVM software is not ready to further process the audio data and thus be able to output it remotely.) The problem of feedback from the HDMI port has also been solved with the PiKVM. Feeding back from the HDMI port can cause the Raspberry Pi not to boot with current inexpensive HDMI to CSI2 bridges.
USB-C-Ports
The PiKVM v3 HAT has only USB-C ports for USB. This makes it much easier to plug in cables. The Pi-KVM HAT V3.3 has four USB-C ports, and one of those is used for the connection between the Raspberry Pi 4 and the HAT. The PiKVM v3 HAT comes with a USB-C bridge that supplies the Raspberry Pi with power and provides the data from the USB-OTG port of the Raspberry Pi for the PiKVM v3 HAT.
The USB-C port on the HDMI input side is used for USB mouse, USB keyboard, and mass storage emulation. In addition to this emulation, the PiKVM software can also provide Ethernet-over-USB or Serial-over-USB data. This USB port can be connected to a computer with a suitable USB-C cable. This means that a suitable bootable medium can also be "inserted" into the connected computer remotely for diagnostic purposes.
On the other side are two more USB-C ports. One of these is Power-In and connects to the USB-C power adapter that normally powers the Raspberry Pi. The other USB-C port is the Raspberry Pi's serial console and allows the system to be configured.
USB-C-Ports of PiKVM v3 HAT (above).
RJ45 Ports
The Pi-KVM software was developed to be able to operate and maintain computers remotely. No wonder the Pi-KVM V3.3 HAT comes with a function that allows the reset and power button on a motherboard to be operated remotely. This function is located on an extra board. A standard RJ-45 cable is sufficient to connect this board to the Pi-KVM v3 HAT. The status of the power and HDD LEDs are also transmitted back to the PiKVM v3 HAT through this board.
ATX extension to control the reset and power button of the remote-controlled computer.
The second RJ45 port on the Pi-KVM is something that is rarely found but is often used with networking equipment. This is an RS232 console port, as used in switches and routers (e.g., from Cisco).
Extras
There are a few other useful features on the PiKVM v3 HAT, starting with the RTC and a supercapacitor. In this way, the Raspberry Pi can keep the time, even if there is no network connected or no NTP server can be reached. Since a supercapacitor is built in, you don't have to worry about empty or leaking batteries.
In addition to the RTC, the PiKVM v3 HAT provides control for a fan. If the Raspberry Pi and the PiKVM v3 HAT are installed in one housing, the fan can be controlled and the Raspberry Pi can be cooled with it, without getting the noise of a hair dryer. Pins for an I²C OLED and pin enders (where headers can be soldered) for SPI and GPIO complement the PiKVM v3 HAT so that extensions can be added later. Connections for 1-Wire sensors and Neopixels have also been considered.
DIY or Not
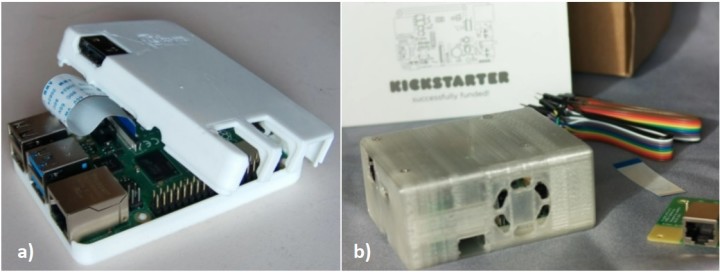
After presenting all the features, the question arises as to whether the kit is worth the money. From a purely monetary point of view, building a basic version yourself might give you a cheaper solution if you just sum up the Raspberry Pi 4, an HDMI-to-CSI2 bridge, a home-made USB Y-cable, and a 3D-printed case. The image below shows the DIY version (this is the minimal version, also featured in the Elektor PiKVM article) and the PiKVM v3 HAT in the 3D printed housing.
a) Not pretty, but rare: DIY version of a PiKVM. b) Metal would be nicer: PiKVM v3 HAT in a 3D printed case.
The Pi-KVM HAT, on the other hand, is ready to plug and play: you only have to screw in a few screws and burn the appropriate image onto the SD card. And you have the option of being able to use a finished metal housing. The option of operating the reset and power buttons on the remote-controlled computer and having the HDD and power LED displayed makes it much more convenient to use than the DIY version. In addition, there is the documentation for the PiKVM v3 HAT. From installation to troubleshooting, everything is available in the manual for the Pi-KVM HAT. There are also a number of tips and tricks for the PiKVM software.
Take a Closer Look
Would I build a DIY version again? It's rather unlikely, as long as the PiKVM v3 HAT is available. A lot of ideas went into the design of the hardware, and the details, adjustments, fixes and features show that marketing was not and is not the driving force. The product is designed according to technical aspects from the point of view of a user/administrator and should not only make using the PiKVM easier, but also make it robust and reliable. Purchasing the PiKVM v3 HAT also supports the PiKVM project. Anyone who wants to remotely control or maintain a computer or machine (equipped with a mouse/keyboard and HDMI monitor port) should take a closer look at the PiKVM v3 HAT. You can order the PiKVM HAT, as well as the optional metal case, from the Elektor Store.
Read full article
Hide full article
Add a rating to this article
★★★★★
★★★★★
Page 1 / 1
Login
No account yet?Register for free!
Forgot password?
Please enter your email address. Instructions for resetting the password will be emailed to you now.

Discussion (0 comments)