
Review: Touch Board Pro Kit
The other essential component of the kit
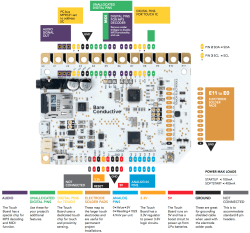
The Touch Board is the other essential component of the kit. Supplied assembled and tested, it has the following functions:- a development tool compatible with the Arduino Leonardo IDE ( USB cable included)
- an MP3/MIDI/OGG/WAV (VLSI Solution VS1053b) file reader with outputs on a 3.5 mm stereo jack
- a MIDI interface and a polyphonic synthesiser
- a prototyping interface (compatible with Arduino shields)
- a socket for a microSD* memory card (up to 32 GB – 128 MB card included)
- a LiPo battery charger; this allows you to make autonomous projects with a battery of >500 mAh (not supplied)
Touch Board module
(Click to enlarge)
Twelve outputs are connected to an MPR121 (Resurgent Semiconductor) capacitive sensor control circuit.
Eight of these pins are configurable as digital I/O. Among the twenty digital I/O lines, three are used by the MPR121 and five by the VS1053b for audio signals (these may be decoupled). And finally seven of the I/O lines are PWM channels.
Don’t forget twelve analog channels (shared with digital I/O pins) but don’t clog your brain with this stuff…
To get the board going once unpacked, you only need a USB power supply (3.0 V to 5.5 V / 400 mA) or a battery and and an amplifier + speaker connected to the audio output.
There are a host of application examples and, for each of the functions listed above, one or more specific libraries.
No need to even program it!
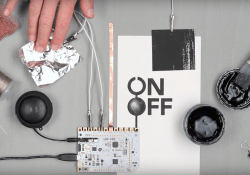
Five minutes after unpacking, watch in hand, we’re already having fun thanks to the other accessories included:
- set of 12 cables (of good quality) with insulated alligator clips at both ends
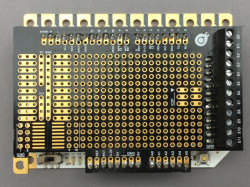
- board for experimenting called Touch Board Proto Shield (pinout compatible with Arduino shields)
- connectors to solder to the Touch Board for connecting the experimentation board above
We’ll mention two that are worth a look: an interface for dogs and other pets, and an electronic hopscotch (see illustrations on the next page).
* In my kit the micro-SD card reader refused to work, but happily the card itself was perfectly OK.
Read full article
Hide full article
Discussion (0 comments)