
Why Study 8-Bit AVR Microcontroller Architecture?
March 14, 2022
on
on
The highly popular ATtiny and ATmega microcontrollers (formerly from Atmel, now from Microchip) are based on the 8-bit AVR microcontroller architecture. Let's consider some of the reasons to learn and understand the underlying architecture of these devices.
AVR Microcontrollers
While Elektor readers are technically inclined and most are probably interested in how anything electronic works, there are other reasons that crop up as to why you should study the architecture of a particular microcontroller. One example has to do with programming AVR microcontrollers using the C programming language. 8-bit AVR microcontrollers are commonly programmed using C. Because these devices have small program memories, C compiler optimization is usually enabled. This causes some lines of C code to be optimized away or to be combined with other lines of code.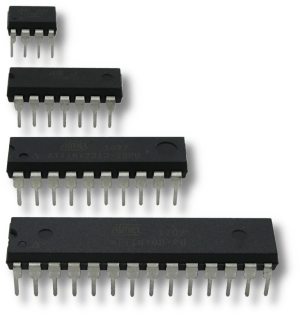
the 8-bit AVR Architecture
Another example of the need to understand the AVR architecture is when reading datasheets or application notes. It is not uncommon to come across some code written in assembly language in these types of documents.
Before looking at some practical examples that aid in understanding these reasons for studying AVR architecture, let us discuss AVR microcontrollers, Microchip Studio, as well as AVR architecture and assembly language. This will get everyone up to speed on this topic and define some of the terms used in this introduction. Following this discussion are some code examples and then additional reasons for learning the 8-bit AVR architecture.
ATmega microcontrollers are some of the most well known 8-bit microcontrollers due to their use on Arduino Uno and Arduino MEGA 2560 boards. The smaller and cheaper ATtiny devices, Figure 1, are also popular with electronic hobbyists and makers. Both ATmega and ATtiny AVR ranges have parts that are available in dual-inline packages (DIP). One of the reasons that makes these devices popular with hobbyist and makers is because they are available in these packages, allowing them to easily be used in breadboard circuits. Other reasons for their popularity is that they are easy to use and program. Official programming tools are available from Microchip, as well as many cheap hobby programmers available for loading code to these devices.
Microchip Studio
Microchip Studio for Windows, which was formerly Atmel Studio, is a free full-featured IDE for programming and debugging AVR 8-bit microcontrollers. In addition, it supports 32-bit AVR microcontrollers and ARM devices that were formerly available from Atmel, but are now supplied by Microchip. This IDE has native support for the open-source GNU GCC C/C++ toolchain for 8-bit AVR microcontrollers, as well as support for the Microchip AVRASM2 8-bit AVR assembler program. Software for AVRs can therefore be developed in C, C++ and in assembly language using this IDE. These programming tools are part of the Microchip Studio standard installation, making it very easy to get started with AVR microcontrollers. The programming tools are automatically installed when installing Microchip Studio, with no additional configuration required after installation.What makes Microchip Studio exceptional is the fact that it also has a built-in AVR simulator and debugger. This means that AVR programs written in C, C++ or assembly language can all be debugged using either the simulator, or an external USB tool such as an Atmel-ICE.
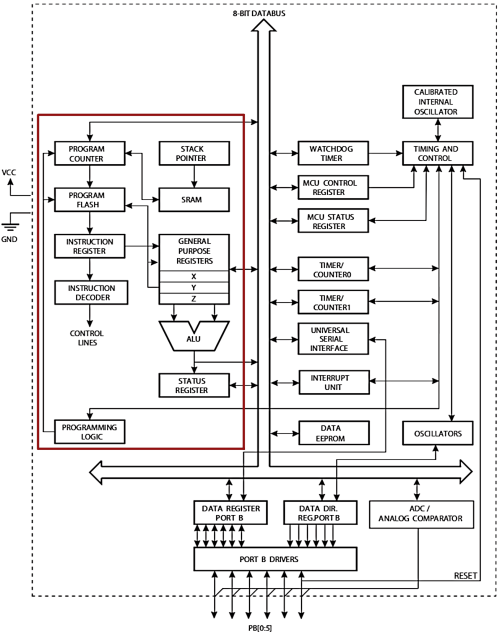
The simulator is particularly useful for those users who are programming AVRs using a hobby programmer. Hobby programmers do not have debugging capabilities as they are only for loading program code to the AVR Flash program memory. Debugging can be done using the simulator instead of using a hardware debugging tool such as the Atmel-ICE. Using the simulator in combination with the debugger is also useful to quickly test a few lines of assembly language code when learning the AVR architecture. Internal registers and memory of AVR devices can be examined and manipulated using the simulator or hardware debugger, which is useful when studying the AVR architecture.
Read full article
Hide full article
Discussion (1 comment)