
Controlling Vacuum Fuorescent Displays / VFD-Displays ansteuern [150720]
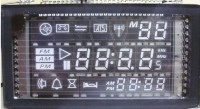
Scroll down to read this article in German After our old kitchen radio broke down, I took the time and opportunity to recycle its display, a Vacuum Fluorescent Display (VFD). When I had finally figured out how to connect it, it fell to the ground, turning it into an FD rather than a VFD because there was not much left of the vacuum.
Original text in German
Nachdem unser altes Küchenradio seinen Geist aufgegeben hat, habe ich die Gelegenheit genutzt und mich mal mit diesem Typ Displays zu beschäftigen. Kaum hatte ich das einigermaßen raus und die Belegung der ganzen Anschlüsse rausgetüftelt, da fällt mir das Teil runter und aus dem Vacuum Fluorescent Display (VFD) wurde ein FD, weil nix mehr mit Vakuum. Naja, dann eben für ganz kleines Geld mal ein paar neue bestellt. http://www.pollin.de/shop/downloads/D120120D.PDF Zusammen mit einem Raspi soll ein neues Küchenradio entstehen. Mit Uhr, Timer zum Backen/Kochen und Webradio. Ein ATmega32 soll das Display und die Tasten übernehmen, der Raspi macht WebRadio (und später vielleicht noch ein bisschen fhem)
Zunächst habe ich das ganze mal auf einer Lochrasterplatine aufgebaut und für die notwendige Filamentspannung sowie die Anodenspannung von ca. 32V den Trafo aus dem alten Küchenradio verwendet. Klappte soweit ganz gut, ich wollte aber für das neue Küchenradio mit einem einzigen 12V-Steckernetzteil auskommen. Also habe ich die Filamentspannung und die Anodenspannung mit entsprechenden Wandlern erzeugt.
Das Protokoll für den Austausch zw. ATmega und Raspi ist auf dem ATmega schon lauffähig, fehlt aber in diesem SW-Stand noch. Die Doku dazu fehlt auch noch.
03.01.2016
So, mittlerweile habe ich auch meine ersten Schritte in C auf dem RasPi gemacht. Der ATmega und der RasPi können jetzt über die serielle Schnittstelle miteinander sprechen. Der ATmega sendet z.B. Nachrichten, welche Taste betätigt wurde. Der RasPi reagiert darauf mit ein-/ausschalten des WebRadio sowie wechseln der Livestreams (e.g. des Radiosenders). Rückwärts gibt der RasPi dem ATmega den Namen des Radiosenders, der gerade läuft. Der Sendername wird dann im Display im Wechsel mit der Uhrzeit angezeigt.
Damit man die Zeit auf dem µC nicht einstellen muss, fragt der ATmega den Raspi danach. Der hat ja die korrekte Zeit per NTP und antwortet mit einer Nachricht, welche die akt. Zeit enthält. Im Ergebnis stellt sich die Uhrzeit automatisch. Ein nettes Feature.
Die akt. Dateien für die Software auf dem ATmega und dem RasPi sind beigefügt.
Als besonders hilfreich hat sich NetBeans für die Entwicklung des C-Programmes aus dem RasPi herausgestellt. Ich habe im Web eine gute Anleitung gefunden, wie man NetBeans einrichten muss. Klappt wirklich gut.
Eine erste, einfache Beschreibung des Rahmenausbaus und des Protokolles ist beigefügt. Das Protokoll unterstützt die Adressierung von Knoten. Das wird in diesem Projekt zwar nicht benötigt, da ich die SW-Module aber auch für Projekte mit 2-Draht-Bus einsetze, habe ich sie einfach receycelt.
Hier noch ein paar nützliche Links zu VFDs allgemein:
Kerry Wong: NE555 als Triber für die Filamentspannung
Das Display FV651G bei Pollin
Wie solche Displays funktionieren findet man hier
oder auf Deutsch, nicht ganz so ausführlich hier
Want to build a project?
Bring your design to life with the Elektor PCB Service, powered by Eurocircuits. Upload the project files and order professionally manufactured PCBs or assembled boards through a proven European production platform.
Supporting KiCad, Eagle, Gerber, and ODB++ formats, the service is suitable for everything from prototypes and validation builds to series production and volume manufacturing.
Made in Europe. Fast. Reliable. Professional.
Discussion (1 comment)