
My Journey into the Cloud (7); the controller in your shirt pocket
April 28, 2016
on
on
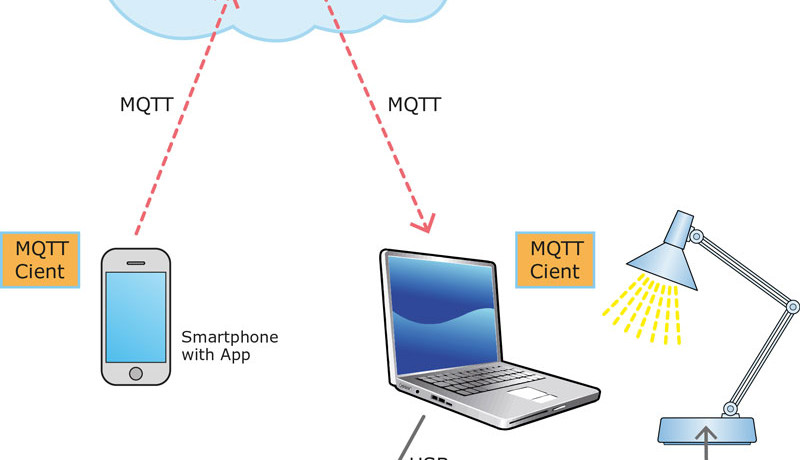
In the last instalment we introduced a smartphone into our setup. The project so far looks something like this: An Android-App sends commands via TCP/IP on the home network to a PC on which an MQTT-Client is running. From here it is sent over MQTT via the internet to another PC running the same MQTT program which receives the commands and sends them via a (virtual) COM port to control the electronic equipment locally (see the 6th instalment).
There is no way you would describe this as a mobile control function. To achieve this we need to be able to send MQTT messages directly from an Android smartphone (see picture). Contained in the pages of the Eclipse Paho project (see the 4th instalment) you can find an MQTT Client library for Android; to be more precise there are actually two. One Java-Library is for the MQTT ‘basic functions’ (www.eclipse.org/paho/clients/java). The other implements the Android-Service and runs in the background in the messenger application to send and receive MQTT messages (www.eclipse.org/paho/clients/android). The package also includes a useful example application.
Libraries and Client example for Android have been written by the Paho developers for use with Eclipse (with the Android SDK). This is no longer supported by the Android consortium (or put more simply, ‘Google’). Google recommends that the more modern Android Studio be used. In fact I already had this installed on my computer. Unfortunately the directory structure which contains the Android project files has changed radically in the new IDE.
I know what you are going to say: Of course Android Studio has an import-function to allow the use of Eclipse-Android projects and libraries. Unfortunately the import-function failed totally when I attempted to load the Paho example project. It generated a series of cryptic error messages; the source of the problem was that the directories and files were not found in the correct location.
I gave up on Android-Service for the time being and turned to the ‘simpler’ Java MQTT-Client library which provides the basic MQTT functions. I followed the directions (as shown on the corresponding Paho page) and created a small Android application which referenced the library. Again I was greeted with a shower of error messages because the logging files were not detected. I finally managed to get a small MQTT-Client running to publish messages by commenting out all the library files that used logging. In the mean time I have also found a web site that shows you how Android-Service can be integrated into Android Studio:
(www.hivemq.com/blog/mqtt-client-library-enyclopedia-paho-android-service). Unfortunately due to time constraints I have not yet been able to investigate further.
My first MQTT Client for Android has the same layout as the TCP transmitter in the previous instalment, the only difference is that we choose a Topic instead of an IP address. To make things a bit clearer I have used variable names similar to those used by the implementation on the PC. This is the section of code called when the ‘Publish’ button is pressed on the mobile phone:
String Topic = "/ElektorMyJourneyIoT/" + txtTopicPublish.getText() + "/test";
String strTextPublish = txtPublish.getText().toString();
int qos = 2;
String broker = "tcp://test.mosquitto.org:1883";
MqttClient mqttclient = new MqttClient(broker, clientId, null);
MqttConnectOptions connOpts = new MqttConnectOptions();
connOpts.setCleanSession(true);
mqttclient.connect(connOpts);
MqttMessage message = new MqttMessage(strTextPublish.getBytes());
message.setQos(qos);
mqttclient.publish(Topic, message);
mqttclient.disconnect();
Thanks to the help from the Paho library we only need a few lines of program code to send an MQTT message. The complete Android project is available for download (see below), included in the package also is my MQTT client for the PC, which passes the message on to the locally connected electronics.
Solved: Using the now familiar command sequence R 0 1 + [PUBLISH] R 0 1 – [PUBLISH] I can turn the lamp in my study on and off from wherever.
In the next instalment we will look to optimizing the control function and also look at communication in the other direction. In addition to that we will test drive a commercial solution and see how it compares. Stay tuned!
Read full article
Hide full article
Discussion (0 comments)