
DIY Solar PV Installation: Building a Balcony Power Plant
on
For some time, I have been a little envious of the rooftop solar PV installations in my area. In the long run, they tick all the boxes to reduce CO2 emissions and help sustain our energy-hungry lifestyles. I haven’t long been living in a house so I am a bit late to the game. I considered a rooftop installation but the feed-in tariff rate has now dropped so low it would take a long time to recoup the outlay. On top of this the installation process would be quite disruptive. Thirdly, this is probably a failure on my part, but I am reluctant to get someone in to do a job (especially electrical) that I could probably do myself and thereby gain some valuable experience and knowledge in the process. In Germany a large rooftop grid-tie installation involves a lot of paperwork and we are then taxed on self-generated and consumed electricity.
I had been putting the idea to the back of my mind for too long now, but after installing a robot mower solar charging station in 2020, I started to think of the benefits of a relatively modest grid-tie PV installation. I did some research to find out what was available and kept coming across the term “Solar Balcony” (see the textbox “What Is a Solar Balcony?”) that described a setup that might just be what I was looking for.
Does a Solar Solution Add Up?
After examining the legal gray areas, I wanted to work out whether such a grid-tied mini solar system would really be financially viable. For small balcony-sized installations, you can choose between a single- or two-panel setup. A single-panel setup can generate a peak output of approximately 300 Wp (the small “p” stands for peak) and we get 600 Wp with a two-panel setup.
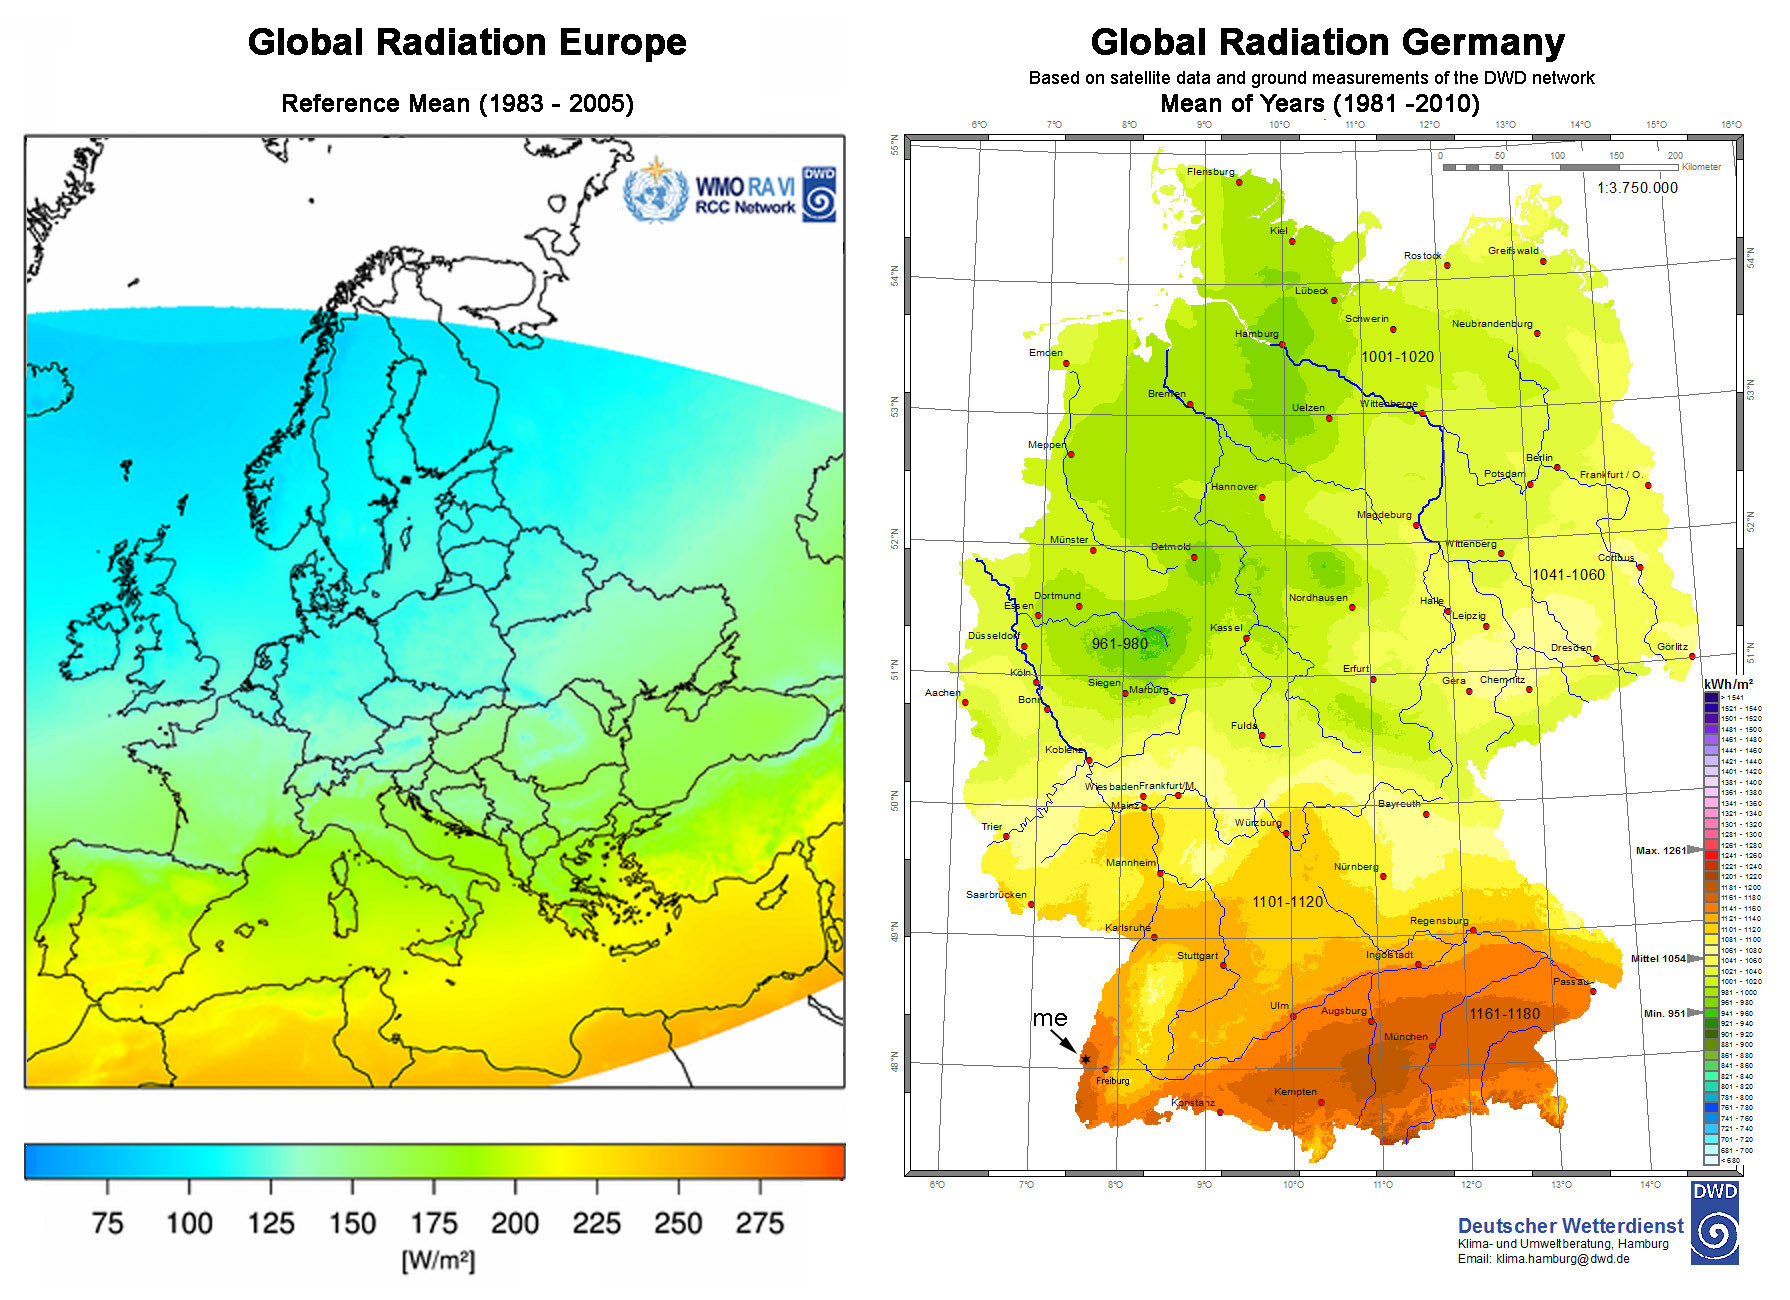
To check the solar insolation in my area, I studied the map produced by the German Weather Service which shows the average solar energy per year in Europe and more specifically in Germany (Figure 1). You can also find lots of solar yield calculators on the Internet. I live in sun-drenched southern Baden, which means I can count on an annual solar irradiance value of almost 1,200 kWh per m2 under optimal conditions. Assuming an efficiency of 20% for monocrystalline solar cells, I could produce up to 240 kWh per m2 and year. A two-panel setup will be more suited for me, a modern panel in the power range of 320 to 370 Wp has a usable area of around 1.6 m2. So, a yearly harvest of almost 770 kWh should be possible from two panels. Using this yield with the current price (30 ¢ per kWh) for electricity in Germany my balcony power plant would save me up to € 230 per annum. The purchase price of my system was almost exactly € 600. This simple calculation means the system would pay for itself in two years and seven months!
I wish! For this to be realistic, the panels should be optimally angled to collect maximum energy and there should be zero losses in the inverter and cabling and no shading from overhead vegetation or buildings. This also assumes that all the energy produced is used in-house with nothing exported to the grid. For a single occupancy apartment where the occupant is out at work during the day a large proportion of the generated power will be exported to the grid. In that case a single 300 W panel should be more than enough. In my house we run two refrigerators and a freezer; my mother likes to watch daytime TV and I work in the home office where a PC combined with a large monitor run during the day. Together with other electrical devices and wall warts, our base usage will easily exceed the output from a single 300 W panel. A 600 Wp setup doesn’t seem to be oversized.
If I calculate with a conservative 75% utilization, under optimal conditions this gives an annual saving in electricity costs of around € 170. My intended site for the panels is also not ideal: there will be no shading on the panels but the elevation angle is just 5° and they will be orientated exactly south-south-east at 135°. I will benefit less from the evening sun, but more from diffuse radiation. If I subtract 25% conservatively to take this into account, I end up with a yearly saving of a little over € 125. At a cost of € 600, my balcony power plant will probably have paid for itself in four years. From then on, anything is money in the bank.
If you get a grant for the system (the neighbouring city of Freiburg, for example, donate € 200), then payback will be much sooner. With a DIY installation, costs are minimal, but this does not take into account any additional outlay for meter replacement that some utility suppliers may insist on. For example, the need for a so-called bidirectional meter is currently under debate (a meter must have a backstop as a minimum requirement). The hardware purchased should also be reliable, failing parts need to be replaced, making the system far less profitable.
I could improve the panel angle to increase efficiency, but they look less intrusive flat with the existing roof and I get a better yield in summer, when the A/C sometimes runs during the day (not so good in winter though).
System Components
A balcony power plant consists of solar cells, a grid-tie synchronous inverter and the means of connection to the domestic mains. The latter component is often a special Wieland plug-in connection (Figure 2), because in Germany we are allowed to use a plug and socket to connect the system output while observing safety and certain restrictions. In the UK this is not allowed; you need to connect the output via a dual-gang fused isolator switch. The inverter is the key component in the system. It converts the low DC voltage of a solar panel into a standard-compliant and feedable AC voltage of 230 V. The grid-tie inverter monitors AC grid voltage closely to ensure power supplied from the panels is in sync. Unplug the inverter from the grid and the inverter output shuts off in milliseconds.

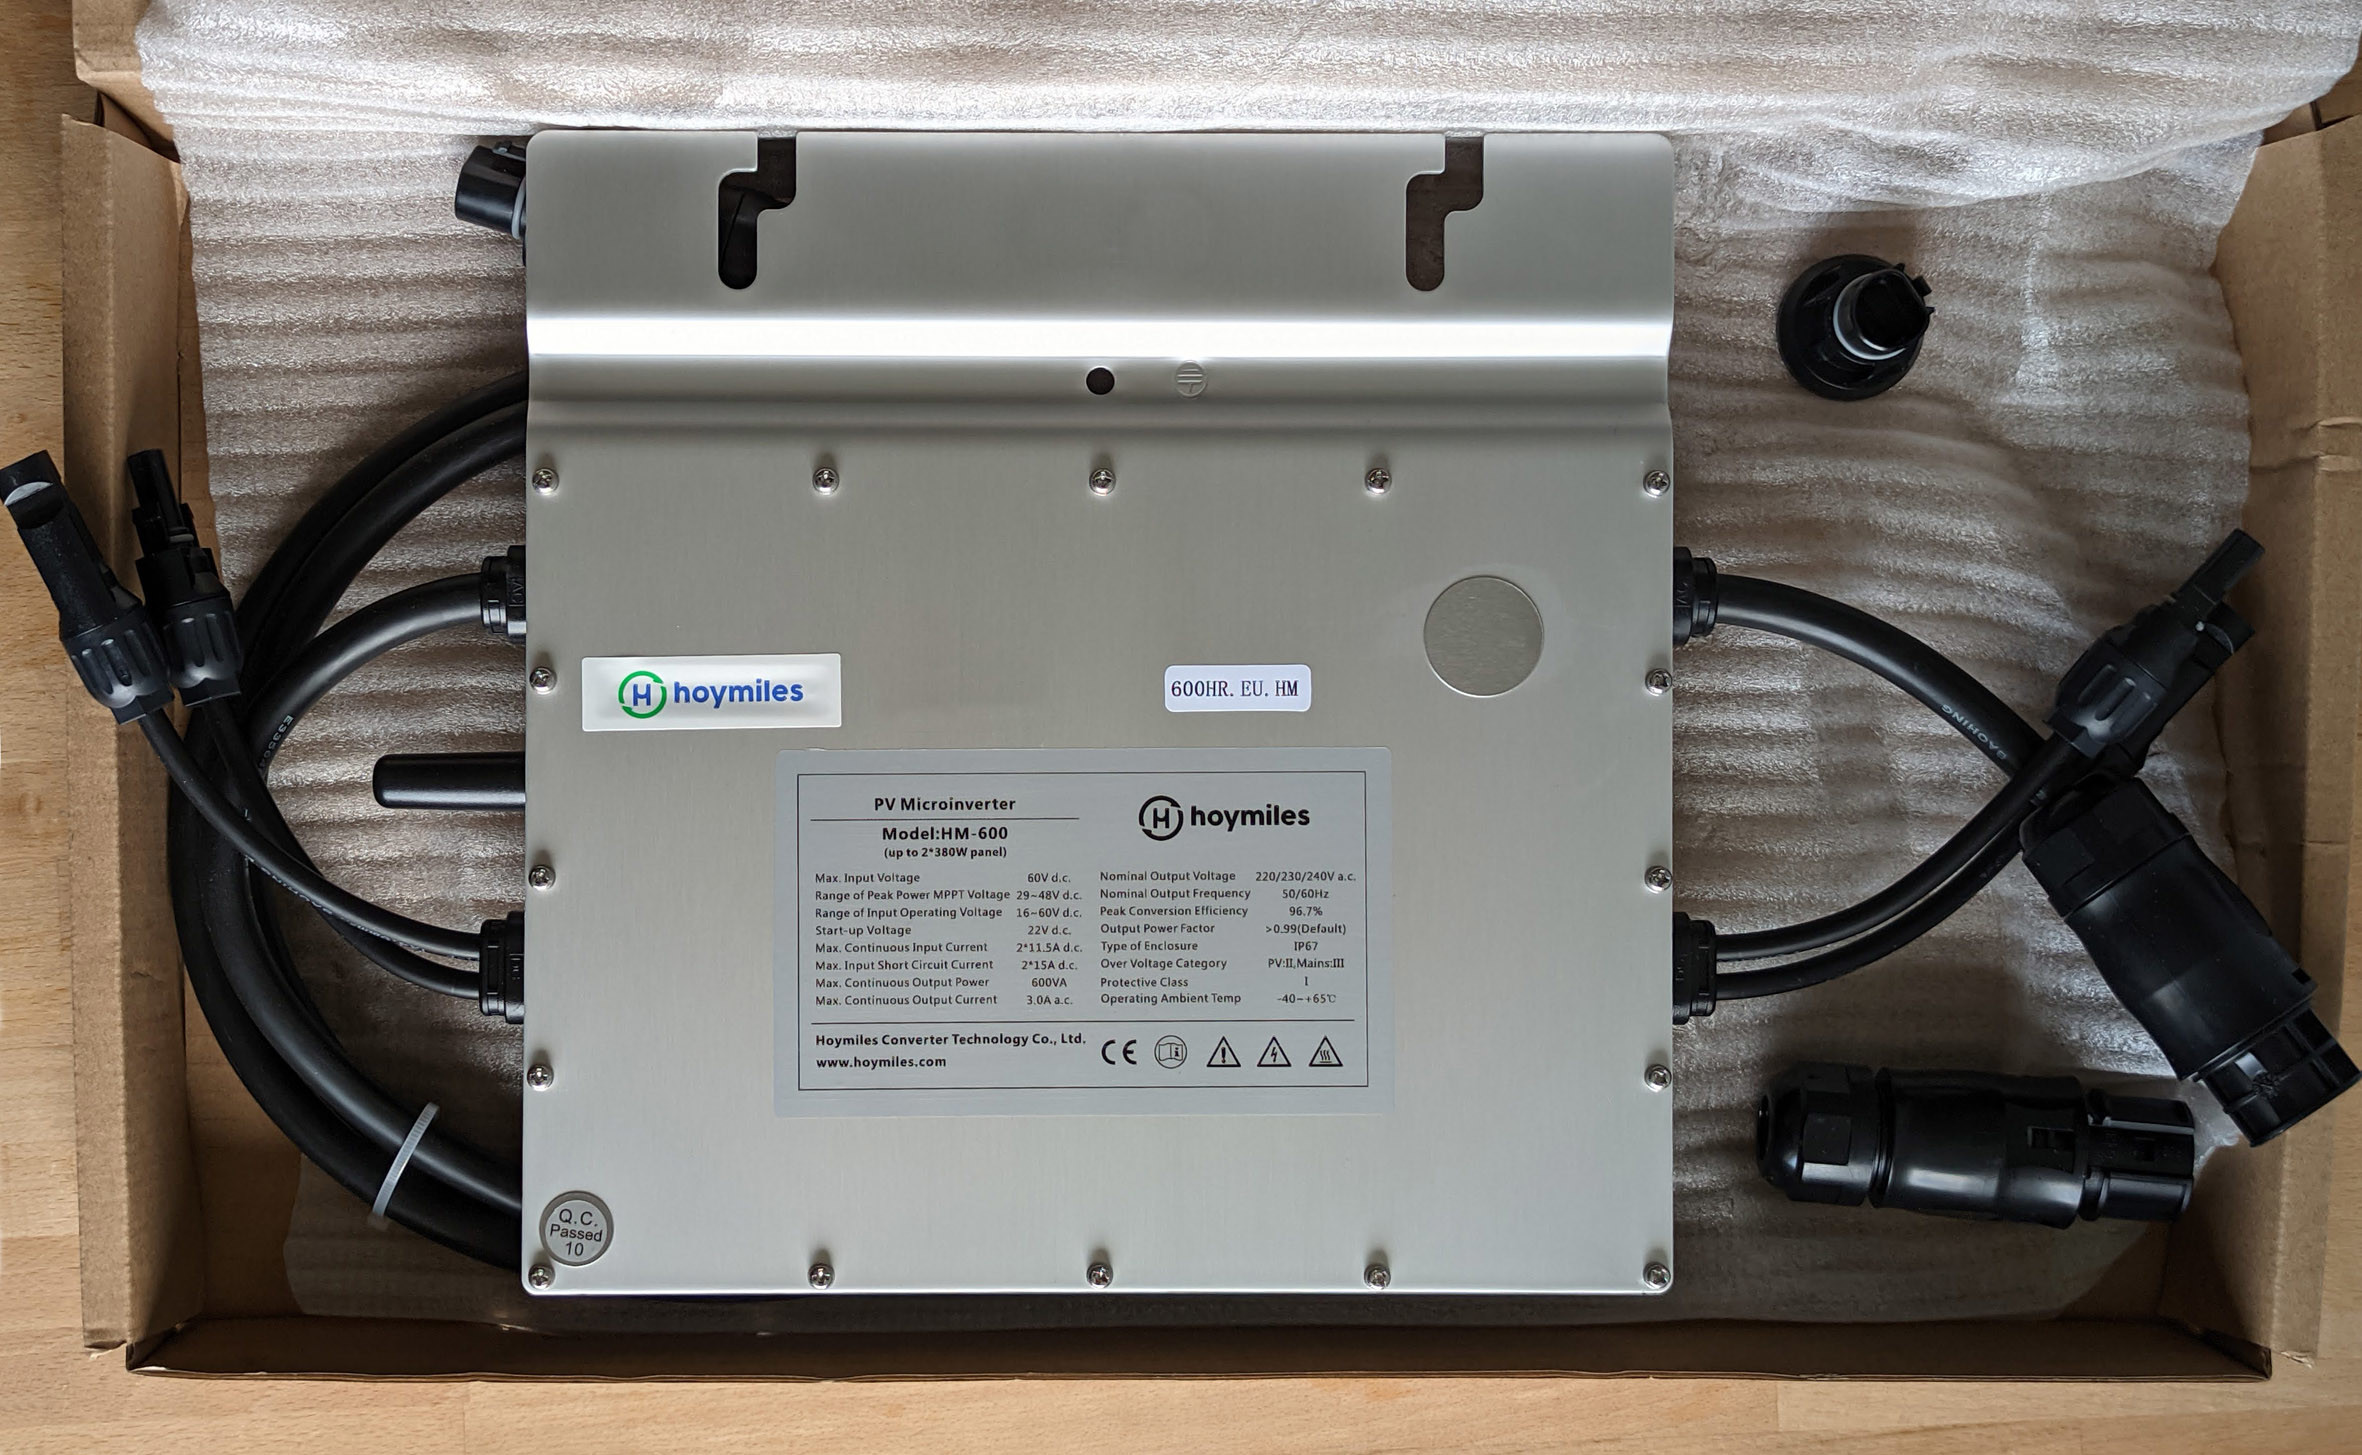
When choosing your system you should consider the output power, the maximum feed-in power, the working voltage range of the solar modules and build quality. I decided on the HM-600 inverter from Hoymiles. It costs € 220 and according to user reviews seems to be reliable. I have read some dubious things about cheaper inverters; I gave those a wide berth. Other good quality inverters are available.
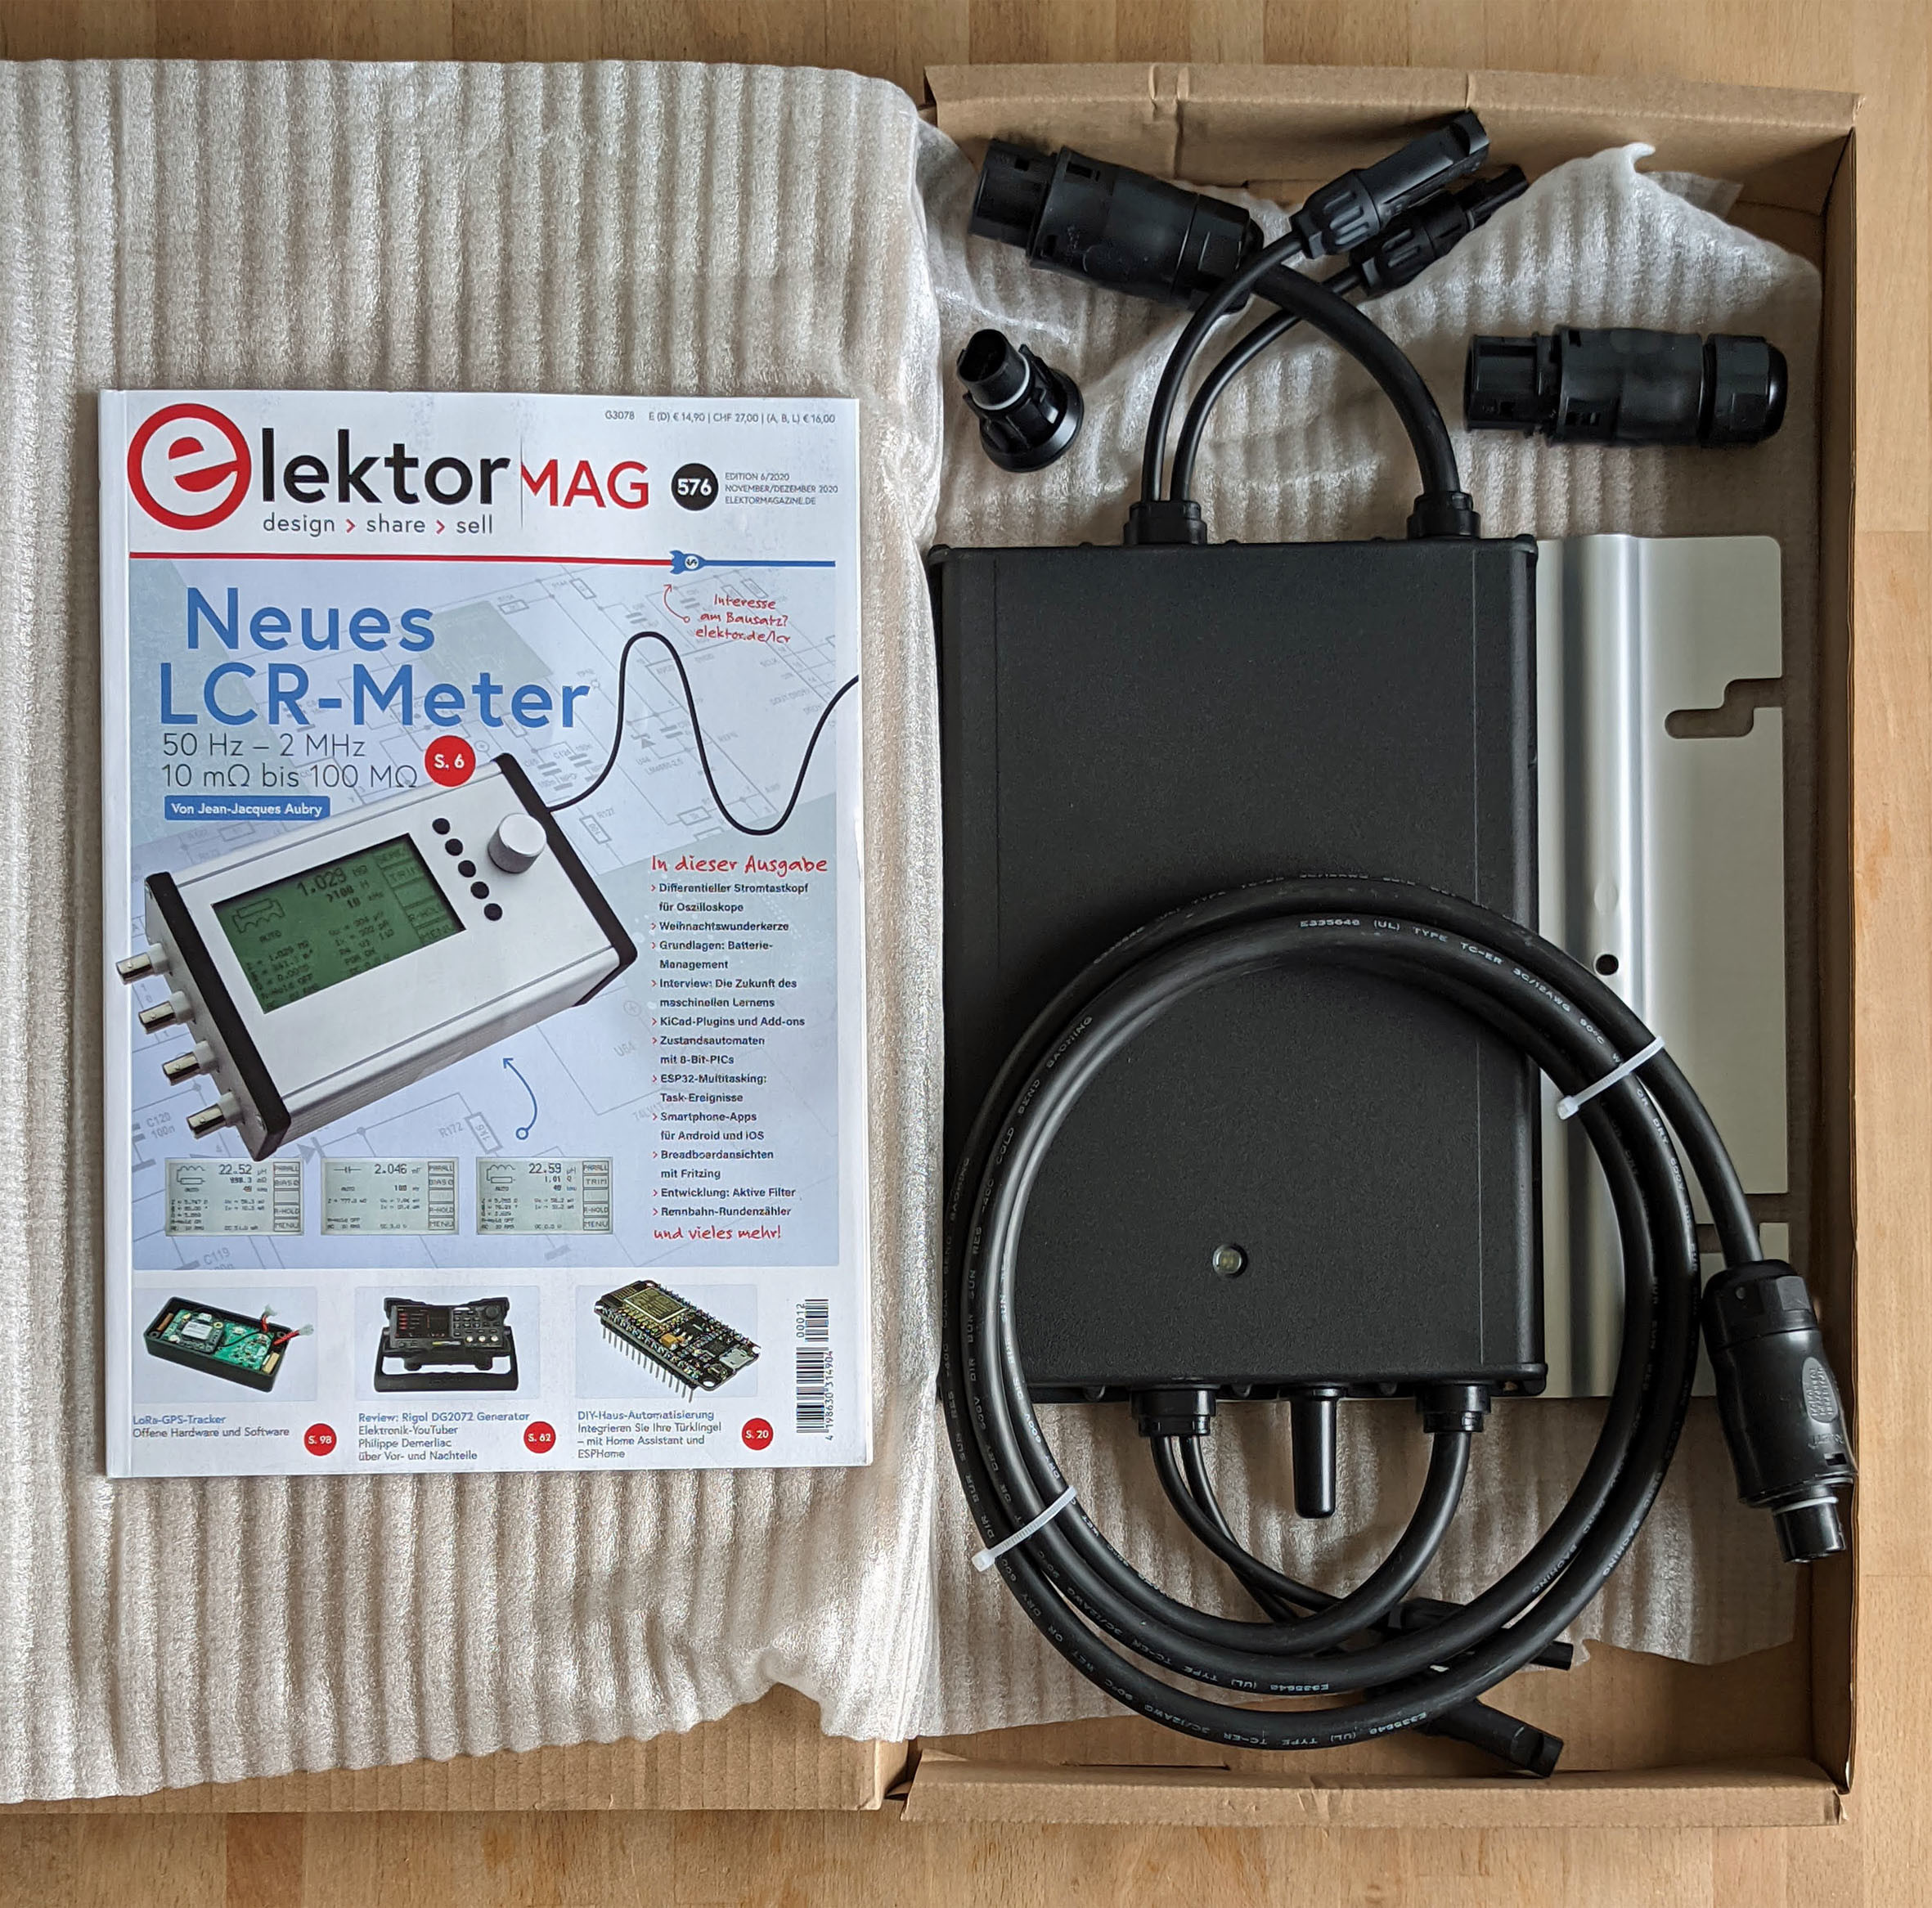
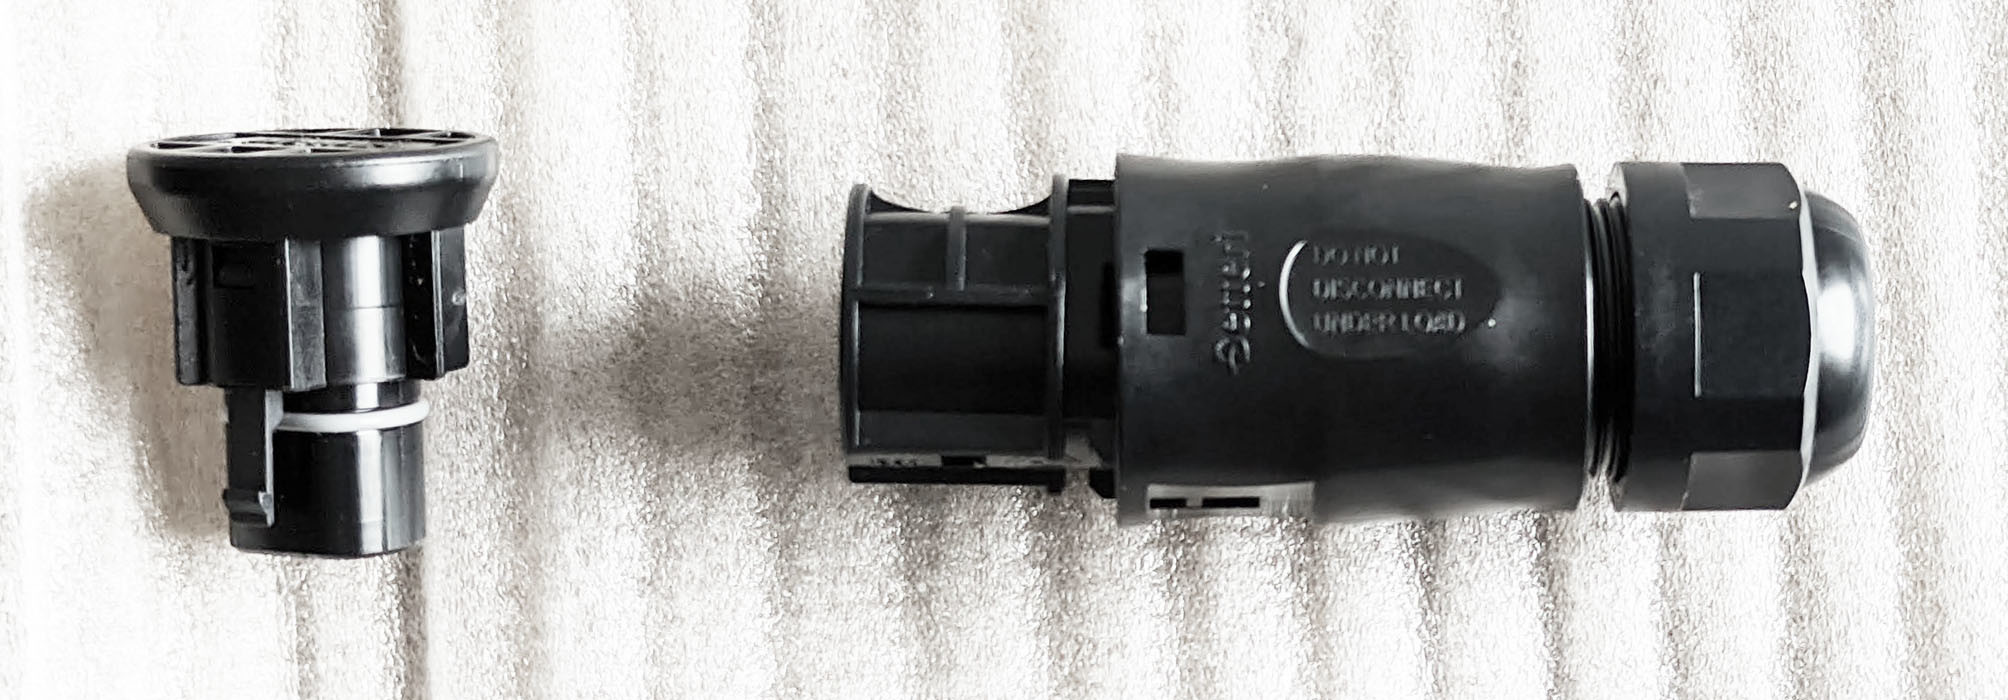
The HM-600 offers a peak output power of 600 W and can handle an input from two panels in the power range from 240 to 380 Wp. It achieves an efficiency of at least 96.5% and draws less than 50 mW at night. A copy of Elektor is used as size comparison in Figure 3. It weighs 3 kg and is quite flat so it can be mounted under a panel. The long cable at the bottom is the mains connection (for which a suitable coupling is required), and the short cable with a thick plug at the top is the connection to additional inverters (a cover cap must be fitted here). You should also order both parts (Figure 4). A view from below is given in Figure 5.
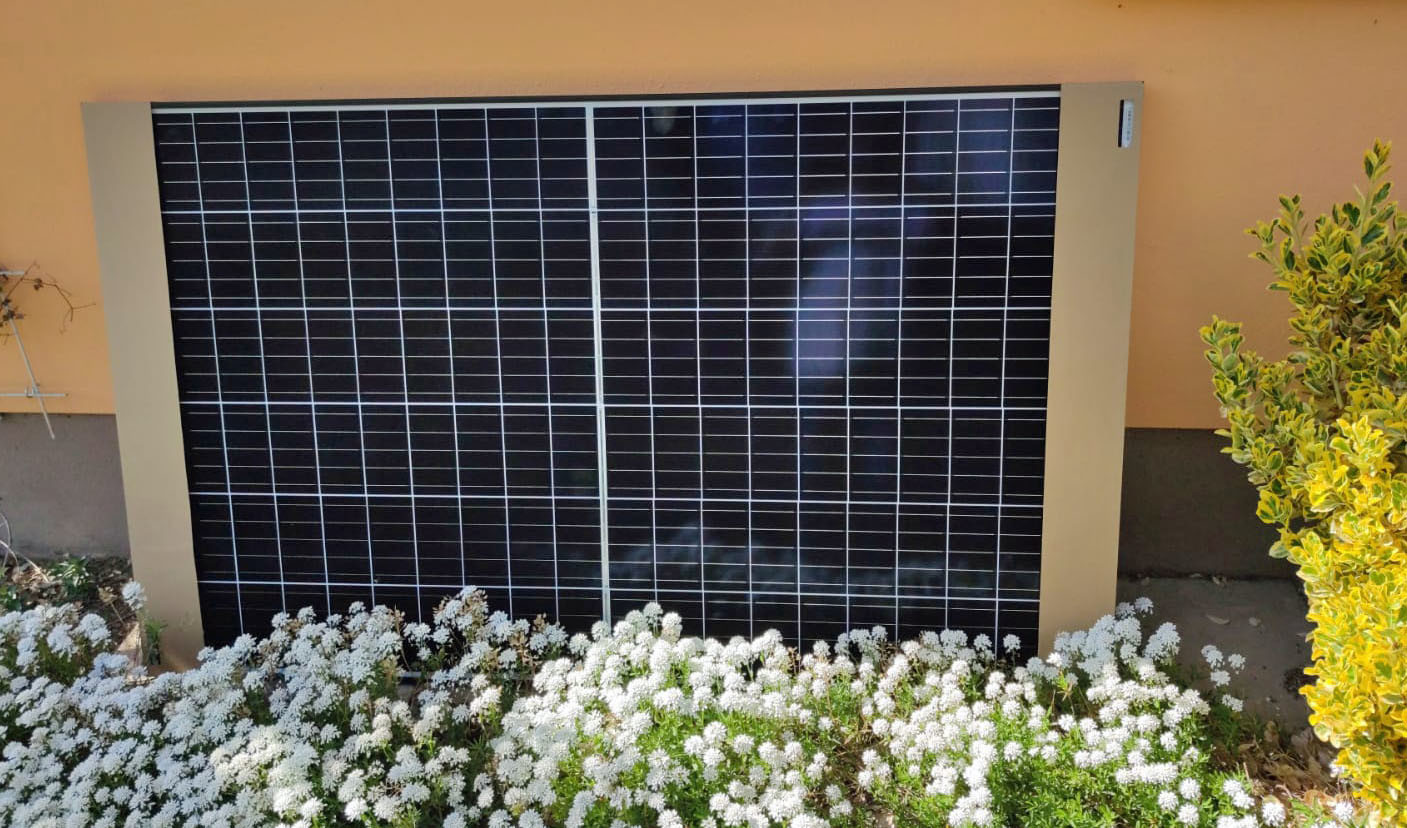
The inverter and efficiency calculations play a part in choosing the PV panels. To get 600 W from the inverter output, the panels should better produce in excess of this to have some reserve. More efficient PV panels cost more. I chose two monocrystalline 330 Wp panels from Jinko Solar (Figure 6). These will provide at least 10% reserve. In the class above 300 Wp rating, almost all panels, with some slight deviations are 166.5 x 100.2 cm and weigh just under 20 kg. The Jinko panel guarantee indicates that after 25 years its output will be at least 80% of its initial output. The panels retail at € 150.
Delivery costs of the larger system components will be high so it’s worth considering a pick up from a local distributor. Two panels fit into an average sized car with the rear seats folded flat.
Hook Up
In some countries it may be permissible to simply plug the output from a balcony power plant into a standard 3-pin wall mains outlet socket. In Germany, we are allowed to use a touch-safe alternative such as the (€ 35) Wieland connector. The risk of a shock is minimal because the inverter switches off immediately the plug is pulled. In the UK, however, IET wiring regulations prevent the use of a standard or shrouded 3-pin connector but more on that later.
The connection can be wired in parallel to an existing mains outlet socket in the ring main somewhere convenient. Alternatively it can be wired back to the consumer unit with its own circuit breaker. Using the first method the existing ring main MCB may need to be de-rated. In the UK, the mains outlets are rated at 13 A and the ring main cabling is typically protected by a 32 A MCB at the consumer unit. With the inverter output connected to a mains outlet socket, it will inject additional current which will not be sensed by the MCB of the socket. A 600 W balcony power plant could add an additional 2.6 A to the current which in the worst case would overload the outlet socket. To be safe, its 13 A MCB should be replaced by the next lowest (10 A) rating.
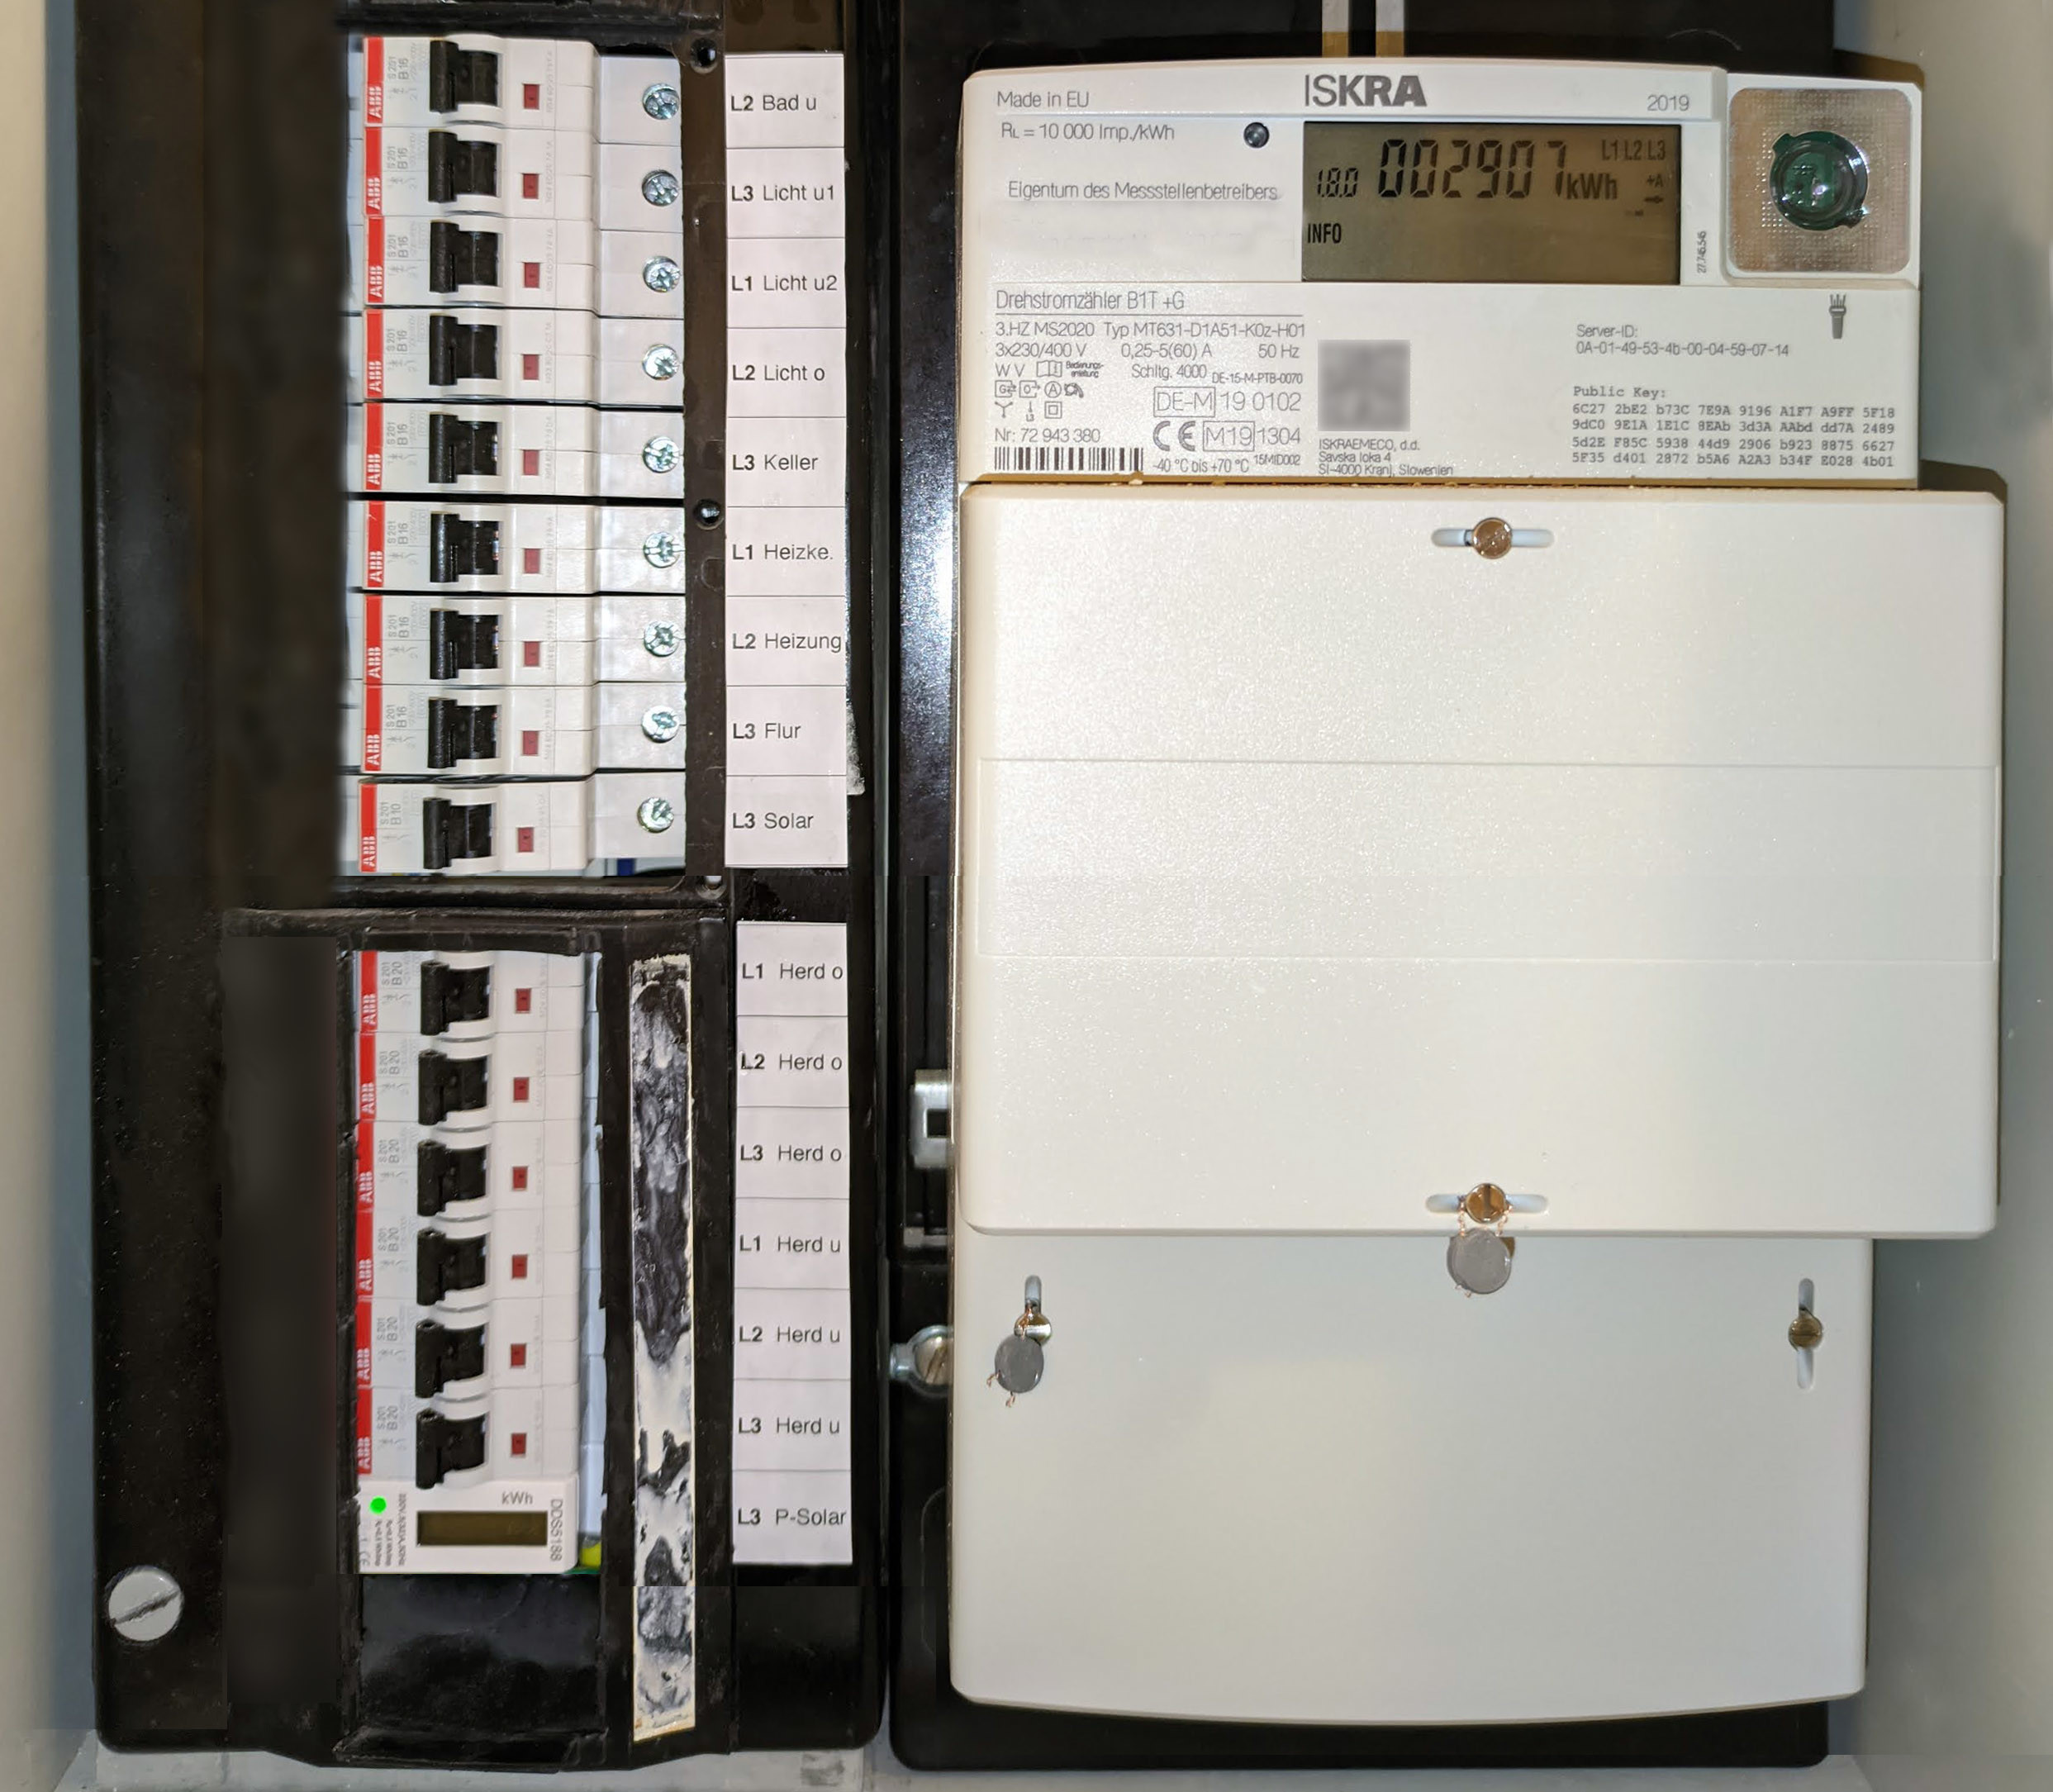
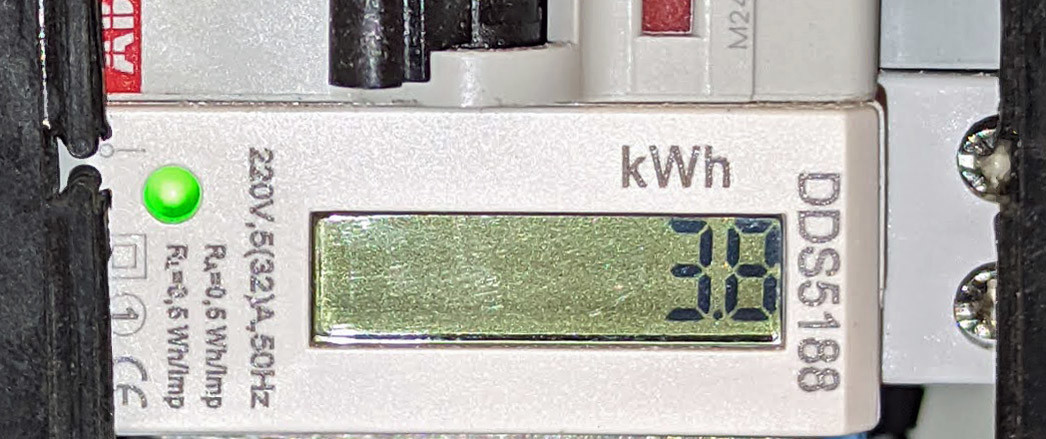
Taking this into account and checking there was spare capacity in my consumer unit, I chose to connect the power plant directly to the consumer unit with its own 10 A MCB. For this I ran 15 m of cable and drilled a number of holes for access. This saved me € 35 for the connector and gives me the opportunity to record the power fed into the system very easily. There are, of course, fancy systems with apps to display real-time power generation on a mobile phone, but I thought this strays into overkill territory. All I need is a running total of power generation which can be shown via a low cost DIN rail mounted kWh meter costing less than € 10. The expanded consumer unit can be seen in Figure 7. The small power logger is at the bottom left. The close-up of Figure 8 shows the reading of 3.8 kWh after the first day on May 9th, 2021 — fortunately, a completely cloudless day. This sums up to € 1.14. My initial calculation of a net yearly income of € 125 is beginning to look quite realistic.
Stay on the Right Side
As Figure 7 shows, I already have a modern electricity meter with a backstop ratchet. If you still have an old style, electromechanical meter, without a backstop it will run backwards when the solar panel output exceeds domestic consumption. If this happens you could argue that you are using the grid as a pseudo battery that you “discharge” when you need more energy or “charge” from your excess energy. Even some politicians had shown naive thoughts like this, but it is neither logical nor allowed! It is illegal and you must play by the rules. Every country has its own regulatory body and in the UK it is a requirement that you fill out and return a G98 Engineering Recommendation Form to your Distribution Network Operator (DNO) within 28 days of installation. To find your network operator, enter your post code here.
The large majority of Plug-in Solar installations will not need planning permission in the UK as they are classed as “permitted development” providing the property is not a listed building or is not situated in an area of outstanding natural beauty or in a national park. It is your responsibility to check whether planning permission is required for the solar installation. If in doubt contact your local authority planning department or visit the solar section of the planning portal here.
In Germany, you should register your balcony power plant with both the network operator and the Federal Network Agency on the day of commissioning. This is obligatory — even for very small systems like mine. You can do this online, it takes less than ten minutes. If your own system is registered on the so-called “market master data register”, it will be reported to the respective provider, but does not mean you don’t need to register yourself. They will then exchange an old meter with a new one with a backstop or replace it with a bidirectional meter.
It is probably not worthwhile registering the system to produce a feed-in return. In Germany the feed-in tariff is currently 7.47 cents per kWh. If, for example, 25% of my estimated harvest of 480 kWh per annum counted as feed-in it would return 145 kWh x 7.47 cents, almost € 11 per annum or a couple of beers. That hardly covers the additional fees and extra paperwork hassle. Better donate any excess energy to the grid; it will give a clear conscience knowing that it has contributed in some tiny way to reducing fossil fuel consumption and CO2 output.
Solar System Build and Installation
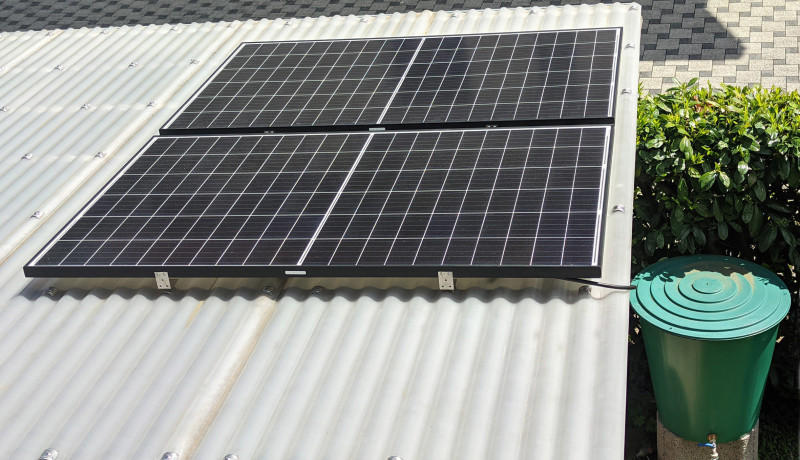
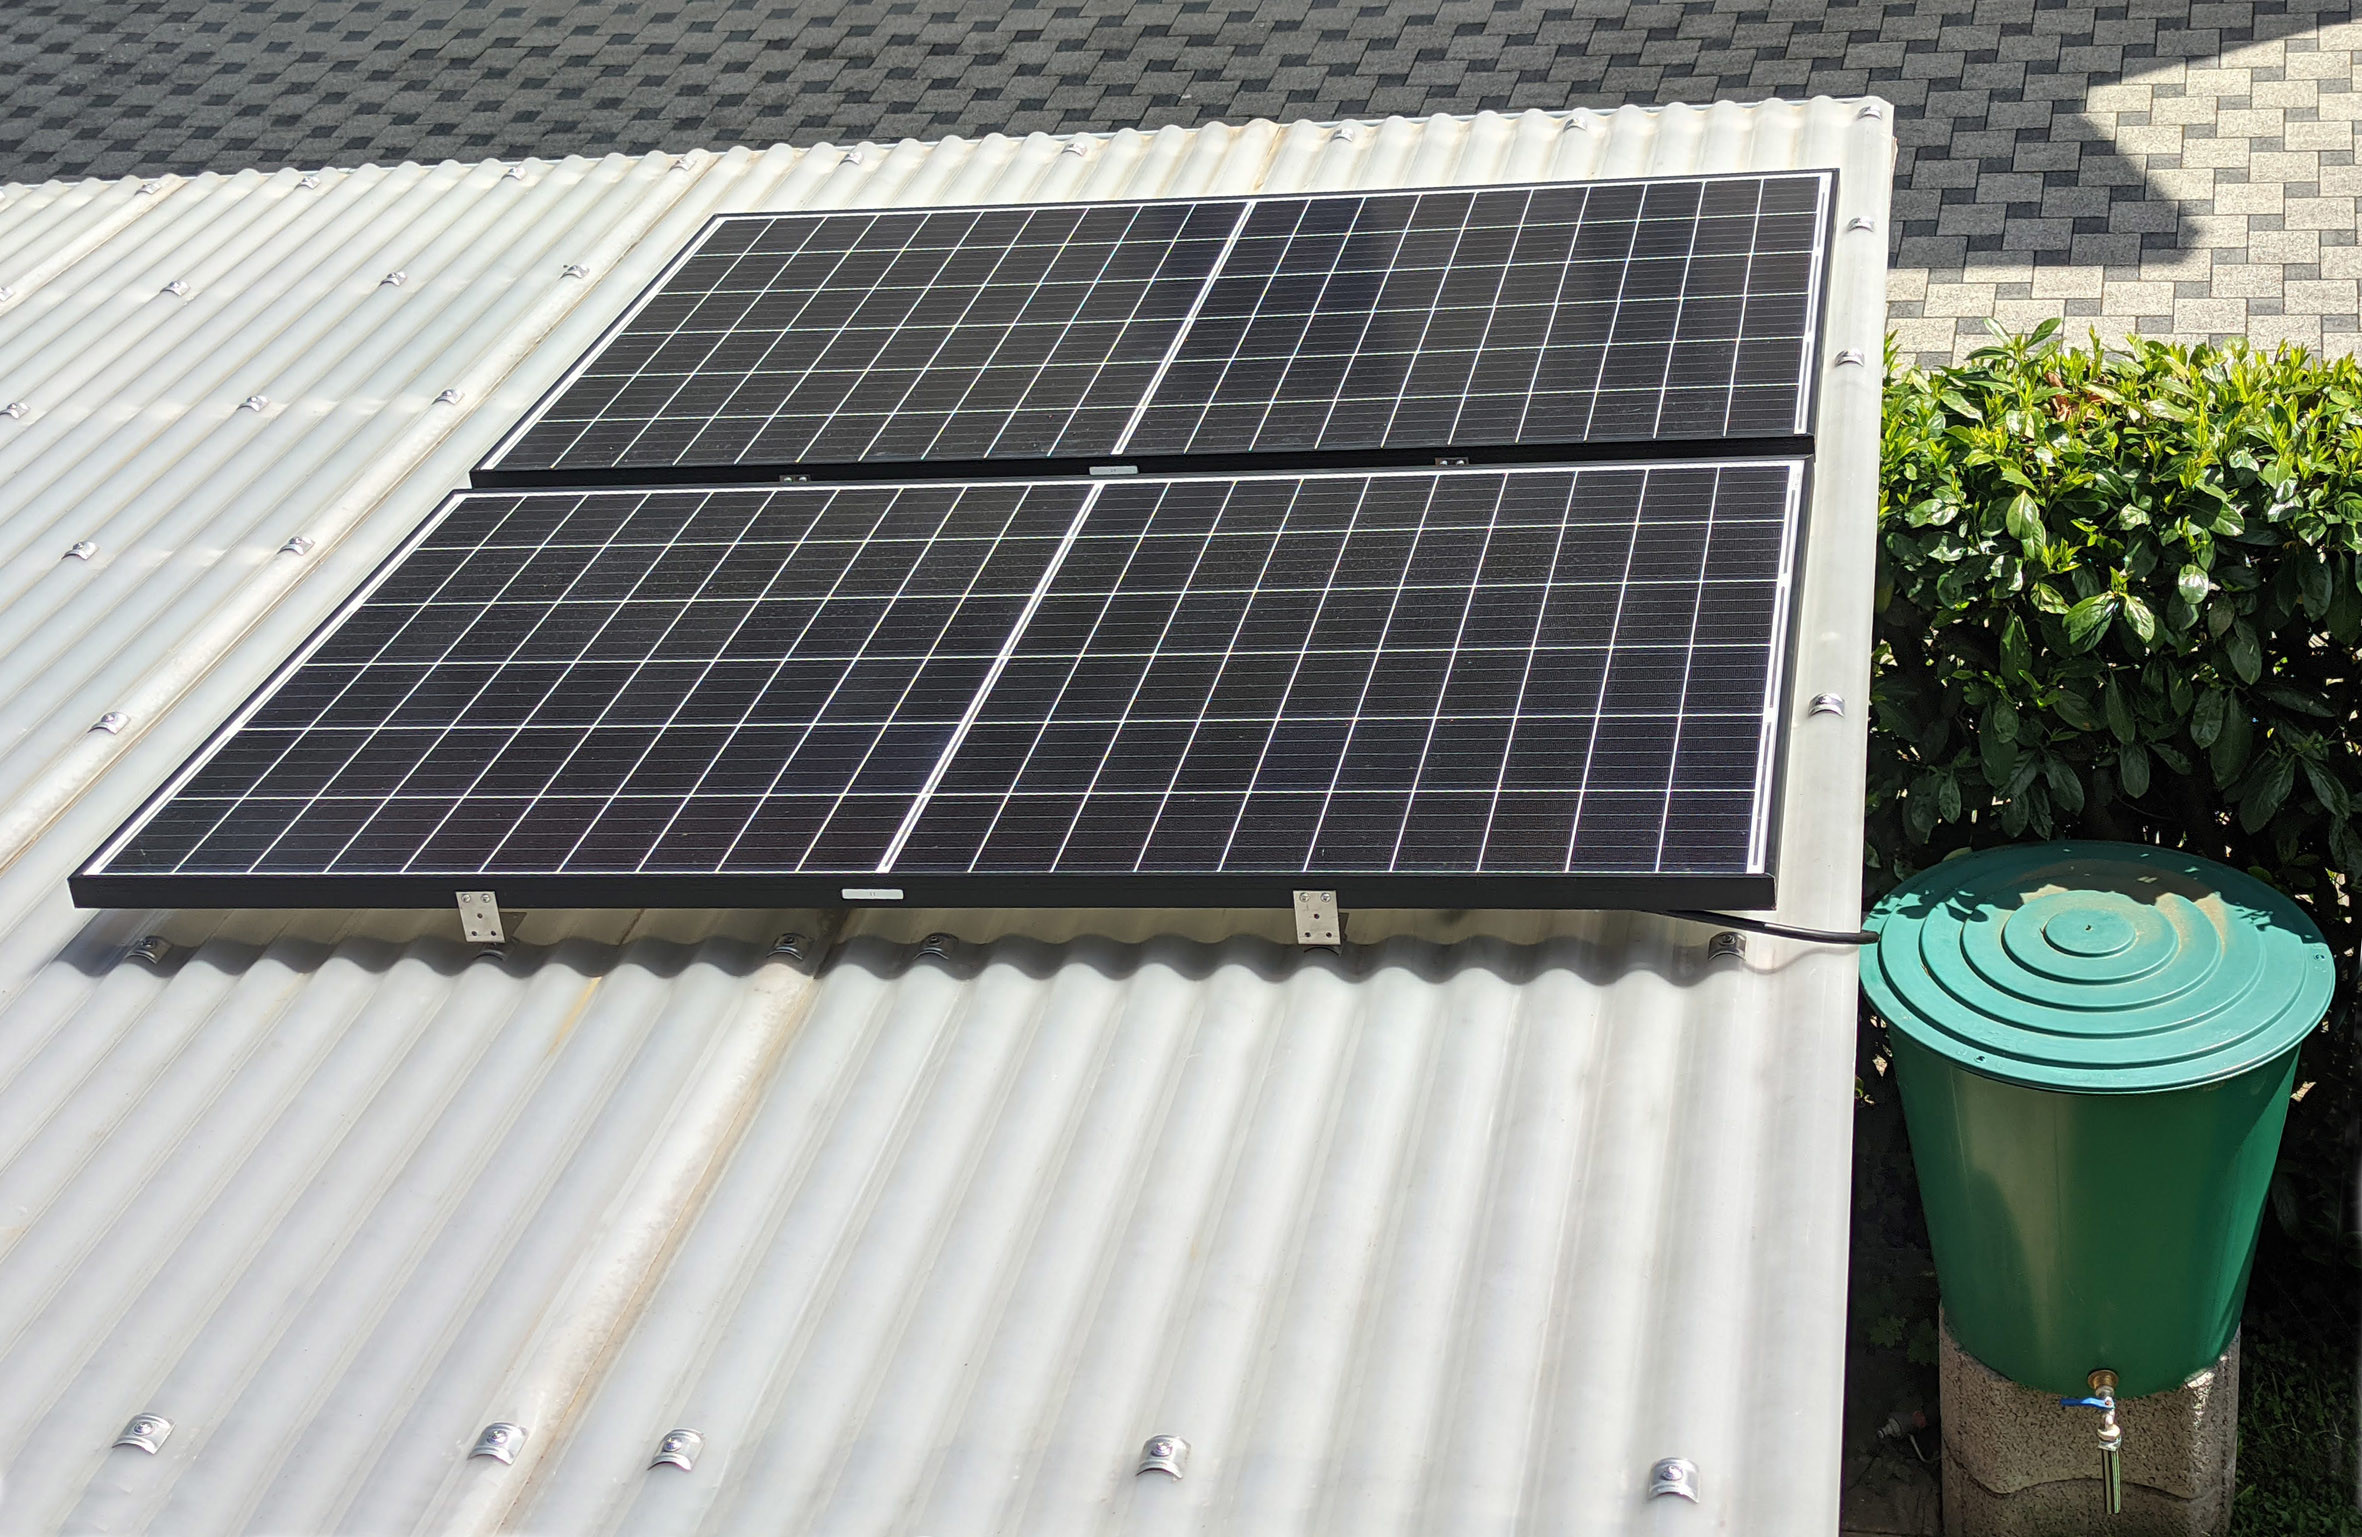
In Figure 9, you can see I’ve used some sturdy stainless steel brackets to fix the two PV panels over the roof of a veranda that directly abuts the house. Special fixings are available for tiled roofs. For a flat roof there are ready-made steel brackets to give the optimal panel mounting angle for Central Europe. The inverter is mounted under a panel, and weatherproof cabling runs into the basement via cable ducts and then with NYM cabling to the consumer unit. It goes without saying that any work on a domestic electrical installation should only be carried out by a suitably qualified electrician. In Germany you should have the necessary expertise and be qualified to work on house wiring and the consumer unit. If in doubt, get an installer approved by the network operator.
IET wiring regulations in the UK, state that an “electrically skilled” person (not necessarily a qualified electrician) can undertake the installation of a plug-in solar kit. All work must comply with the latest edition of the IET electrical installation wiring regulations. In Germany it is possible to wire a Wieland wall mounted socket into the ring main so that the inverter output can just be plugged in. This is not approved in the UK; regulation 551.7.2(ii) states: “The microgenerator (solar panels) must not be connected to the final circuit by means of a plug and socket”. The microgenerator must instead be connected via a 13 A, double pole isolator switch wired to the existing ring main, as a spur from a ring main or via a dedicated radial circuit. Part P of the UK building regs (sections 2.7 and 2.8) state the addition of a fused switched connection unit is classed as non-notifiable work (unless it is part of a bathroom installation).
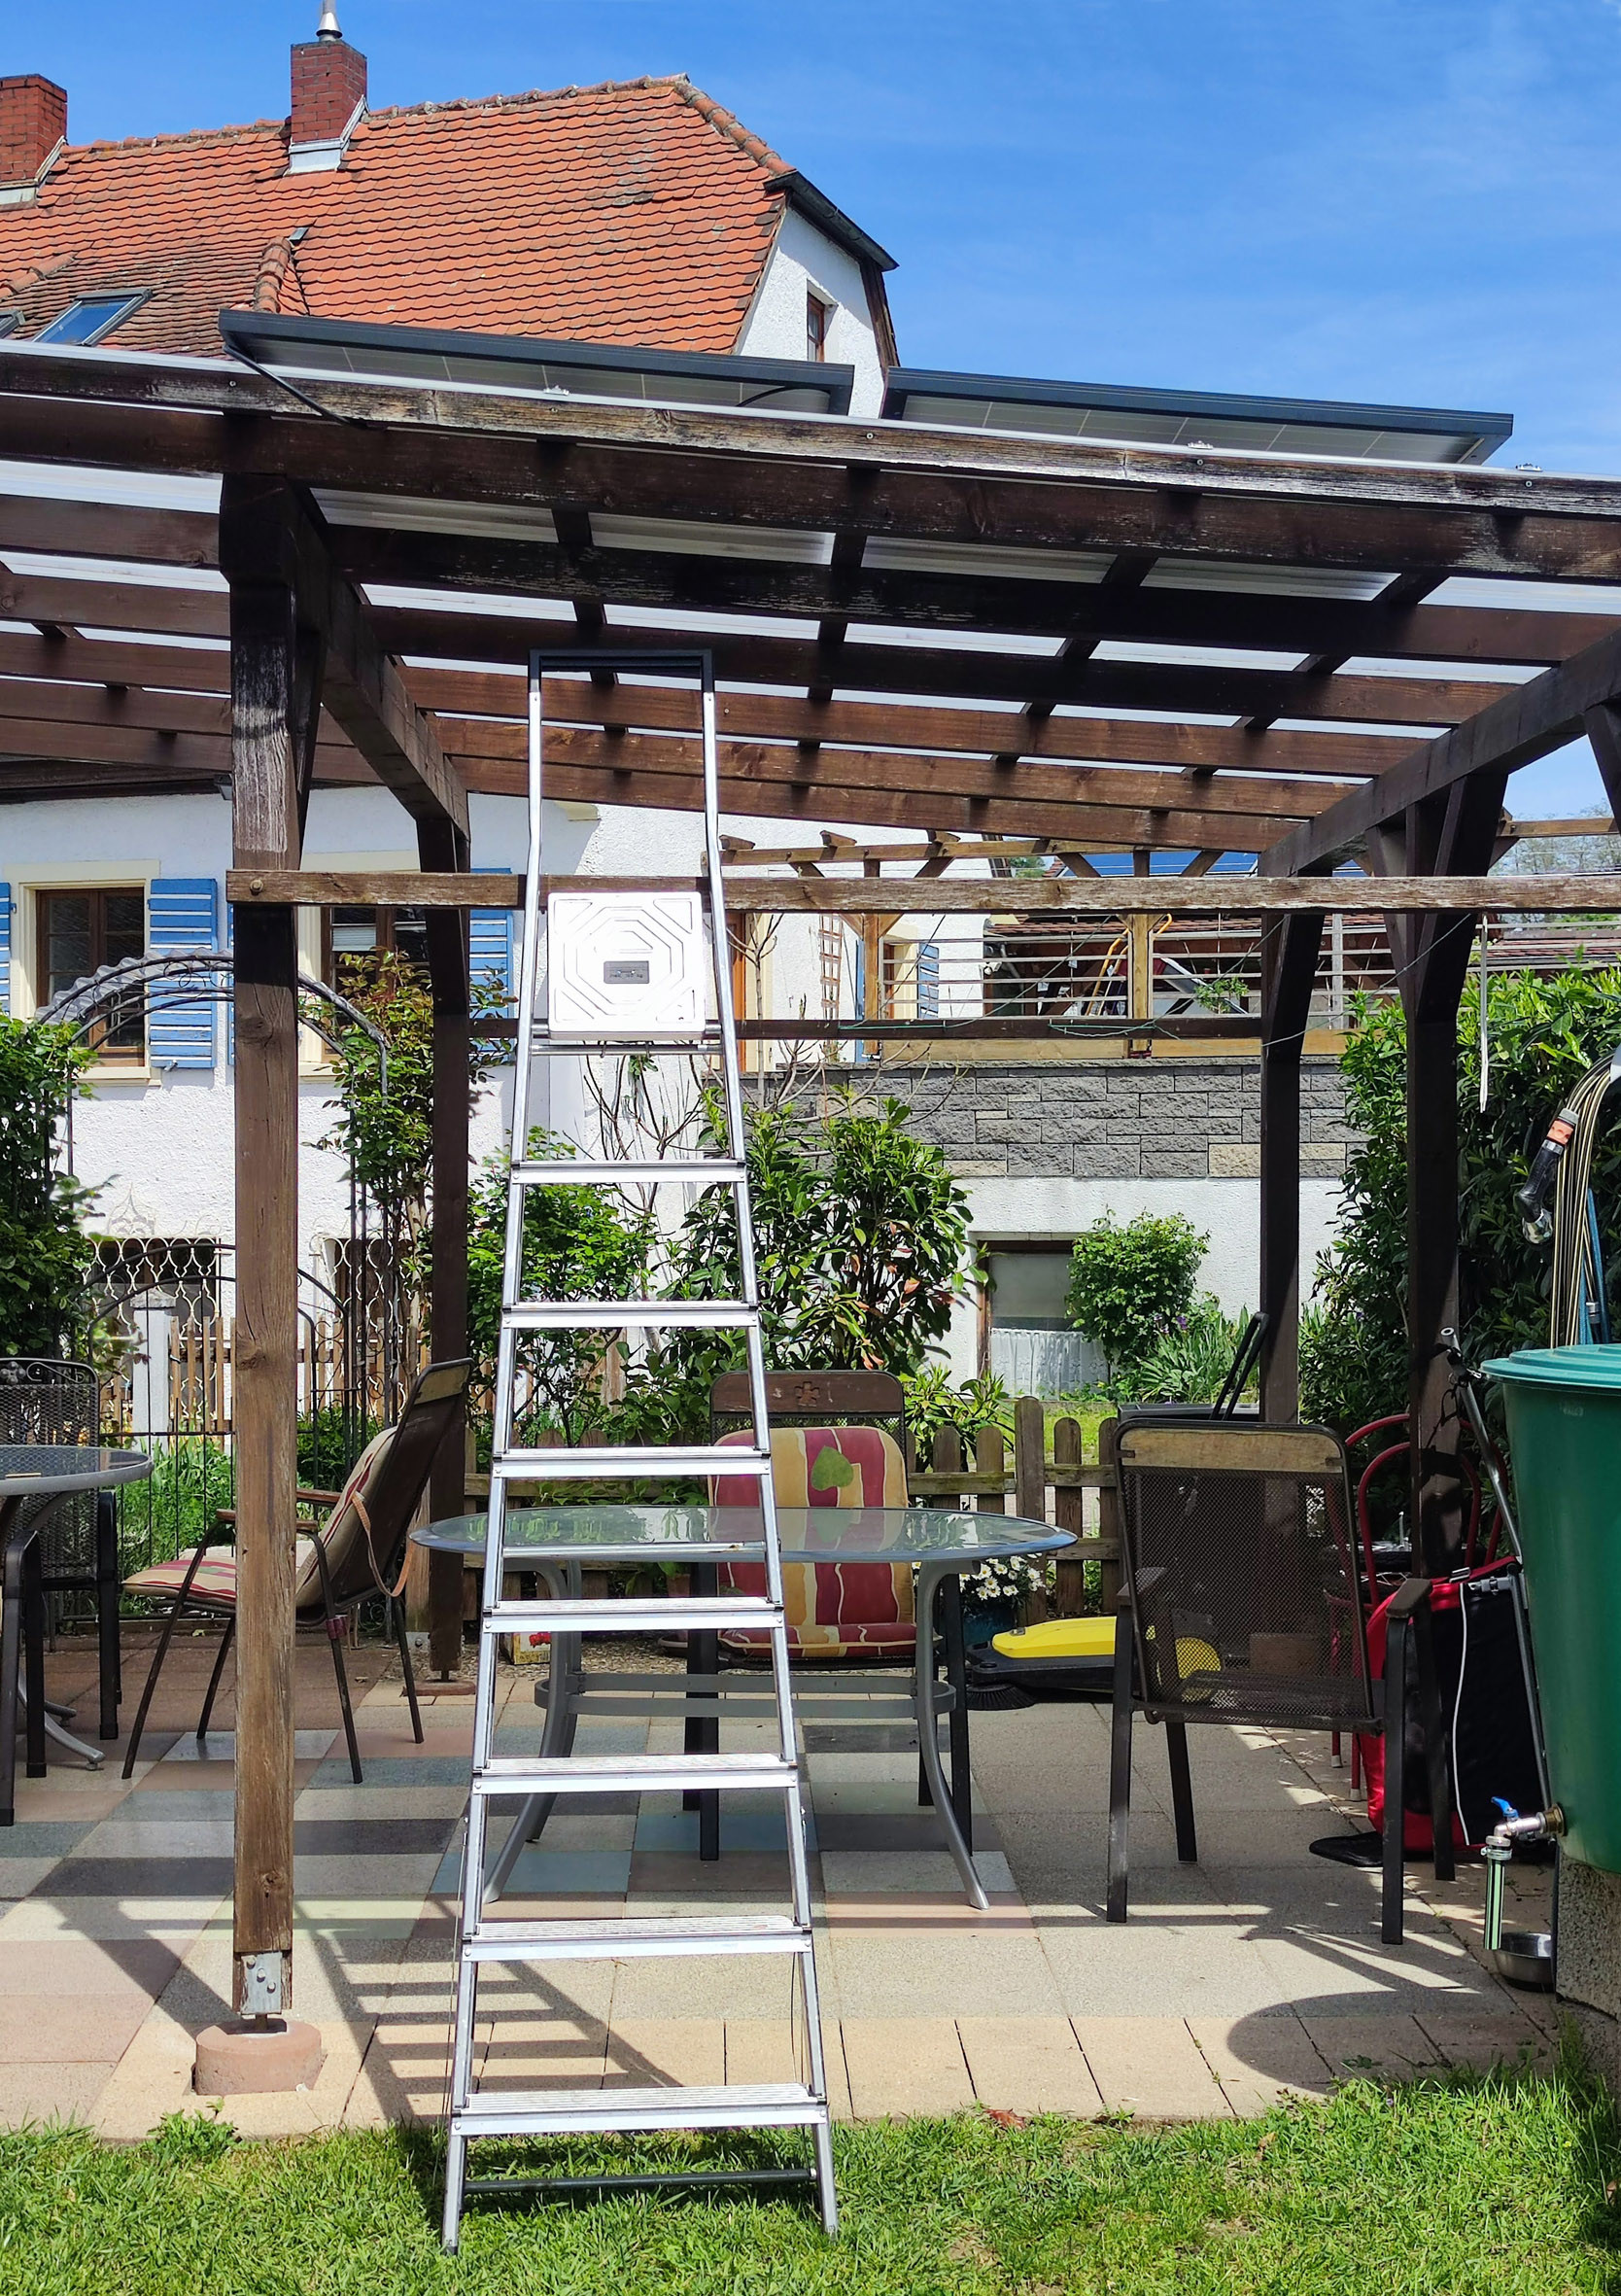
All in all, making the slots, installing cable ducts, laying cables, drilling the holes in the stainless steel angles, modifying the consumer unit and installing the panels took me less than three working days. An experienced “solar installation technician” would no doubt have done the job in half the time, but I get the satisfaction of knowing I installed the system myself and am familiar with it if anything needs replacing. Figure 10 shows a side view of the system immediately after completion. Oh, that’s where I left the ladder.
Operation
There are many manufacturers in Germany who offer a complete plug-n-play solar balcony system to plug into a mains outlet. These systems can be up and running very quickly, but you should check whether you could buy the individual components more cheaply. Personally, I enjoy doing the research. That way, I can choose components to build a system that meets my needs.
Looking back now it’s finished would I recommend you try it? Definitely! I’ll admit to being a bit obsessed keeping track of the energy harvest. I noticed you can even expect a few hundred watt hours on cloudy days with rain. What I'm looking forward to is high summer when I can chill with a beer knowing the PV panels keeping the sun off me have played some part in cooling the beer. Operation over winter should also be interesting. By this time next year, I will know how things actually went with the electrical harvest in 2021.
You may be tempted to add one or two more PV systems; the inverters are even fitted with AC connectors allowing several systems to be daisy-chained. In Germany this would push the power plant output over 600 W and make it necessary to use an installation engineer and inevitably increase the necessary paperwork. In any case, for any solar balcony installation, you will need to inform the network operator who will visit and check that the existing electricity meter is compatible (at least fitted with a backstop ratchet). You will not gain so much from a larger system anyway because any excess power from these simple installations — that do not measure the energy generated for FiT payments — will just be donated to the grid.
Update from May 9 2022
The situation after exactly one year of operation:
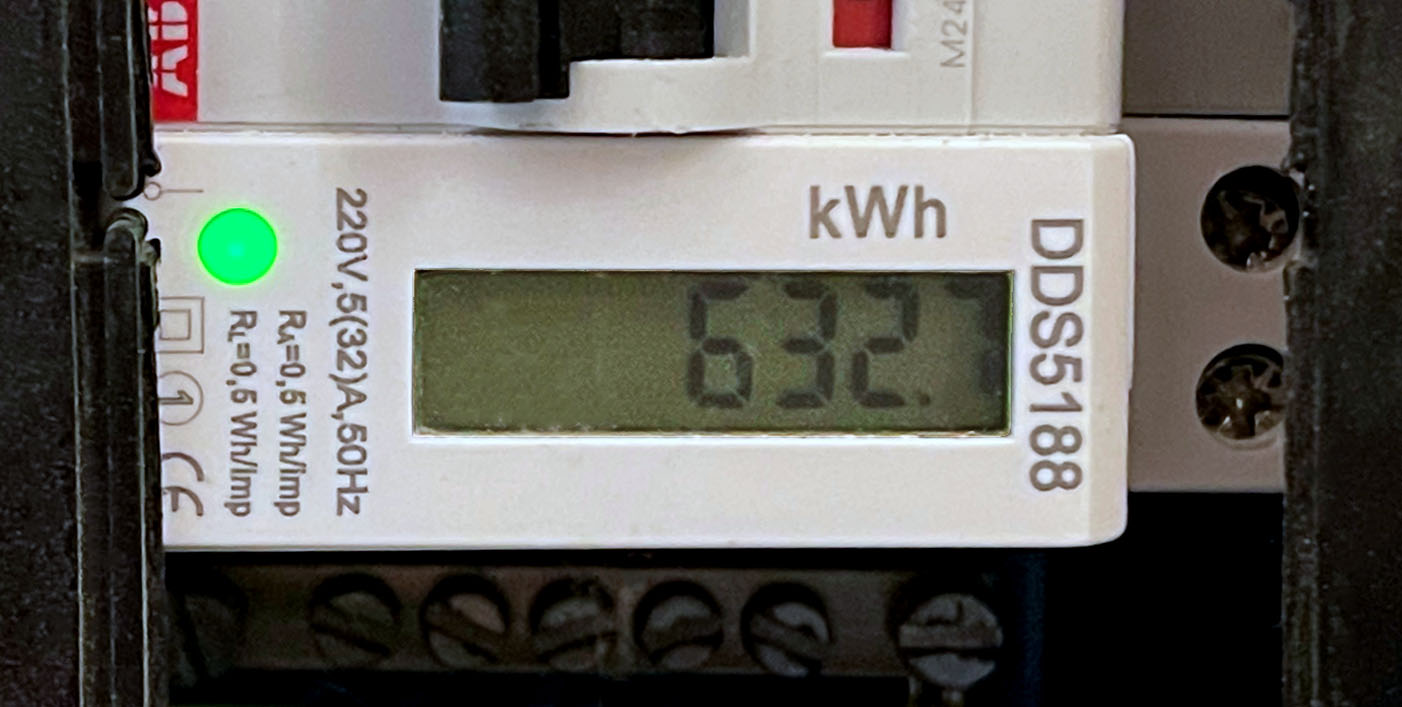
Originally, I had roughly calculated a "power harvest" of 480 Wh/y. After 196 days, the meter of the system was already reading 410.8 kWh, but that was the summer phase. Today, after exactly the first year, the display (see Figure 11) shows 632.7 kWh/y. After 365 days, that makes an astonishing 1.73 kWh per day. This is much better than I estimated last year when I set it up and still a little better than I predicted 6 months ago (589 kWh/y) when I already had empirical data. In any case, I am positively surprised!
If 75 % of this is used and I calculate with 30 ¢/kWh from my old contract, this would result in a saving of about 474.5 kWh * 0.3 € ≈ 142 €/y. Not bad, is it? The fact that I save so much is also evident from my main meter, because compared to previous years, with no other changes except for the balcony power plant, there are about 500 kWh (= 150 €) less on the electricity meter. Mathematically, this would result in a payback of exactly four years.
But the real payback is shorter than four years. It is even quicker if you consider the currently much more expensive electricity prices of at least 42 ¢/kWh in Germany due to the war in Ukraine. So next year I'll probably save around € 200 and my balcony power plant will probably have paid for itself in just over three years, given the current energy crisis. Where else can you get an interest rate of well over 25 %?
Discussion (8 comments)