Elektor Lab Notes 13: Energy Meter, Battery Chargers, Temperature Logging and more
Check out the latest installment of Elektor Lab Notes. We cover some of the latest projects we are working on, including the ESP32 Energy Meter, the AmpVolt DC measurement project, battery chargers, temperature measurement and more.
Welcome back to Elektor Lab Notes! Every few weeks, our engineers and busy editors post a few lab notes and updates about new DIY electronics projects, industry news, and helpful engineering tips. This time, we present updates about the ESP32 Energy Meter Project, the AmpVolt Project, a few notes about temperature measurement, and more. Please share your thoughts in the Discussion section at the bottom of this page. You can post your own lab notes and let us know what you are working on at your electronics workbench!
Saad Imtiaz (Senior Engineer, Elektor)
ESP32 Energy Meter Update: The latest iteration of the ESP32 Energy Meter PCB is now en route to production. This version boasts significant improvements, featuring more capabilities and a more refined design than the prototype. I am writing an article about this project to share new information and ideas. For those eagerly awaiting the full story, keep an eye on Elektor Magazine for the detailed reveal.
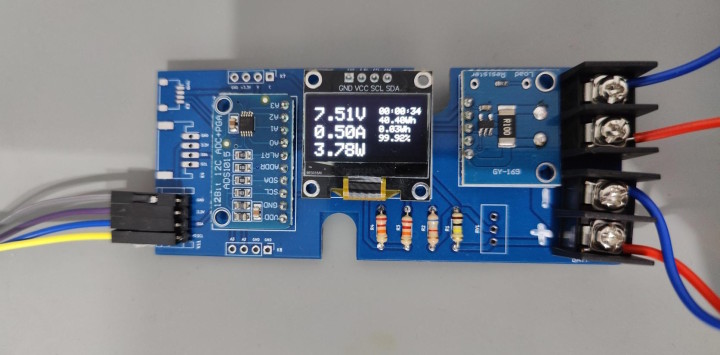
AmpVolt Project Nears Completion: As the AmpVolt project edges closer to completion, the familiar adage that an engineer's work is never truly done rings especially true. The arrival and successful testing of the PCB are important achievements. The initial testing code has been implemented, providing a solid foundation for further development. But our quest for accuracy continues as we go into calibration mode. The aim is to enhance the module's accuracy, ensuring it meets our high standards and expectations.
Jean-François Simon (Engineer, Elektor)
Thermocouple Temperature Logging
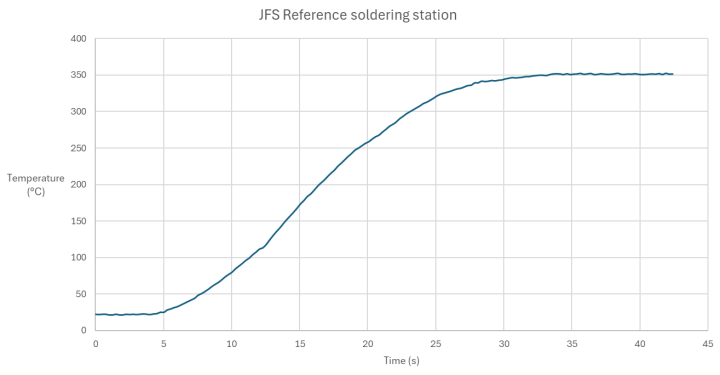
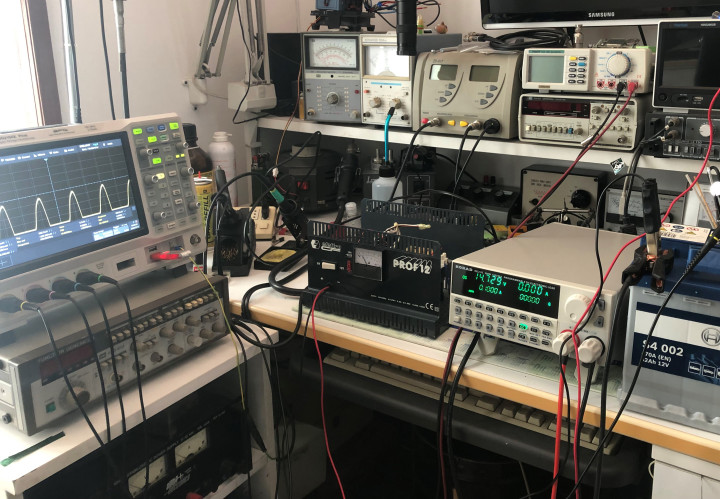
As part of a review of soldering equipment, I needed to record a temperature rise between 20°C and 350°C approximately. To cover such a temperature range, several solutions exist, the most common of which is to use a type K thermocouple. To interface the thermocouple with a PC, you can use a multimeter which can accept such thermocouples, provided it has a PC connection; you can then capture the measurements using the software supplied by the multimeter manufacturer, or with Sigrok, or even with Python.
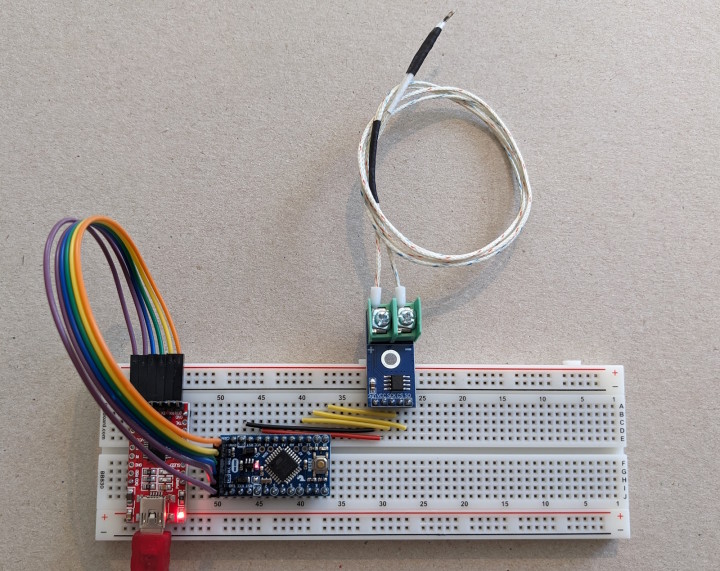
Alas, the multimeter I have (Uni-T UT61D), while it does have a PC link, has no thermocouple input; and the other thermocouple-compatible instruments I have (Voltcraft K101, Aneng AN8009) have no PC link. So I had to find another solution. I chose to use an Arduino Pro Mini, an FTDI module and a MAX6675 module.
Surprisingly, these modules are commonly available on Chinese websites for around 2 euros, and for that price you also get a thermocouple and sometimes some jumper wires. However, whatever the distributor, the price of the MAX6675 is around 10 euros, even in relatively large quantities. I think it's safe to say that these modules are equipped with clones. But functional clones, at least most of the time. I've heard people complain about receiving such modules, which were defective. You get what you pay for, so if you're designing a board that needs to measure temperature by thermocouple, for professional use, I wouldn't recommend relying on Aliexpress for that, and instead point you to a supplier listed in the link above.
The MAX6675 has a Conversion Time of 0.17 s (Typical) to 0.22 s (Max). Let’s assume that the clone will have similar specs. Logging can therefore be performed at a frequency of around 5 Hz maximum. Note that the thermocouple itself has a response time. In this case, I'm dealing with a 0.35mm diameter “beaded” thermocouple, which will therefore have a response time of around 0.75 s. The recorded curve will be lagging 0.75 s behind the “real” value, but I’m only interested in comparative measurements, so this shouldn't be a problem.
If we wish to acquire the signal at a frequency higher than around 5 Hz, we'll have to adopt a different strategy. As the design of an analog frontend is complex, it's best to choose a readily available IC. In the MAX series, the MAX31855 has a conversion time of the order of 0.1 s maximum, and its sibling, the MAX31856, offers superior performance in terms of precision and filtering. Not to be confused with the MAX31865, which is designed for RTD sensors. On the Microchip side, the MCP9600 also offers good performance, but in a QFN package that's not very easy to solder by hand.
Here's an example of a curve obtained with the MAX6675 + FTDI + RealTerm in Capture mode, then displayed in Excel:
Chip of the Month
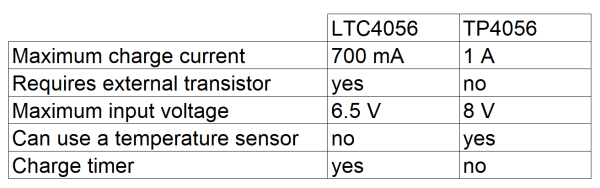
When searching for Lithium battery charging solutions, the search results were saturated with content mentioning the TP4056. Looking hard, I found Linear Technology's (now Analog Devices) LTC4056. Surprisingly, given their respective names, these are not direct equivalents!
The pinouts are completely different, too. If you compare the LTC4056 datasheet with that of the TP4056, you'll appreciate the excellent quality of the former. It consists of sixteen highly detailed pages, in which every part of the component is clearly explained. Advice is given on how to make the best possible use of the component, and several application diagrams are given. It's a true work of art! Finally, the Related Parts section at the end is also very interesting.
I was looking for a way to charge a battery at 4 V or 4.1 V instead of the usual 4.2 V, in order to extend its life. Most dedicated charging ICs use 4.2 V with no possibility of changing this setting. I was reinventing the wheel by trying to implement a current limit on a linear regulator, looking for the best way to obtain an accurate 4 V voltage. That's when I discovered the LTC4064 in the "Related Parts" section. Problem solved, thanks Linear/Analog Devices! And for you, which "Chip of the Month" saved the day? Tell us in the comments.
5G in Europe and Worldwide: What’s Round The Corner?
Small Circuits are Coming for the August Summer Special: Stay Tuned!
Italian Newsletter for end of March.
…and, why not, some laboratory testing for “Pimp My Car Battery Charger” article on EK Summer special!
Jens Nickel (Editor-in-Chief, Elektor Magazine)
Wi-Fi Remote Control for Audio Amplifiers: I've shared quite a bit about my latest hobby project, which I've been working on with a friend. I've now also created a project page on the Elektor Labs platform. There, you can learn more about the project's history and background, including initial insights into the modules we've used and their wiring. Because we couldn't find affordable modules for the external ADC, which we use to monitor the actual position of the motorized potentiometer, we decided to design our own PCB. It's a straightforward PCB featuring just a few connectors, but it offered me (a beginner in this field) valuable hands-on experience with KiCad, as well as a general introduction to PCB design and production. I've ordered three PCBs from Aisler and am eagerly awaiting their arrival.
KiCad for Wiring diagrams: I've created a wiring diagram for our modules. Interestingly, I discovered that KiCad is suitable for this task as well. I designed circuit symbols for the modules, added rectangles to represent the connectors, and modified the wires' width and color. While it might not be as visually appealing as Fritzing, it serves its purpose well in my opinion.
Audio Amplifier Chip: Additionally, in connection with this project, I conducted some research on the Mini Class D Mono Amplifier we are currently utilizing. After evaluating several options, we selected this model because it delivers sufficient power when powered by a 36V from a 10S3P bicycle battery. While specifications like “300 W” should be approached with caution, my tests have demonstrated that the actual consumption is about 40 W at 4-ohm speakers when audible clipping begins. Trust me, this translates to “extremely loud”! In enclosed spaces, there's a real risk of inducing tinnitus, and outdoors, it can draw attention across a 500-meter meadow and beyond. Today, my curiosity led me to investigate the chips used in our amplifier. I discovered that our amplifier essentially encases a TPA3255 chip by Texas Instruments, alongside a few capacitors and inductors, and many SMD passives, which I jokingly refer to as “bird feed”. I was impressed by the integration and flexibility of this TI chip, and how detailed the support is for creating your own amplifier. It's worth noting that there are plenty of affordable boards featuring this chip available on Alibaba. We may soon order one for around 20 dollars to see how it compares.
Subscribe
Tag alert: Subscribe to the tag Power & Energy and you will receive an e-mail as soon as a new item about it is published on our website!
C. J. Abate (Director, Content and Engineering)
The year 2024 is moving along quickly. It's already March? Here are a few notes from my desk:
Embedded & AI: Check out our new webpage devoted to everything embedded- and AI-related. Our extensive archive offers a wealth of DIY projects, in-depth engineering tutorials, engaging interviews, and instructional videos. All content is carefully selected and regularly updated to ensure you stay ahead in the rapidly evolving fields of embedded and AI technologies. Discover the intriguing world of embedded development, showcasing projects powered by microcontrollers and MCUs. Unravel the mysteries of embedded programming and machine learning in daily life. We delve into specialized areas like embedded vision and security, where innovation meets practicality. The new page is more than a resource: it's your entry point to the dynamic universe of embedded systems and AI.
The Embdded & AI page
Elektor Mag: The March/April edition of Elektor Mag is out. The issue focuses on a range of important topics: machine learning with the Jetson Nano; object detection and machine vision; an introduction to FPGAs; BLE with MAUI; object counting with Edge Impulse; and much more.
March/April 2024 table of contents
STM32 Wireless Innovation Design Contest Nominees: On March 8, Elektor and ST announced the nominees for the design challenge. The projects are: Zigbee Environmental Measurement Center for Indoor Plants or Greenhouse; The Electric Meter that Matters; BLE Ski & Snowboard Performance Evaluation Platform; Connected and Democratic Air Conditioning IR Remote; and The Open-Source Multifunction Variometer for Paragliding.The top three winners will be announced on April 10, at embedded world 2024.
Elektor @ EW: Are you planning to attend embedded world 2024 from April 9 to 11 in Nuremberg, Germany? If so, visit Elektor's engineers and editors at booth 5-181. If you can’t attend in person, we will livestream Elektor Lab Talk on Wednesday, April 10. Join us!
Project Challenge: Looking for a new challenge? This month, Elektor launched of the Elektor Labs 2024 Project Contest. Talk a look at the rules and give it a go!
Subscribe
Tag alert: Subscribe to the tag Elektor Lab Notes and you will receive an e-mail as soon as a new item about it is published on our website!
Elektor Magazine has been one of the leading sources of information on electronics for engineers, designers, start-ups and companies for 65 years. Our magazine is powered by an active community of electronics engineers – from students to professionals – who are passionate about designing and sharing innovative ideas.
For them, we publish hundreds of items a year, in formats such as articles, videos, webinars, and other learning formats. Our mission is to share knowledge in every possible way and inspire readers with the latest developments within the electrical engineering sector.
Thank you for your vote!
Leave further comments in the fields below.
Thank you for your vote!
If you wish to leave a comment with your rating, please first use the login below. If not, just close this window.


Discussion (0 comments)