
My Journey into the Cloud (11); Pretzel board works as a Wi-Fi Dongle
September 25, 2016
on
on
In the last installment in this series I started with the Pretzel Board which has an ATmega328 and a WiFi LAN ESP8266 chip on board. The Pretzel board was just hooked up to the PC using a USB cable and with a terminal emulator program running on the PC, I am able to send simple text-based commands to the ESP8266 WiFi module via the ATmega328. Using this setup I can log into my home WiFi network network and was eventually able to pass characters using TCP/IP around my local intranet.
Now we need to continue with MQTT. I must admit it’s a bit clunky generating the commands by hand using a terminal emulator program. You may remember that in the ninth installment of this series I already wrote some very basic library routines which allow you to assemble MQTT command strings such as CONNECT and PUBLISH and send them to a test MQTT broker resident on the internet.
Where I can use
TCPClient_Connect(String IPAddressString, int Port)
To connect to a TCP on the net
TCPClient_Send(Byte[] data, int length, Boolean Answer)
To send data to this server
all I need to do is to simply rewrite them so that instead of the built-in network interfaces the ESP8266 performs the tasks, then I will be able to 1:1 reuse the routines for the MQTT commands.
The Pretzel board would effectively act as a type of WiFi dongle for my PC. Up until now firmware in the ATmega328 was just passing on characters received and sent by the ESP8266 via a virtual COM port on the PC. I already have a C# routine able to send data via the serial interface. I still need a Thread to continuously monitor received characters so that I can monitor the replies from the ESP8266 in the PC program. To implement this I was able to make extensive use of code examples given in Microsoft's official C#/.net documentation.
I anticipate the need for some buttons in the PC program so that I can initiate certain actions such as resetting the ESP8266 and for selecting and connecting to the WiFi network. To keep an eye on data from the ESP8266 I would also need a large text field on the PC display where this information can be displayed.
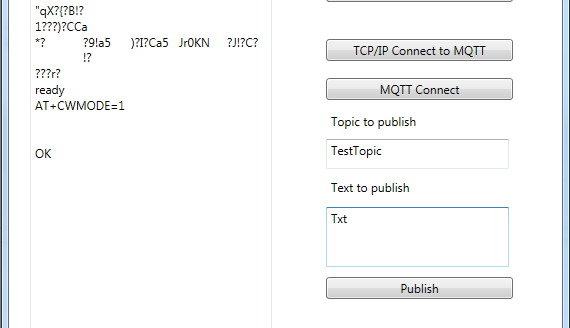
The results of my efforts can be seen in the screenshot. Using my 'MQTT Minimal Client with ESP8266' you first need to select the COM port used for communication between the Pretzel board and PC. Now click on the button below to reset the WiFi chip. Next you can enter the SSID and password for your wireless network in the field below and press 'WiFi connect'. The AT command and somewhat delayed response from the WiFi chip ('OK' if successful) will be displayed in the main text window.
If everything looks good we can use the button underneath to connect with the TCP server on the internet which acts as a MQTT broker (In my case I use the HiveMQ broker). If we then see 'CONNECT' followed by 'OK' it means that the TCP/IP connection is established.
Now we can start with the MQTT. A press on the 'MQTT Connect' button generates the MQTT command from the basic functions and sends it to the test broker over TCP/IP. It all works just as described in the ninth installment from this series only this time the ESP8266 takes care of network activity. The similarity of the two programs is evident from their source code which can be downloaded below - it's worth comparing the two listings.
once you have entered a topic and some text to a MQTT broker it can then be read by any MQTT client anywhere in the world with an internet connection who has subscribed to that topic. incidentally both the HiveMQ broker and the Mosquitto test broker (the one we used earlier in this series) take exception to the CrLf control characters that the ESP8266 automatically appends to TCP/IP text strings. Both brokers react by terminating the TCP connection when they see these characters. It is therefore necessary to give the exact character count of only the MQTT string using the AT+CIPSEND command line.
After a couple of minutes of no data being sent the ESP8266 automatically disconnects from the TCP/IP ('CLOSED'); the connection will now need to be reestablished. A simple way of avoiding this is to implement a timer in the PC software so that a new MQTT message is sent every minute to keep the connection alive. This sort of feature may be useful in applications such as a remote temperature sensor where new measurement values can be regularly published using MQTT at this sort of time interval. More on that topic in the next installment!
Now we need to continue with MQTT. I must admit it’s a bit clunky generating the commands by hand using a terminal emulator program. You may remember that in the ninth installment of this series I already wrote some very basic library routines which allow you to assemble MQTT command strings such as CONNECT and PUBLISH and send them to a test MQTT broker resident on the internet.
Where I can use
TCPClient_Connect(String IPAddressString, int Port)
To connect to a TCP on the net
TCPClient_Send(Byte[] data, int length, Boolean Answer)
To send data to this server
all I need to do is to simply rewrite them so that instead of the built-in network interfaces the ESP8266 performs the tasks, then I will be able to 1:1 reuse the routines for the MQTT commands.
The Pretzel board would effectively act as a type of WiFi dongle for my PC. Up until now firmware in the ATmega328 was just passing on characters received and sent by the ESP8266 via a virtual COM port on the PC. I already have a C# routine able to send data via the serial interface. I still need a Thread to continuously monitor received characters so that I can monitor the replies from the ESP8266 in the PC program. To implement this I was able to make extensive use of code examples given in Microsoft's official C#/.net documentation.
I anticipate the need for some buttons in the PC program so that I can initiate certain actions such as resetting the ESP8266 and for selecting and connecting to the WiFi network. To keep an eye on data from the ESP8266 I would also need a large text field on the PC display where this information can be displayed.
The results of my efforts can be seen in the screenshot. Using my 'MQTT Minimal Client with ESP8266' you first need to select the COM port used for communication between the Pretzel board and PC. Now click on the button below to reset the WiFi chip. Next you can enter the SSID and password for your wireless network in the field below and press 'WiFi connect'. The AT command and somewhat delayed response from the WiFi chip ('OK' if successful) will be displayed in the main text window.
If everything looks good we can use the button underneath to connect with the TCP server on the internet which acts as a MQTT broker (In my case I use the HiveMQ broker). If we then see 'CONNECT' followed by 'OK' it means that the TCP/IP connection is established.
Now we can start with the MQTT. A press on the 'MQTT Connect' button generates the MQTT command from the basic functions and sends it to the test broker over TCP/IP. It all works just as described in the ninth installment from this series only this time the ESP8266 takes care of network activity. The similarity of the two programs is evident from their source code which can be downloaded below - it's worth comparing the two listings.
once you have entered a topic and some text to a MQTT broker it can then be read by any MQTT client anywhere in the world with an internet connection who has subscribed to that topic. incidentally both the HiveMQ broker and the Mosquitto test broker (the one we used earlier in this series) take exception to the CrLf control characters that the ESP8266 automatically appends to TCP/IP text strings. Both brokers react by terminating the TCP connection when they see these characters. It is therefore necessary to give the exact character count of only the MQTT string using the AT+CIPSEND command line.
After a couple of minutes of no data being sent the ESP8266 automatically disconnects from the TCP/IP ('CLOSED'); the connection will now need to be reestablished. A simple way of avoiding this is to implement a timer in the PC software so that a new MQTT message is sent every minute to keep the connection alive. This sort of feature may be useful in applications such as a remote temperature sensor where new measurement values can be regularly published using MQTT at this sort of time interval. More on that topic in the next installment!
Read full article
Hide full article

About Jens Nickel
Jens Nickel is ElektorMag’s Editor in Chief. His interests include programming, home automation, and the IoT, and he enjoys the production of electronic music. Watch him on <em>Elektor Lab Talk</em>. >>
Discussion (0 comments)