
My Journey into the Cloud (9); A minimal MQTT client
June 24, 2016
on
on
In the previous instalments of this ongoing venture into the Internet of Things we have made use of several different open-source libraries in order to program two MQTT clients for the PC and Android smartphone. Now from a cell phone anywhere in the world we can send commands via a public MQTT broker to a MQTT client on a PC and then via a USB port to a controller board. That’s all fine and dandy but in this setup we need a PC to act as a relay station and we haven’t yet dealt with information flowing in the opposite direction. A classic IoT application would typically need to transfer information from a local sensor board out to a user somewhere on the internet.
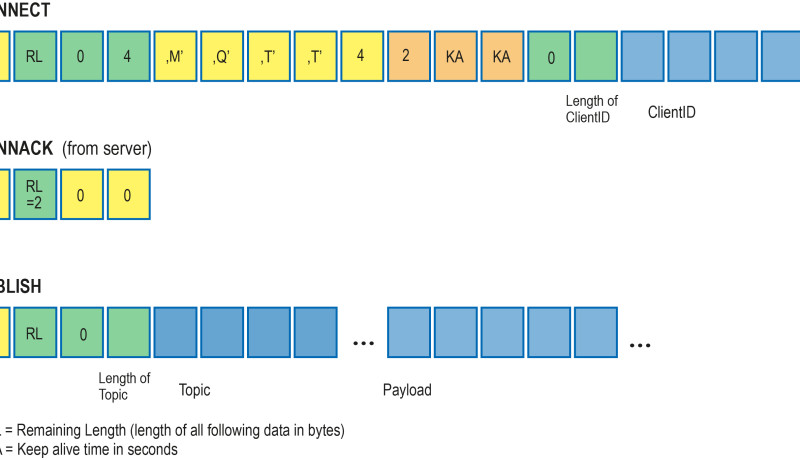
In the following sections we intend to implement the MQTT client on a controller board which will be able to publish and subscribe to topics. You of course already know that MQTT is based on TCP/IP protocol. That means in addition to a physical network connection or WLAN interface on the card we also need some suitable library routines. If we take a look at what the Arduino environment has to offer, an Ethernet shield takes care of the network connection and an MQTT library is available in the Arduino IDE (this has now become more or less a standard implementation). We are talking here about PubSubClient.cpp/.h by Nick O‘Leary (http://pubsubclient.knolleary.net/index.html); the source code of which can be downloaded from GitHub.
We could of course just fit the Ethernet shield to a Uno, load all the necessary libraries to the Arduino IDE and play around with some of the examples given. This would be way too simple and anyway it wouldn’t give me the opportunity to learn more of the nuts and bolts of MQTT. It will take more time but it will mean we would also be able to develop libraries for any controller board we want. To take things one step at a time I first looked at what features would be necessary to publish MQTT messages. This sort of minimal library on its own will be enough to send measurement values to the Cloud.
After some study of the PubSubClient source code it was clear what was needed:
Using this information I have written a minimal library based on the PubSubClient-Library; initially for the PC written in C#, because there is already a good TCP library available and data can be displayed easily. For testing I have programmed a small MQTT client PC that can only publish messages but without the large .NET-MQTT library M2Mqtt we used in the fourth instalment. You can download the source code and working application from below. It can be tested sending data, for example using my MQTT-Test-Client described in the fifth instalment of this series. In the text box labelled ‘Topic to subscribe’ you can enter a short topic keyword such as ‘min’ for example. Once the ‘Subscribe’ button is clicked the keyword will always be attached to the topic ‘ElektorIoTJourney/min/test’. Now you can try out this minimal client. After program start you can already see which bytes inside the connect request were sent to the public MQTT-Server (just as in test.mosquitto.org we used earlier). The Client identifier (ClientId) is ‘elektorIoT’ for example. The server should have replied with the byte sequence ‘32 2 0 0’. You can now enter ‘min’ as the topic keyword, text in the corresponding text box and then publish by clicking on the ‘Publish’ button.
There is still much to do, stay tuned for next instalment. In the mean time I’m sure there has got to be a reader out there who has managed to implement a minimal client on a platform of their own choice. Let us know how you got on by using the comment section below!
In the following sections we intend to implement the MQTT client on a controller board which will be able to publish and subscribe to topics. You of course already know that MQTT is based on TCP/IP protocol. That means in addition to a physical network connection or WLAN interface on the card we also need some suitable library routines. If we take a look at what the Arduino environment has to offer, an Ethernet shield takes care of the network connection and an MQTT library is available in the Arduino IDE (this has now become more or less a standard implementation). We are talking here about PubSubClient.cpp/.h by Nick O‘Leary (http://pubsubclient.knolleary.net/index.html); the source code of which can be downloaded from GitHub.
We could of course just fit the Ethernet shield to a Uno, load all the necessary libraries to the Arduino IDE and play around with some of the examples given. This would be way too simple and anyway it wouldn’t give me the opportunity to learn more of the nuts and bolts of MQTT. It will take more time but it will mean we would also be able to develop libraries for any controller board we want. To take things one step at a time I first looked at what features would be necessary to publish MQTT messages. This sort of minimal library on its own will be enough to send measurement values to the Cloud.
After some study of the PubSubClient source code it was clear what was needed:
- Right at the start a function from the TCP library is called, which links our program as a TCP-Client with a TCP-Server (it can be called TCPClient_Connect for example). We supply this with the IP address of our public MQTT server.
- Next a MQTT-Connect request is sent to the MQTT/TCP server and an acknowledgement received. This procedure can be taken care of in a function with a name such as MQTTClient_Connect for example. This refers back to the TCPClient_Send function, which can simply send bytes using TCP and receives back replies from the server in the form of bytes.
- The MQTTClient_Publish function sends the payload data to the MQTT-Server, to publish it on a specific topic. The function uses TCPClient_Send to send the corresponding bytes. In the simplest case (Quality of Service = 0) no reply will be returned from the server.
- Two auxiliary functions (called …_Write and …_WriteString in the PubSubClient library) simplify assembly of the bytes according to TCP to be sent to the server; initially for the connection request and then the published message.
Using this information I have written a minimal library based on the PubSubClient-Library; initially for the PC written in C#, because there is already a good TCP library available and data can be displayed easily. For testing I have programmed a small MQTT client PC that can only publish messages but without the large .NET-MQTT library M2Mqtt we used in the fourth instalment. You can download the source code and working application from below. It can be tested sending data, for example using my MQTT-Test-Client described in the fifth instalment of this series. In the text box labelled ‘Topic to subscribe’ you can enter a short topic keyword such as ‘min’ for example. Once the ‘Subscribe’ button is clicked the keyword will always be attached to the topic ‘ElektorIoTJourney/min/test’. Now you can try out this minimal client. After program start you can already see which bytes inside the connect request were sent to the public MQTT-Server (just as in test.mosquitto.org we used earlier). The Client identifier (ClientId) is ‘elektorIoT’ for example. The server should have replied with the byte sequence ‘32 2 0 0’. You can now enter ‘min’ as the topic keyword, text in the corresponding text box and then publish by clicking on the ‘Publish’ button.
There is still much to do, stay tuned for next instalment. In the mean time I’m sure there has got to be a reader out there who has managed to implement a minimal client on a platform of their own choice. Let us know how you got on by using the comment section below!
Read full article
Hide full article
Discussion (1 comment)